Showing posts with label Copics. Show all posts

Sunday, 21 April 2013

'Blues and/or Browns' mini challenge!

Hello again!
 
I'm just popping in to let you know about the new theme for our mini challenge at Creative Craft World this month.
All you need to do is make a project using blue and/or brown and link it to the
Creative Craft World blog HERE.
 
Lou very kindly sent me April's mini kit to have a play with.
You can find it HERE but you don't have to use it to enter the challenge.
 
(although you can if you want!)
 
 
This is what I came up with...
 The flower stamp is by Unity and the 'hello' stamp is Stampin' Up.

The sentiment is a stamp by Hampton Art Clear Expressions
and it's stamped with Elzybell's white ink. 
 

I have been very quiet on the blogging front,
mainly because we have been getting work done to the house and I'm stressed out with it!
Roll on the next few weeks to get the house back in order again :)
 
Thanks for visting and enjoy the rest of your weekend!
Sarah xx

Friday, 25 January 2013

New Christmas challenge at CCW

Good morning!
 
I hope by now those of you dealing with the terrible snow storms are over the worst of it.
We've been very fortunate here with just a little sprinkling of snow.
 
I'm back today to tell you about a new monthly challenge over at Creative Craft World.
For those of you who want to get a head start on your Christmas cards this will be perfect for you.
The challenge is called BtCR (Beat the Christmas Rush) and the idea is to create some Christmas cards each month and add them to the linky HERE.
By the time 25th November comes round you could have all your cards ready in time for posting in December!
 
This is a card I made as a Christmas thank you.
The image is a digi stamp from Tiddly Inks.
 
I coloured it with Copics and tied some twine around the centre to look like a present.
I stamped the sentiment (Stampin' Up) and punched it out with the Tiny Tags punch.
To add a little sparkle I outlined parts of the image with Stickles glitter glue.
 

Thank you so much for visiting today.
And to all my followers thank you for sticking with me.
I haven't been able to blog lately with my health playing up and other things having to take priority
but I hope to be back soon when everything settles down.
 
Hope you have a lovely day,
Take care.
Sarah xx

Wednesday, 28 November 2012

Sparkle with LIM

Hello everyone,
I've been trying to get time since Saturday to play in the Less Is More
challenge this week and I finally managed it this morning :)
Chrissie & Jen are looking to see Glamour & Glitz!
 
I love glitter and all sorts of sparkly things so I couldn't miss this one :)
I have made a quick little Christmas card.

I love using kraft card for Christmas cards and this one is 12x12cms.
I stamped a little Elzybells robin, coloured him with copics and added Glamour dust underneath him
and a few dots of it around him. I also added white dots (inkessentials pen) around the frame.
The stamp is from a little clear set by Hampton Art.

-------------
 
Keeping with the Christmas theme, we are down to our last few projects over at
Creative Craft World....November has flown by!
Today Lou has a bottle tag and gift carton to share.
Here's a little peek and you can find out how to make them here.
 
Thanks for popping in today
and I'll be back tomorrow with a link to Sue's project.
I have a couple of birthday cards to share soon but I have to wait in case they see them on my blog!
Take care,
Sarah xx

Tuesday, 20 November 2012

4 cards using CCW's November Mini kit

Hello again!
I just remembered last night that I had to post these cards for the new mini challenge at
We've been so involved with the Christmas Countdown that the regular challenges have been a bit forgotten about.
We'd love you to take a moment and enter your projects.
 
Lou very kindly sent me this month's mini kit to have a play with and with the gorgeous mix of colours, I was able to make a male card as well as more feminine cards.
 

 This cute little mouse is from The Paper Shelter, the sentiment is a Daisy Bucket stamp and the brad is K&Co.
 
 The sentiment on this card is computer generated using 'LoosieScript' and the oval is cut with Nestabilities.

 I 'm sorry I can't remember the make of this stamp.  To save on space I removed all my stamps from their wooden blocks and I never made a note of the names!
It's coloured with Koh-i-Noor woodless pencils.
The button is by Fancy Pants and I tied twine through it. 
The brads were stuck on with pinflair glue gel after I removed the pins from the back of them.
I find that if I'm placing brads close together on card it can be hard to get them in a straight line.
Also the card crinkles when I pierce holes closely together so I find gluing them on gives a neater finish :)
The sentiment is computer generated using 'PhontPhreak's Handwriting'.
 
The flower stamp on this card is by Elzybells and the button is American Crafts.
Everything else is from the kit.
 
Thank you for reading both my posts today,
I'm a little behind in my commenting but I will be round to visit you soon :)
I  hope you have a lovely day
and if you pop back tomorrow, I'll have a link to Sue's project.
 
Take care,
Sarah xx

I'd like to enter some of these in the following challenges:
Loves Rubberstamps ~ fun with ribbons
Oldie But A Goodie ~ anything but Christmas (Sailing card...stamp, brads, button, twine, more than 6 months old)
Incy Wincy ~ hip to be square (Sailing card)
Crafty Cardmakers ~ more than 1 punch/die cut (Flowers/butterfly card...2 die cut circles, 2 punched butterflies)
Whoopsi Daisy ~ die cuts and punches (Get well soon card... die cut oval, punched flowers & Flowers/butterfly card...2 die cut circles, 2 punched butterflies)
 

Monday, 12 November 2012

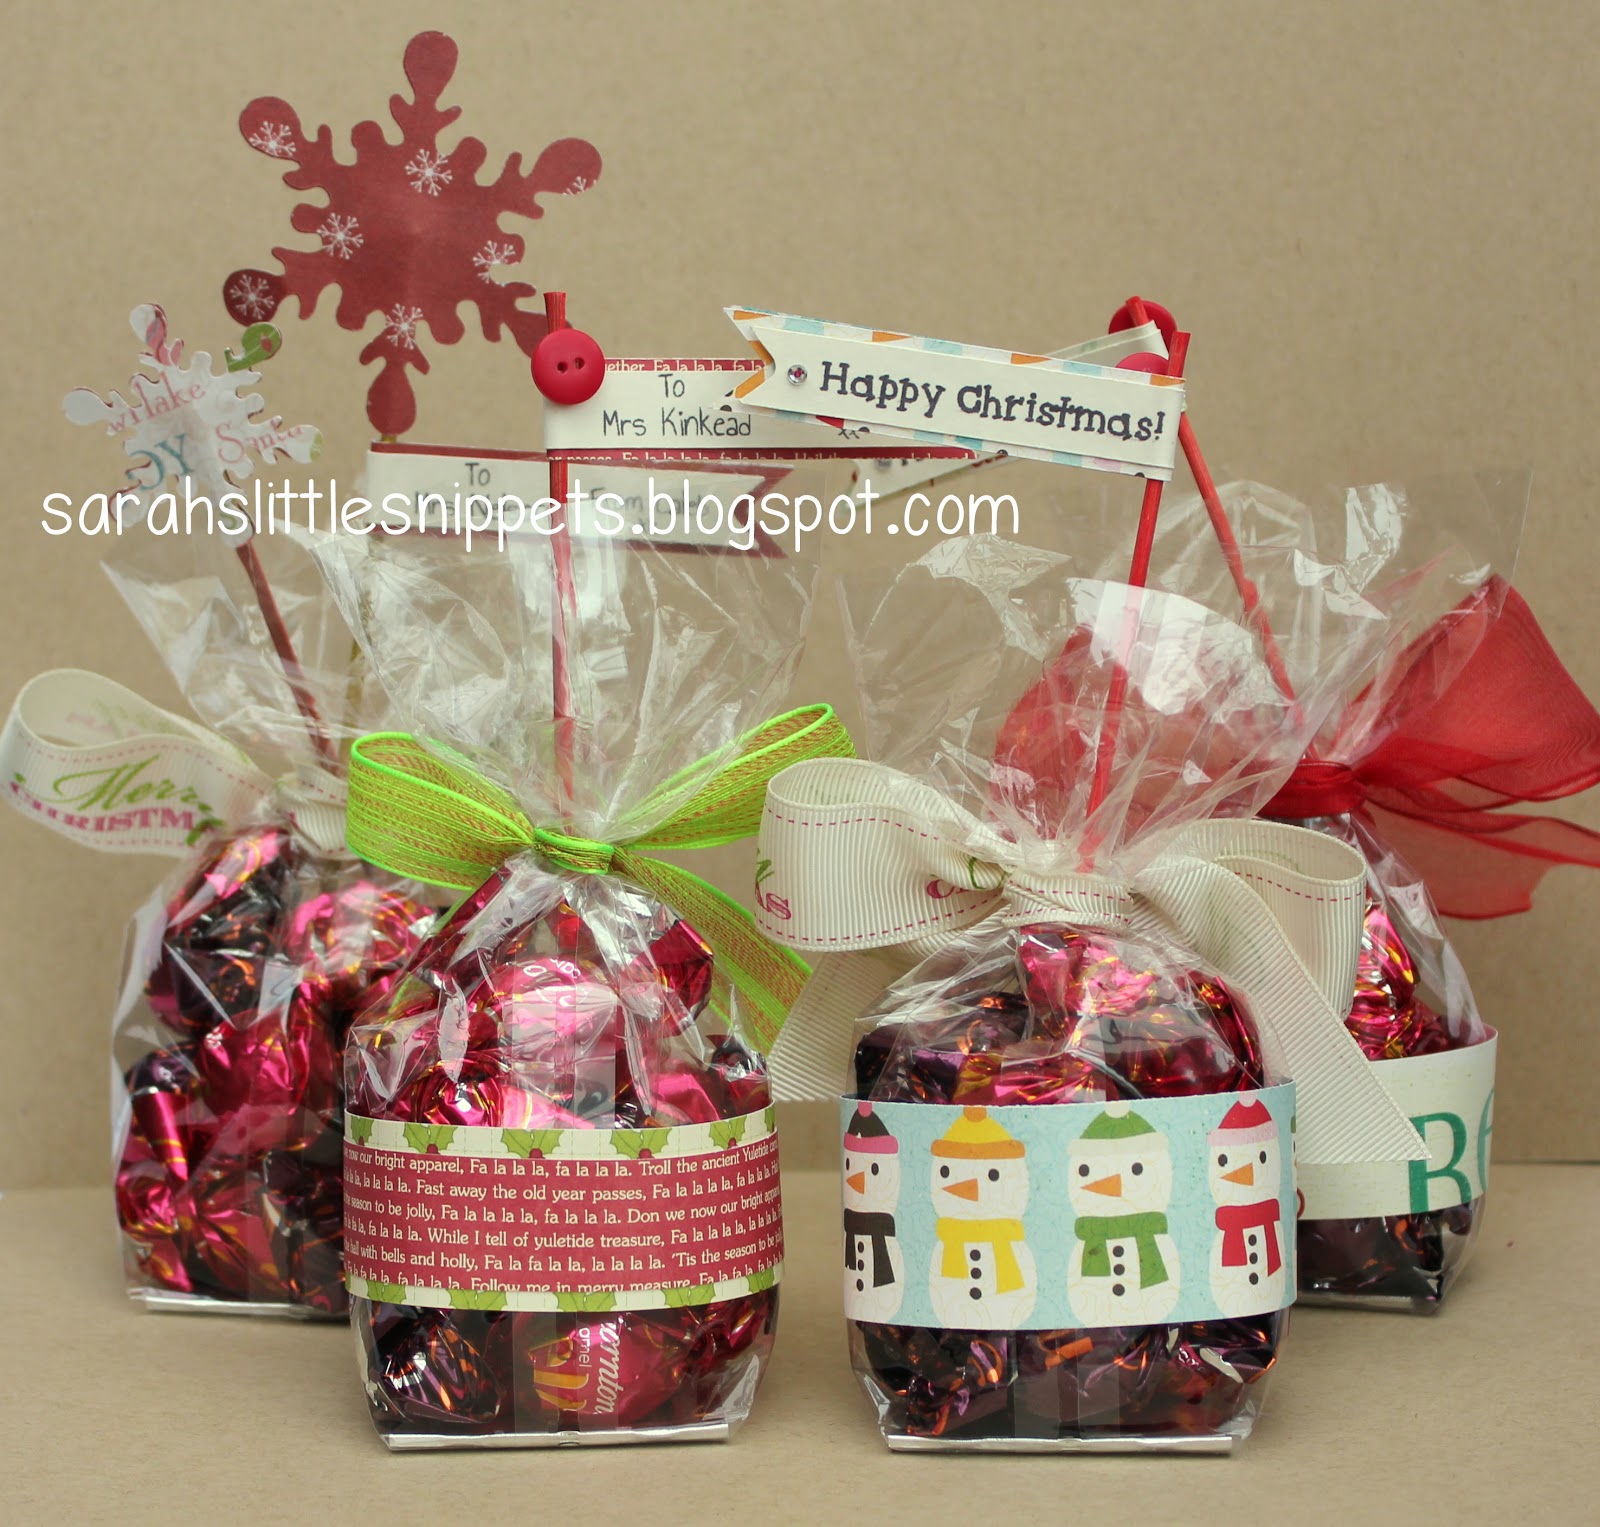
Christmas treat bags

Good morning everyone,
 
I hope your weekend went well.
It's my turn again to create a project for Creative Craft World's
Christmas Countdown.
 
I like to make the children's teachers a little handmade gift at Christmas,
so this year I thought I would make some pretty packaging for some chocolates.
 
and here they are....
 
They are very easy to make!
 
You just take a cello bag (it's better if you can get one with a gusseted bottom or one with card in it like I have) and fill with chocolates.
It's very tempting having chocolates on my desk and I have to say they are YUMMY!!
 
For this bag, I just tied the top with ribbon and then made some toppers
with snowflakes cut out with my Silhouette Cameo.
Next, I cut two wooden skewers to size and coloured them with Copics.
Then layered the snowflakes with the stick in the middle and finished it with a button and some gems.
The banner with the sentiment was also cut out with the Silhouette,
wrapped around the stick and held in place with wet glue.
 
Regular readers of my blog may recognise this little gingerbread man from HERE.
 
I used the same cutting file and just reduced it in size before cutting him out of kraft card.
I layered two lenghs of Christmas paper together (one narrower than the other) and wrapped them around the bag, with the join at the front.
I covered the join with the gingerbread man, popping him up with foam pads.
The banner was made with matching paper with the sentiment on one side
and the to/from details on the other side along with a matching button.


 This 'Merry Christmas' ribbon is available to buy at Next!
 
 The back of the bags
 
The little banner - on one side 'Happy Christmas', on the other it's personalised with the teacher's name.
A wooden skewer, trimmed to size and coloured with a red Copic pen.
 
Supplies list
cellophane bags ~ with a gusset or a firm bottom (teehee...)
I got mine from a chocolate factory.
ribbon
chocolates ~ I used Thorntons Praline melts and Caramel melts
wooden skewers
various Christmas papers
buttons and gems
 
I hope you have enjoyed these little treat bags today,
and if you pop back tomorrow I'll have a link to Lou's blog where she will have a tutorial for a Christmas journal.
 
I'll also have a little project of my own that I made way back in the summer
but I'm only able to share it now, as it had to be kept secret!
 
Once again, thank you for stopping by today,
and I'll be catching up with you all later :)
Take care,
Sarah xx
 
I'd like to enter these in the following challenges:
MIM ~ always anything goes
Crafty Bloggers Network ~ Christmas anything goes
Forever Friends ~ ribbon and/or twine 
 

Saturday, 10 November 2012

'cool company' Christmas card

With Christmas fast approaching I have another card to share today.
It's only the 3rd Christmas card I've made so far, so I'd need to get my skates on!
 
I've been trying to use up some of my forgotten/older stash for my cards this year.
I have no room to store anything new!
 
Supplies used
White card ~cut and scored to A6 size
Patterned Paper ~ DCWV Christmas multi stack (6x6")
Red card ~ cut with Nestabilites labels 8 die
Green card ~ embossed with Cuttlebug snowflake folder
Stamp ~ Penny Black 3743K 'cool company'
Ink ~ Memento black
Coloured with Copics
Red/White ribbon, Christmas twine & Green star button
Stickles 'star dust'
for the dots of snow in the background, but they haven't shown up too well in the photo.
 
 
....continuing on the Christmas Countdown....
I hope you've been enjoying the lovely festive projects shared by the DT
We're now on day 10 and Morag has a winter scrapbook page here
 
 
and that's it from me today!
I hope you're all enjoying your weekend :)
I have an appointment at the hospital this morning for a nerve conduction study
for Carpal Tunnel syndrome.
I'm dreading it a bit because I don't know what to expect and it sounds possibly painful??
Maybe it won't be as bad as I think :)
I'll let you know how it goes....
 
All the best
Sarah xx
 
I'd like to enter this card in the following challenges:
Penny Black Saturday ~ cute Christmas
One Stop Craft ~ anything goes
Krafty hands ~ Christmas
2 Sisters ~ favourite Christmas stamp
CSAYL ~ anything goes
Fun with shapes & more ~ the 1st snow (Christmas/winter, white base colour)

Thursday, 8 November 2012

Christmas card with Barry Bear

Hello again!
This is my second post this morning and here's the Christmas card
I said I would share when I got a photo of it :)
 
 
 I love kraft and white together for Christmas along with traditional red and green.
So for this card I stamped white dots on the base card and added strips of patterned paper then tied satin ribbon around the top and finished with a snowflake button.
 

This little teddy is a digi from The Stamp Fairy and he is actually standing beside a birdhouse but for this card I cut it off.  I love this wee image so much you'll be seeing more cards with him soon!
He is coloured with Copics and raised with foam pads.
I added Stickles 'star dust' to his hat and bobble on the top.
 
 
It's a beautiful morning here today and my Mum
very kindly came over to help me with the housework
and then took away a big basket of ironing to do, just so I can get my DT projects finished.
Isn't she lovely!
 
That's it for me today, it's been lovely to have you vist :)
See you tomorrow
Take care,
Sarah xx
 
Supplies used
Bazzill kraft card
DP ~ Three Bugs in a Rug 'Let it Snow'
Digi image ~ The Stamp Fairy
Sentiment ~ Playtime font
Background stamp ~ Unity
White Ink ~ Elzybells pigment ink
Stickles 'Star Dust'
Snowflake button ~ Dress it up
Satin ribbon
Copics ~ C1,3,5...E53,31,33...R00,20,32,35,46,37
 
I'd like to enter this card in the following challenges:
Ready Teddy Go ~ don't be square
Whimsy Stamps ~ traditional Christmas colours
Bearly Mine ~ anything goes
Just keep on creating ~ anything goes Christmas
Oldie but a Goodie ~ spots & stripes (DP, ribbon & button all older than 6 months)
Sweet Stampin ~All that glitters

Wednesday, 7 November 2012

18th Birthday card

Hello again!
 
Can you believe I'm managing to schedule a post every day!
It's amazing what you can do when you put your mind to it, isn't it?
( The housework has been put on hold though....lol)
 
This weekend is one of my nephew's (I have 10 of them!) 18th birthday.
As well as having a party with his friends he is having another party for family.
Sadly we won't be able to go because my brother (Nathan's dad) is in the middle of chemotherapy
treatment and Phoebe's chicken pox could be extremely dangerous for him.
 
This is the card I've made to send to Nathan.
Earlier in the year, I won a challenge at Ladybug Crafts Ink and my prize was a voucher for the shop.
I love digi images so that's what I bought with my voucher.  As soon as I saw this image it reminded me of my nephew and I knew it would be perfect for his birthday.

The papers are Echo Park 'Note to self'.  I didn't intend the card to have as many layers but they're covering up a few mistakes... things stuck in the wrong place and then the paper tearing as I removed them...you know how it is!  lol
The large star though is to cover up a sentiment on the background paper that I don't think Nathan would appreciate....
When I stuck the image down I realised that beside it,
it said in bold orange writing 'one thing after another'.
Well, Nathan like many teenagers gets into mild scrapes and lately it has been 'one thing after another' so I didn't think he'd appreciate it pointed out to him on his birthday!
 
The number and stars are cut with the Silhouette
and the sentiment is computer generated using 'Oleo' font.
I coloured the image with Copics.
Skin: E00, 11.....Hair: E51,53,33, YR20
Trousers: B93,45....Railings & Ground: C1,3,5
Cap:R17, YR07

a close up of the layers

I also have a reminder of the Christmas Countdown over at Creative Craft World.
Today is day 7 and it's Trish's turn to share some stunning Christmas cards
she's made using her Silhouette.
 
Here's a little peek.....pop over to her blog HERE for the tutorial.
 
I know I always say it but I really do appreciate you stopping by my blog.
Your comments are a treat to read :)
 
I'll be back again tomorrow
with another Christmas link and maybe a project of my own to share too.
Take care!
Sarah xx
 
I'd like to enter my card in the following challenges:
Cards for men ~ anything goes
Ladybug crafts Ink ~ In the office  (does the string wrapped around the star count?)
Lexi's Creations ~ special birthday
The Pink Elephant ~ favourite colouring medium (Copics)
Kaboodle Doodles ~ anything goes
Make it Monday ~ anything goes
Here come the Boys ~ Die cuts/punches
Allsorts ~ for men only

Tuesday, 6 November 2012

Day 6 and a birthday card

Good morning!
I'm back again today with another link
and this time it's for Lou's lovely Christmas scrapbook page.
You'll find it HERE with all the details.


My card today was another rush job, this time to send to Australia...
I'm getting into a bad habit of leaving things to the last minute!
It was for my wee nephew's birthday and although it's pretty simple I was pleased with it in the end :)

I used Woodware 'peeking over' stamps and I decoupaged the horse and sheep for some dimension.
Layered it on yellow card, added doodled stitching around the outside
and tied some twine around the top.  It was coloured with Copics.
 
That's it from me today.
I will be back tomorrow with a link to Trish's Christmas cards.
 
I'll also be sharing a card I've made for my nephew's 18th birthday this weekend.
Thank you so much for stopping by,
Take care
Sarah xx

I'd like to enter this card in the following challenges:
The Squirrel and the Fox ~ flowers, hats or horses
Make it Monday ~ anything goes
The Crafty Pad ~ anything goes
Kaboodle Doodles ~ anything goes

Friday, 2 November 2012

Day 2 of Christmas Countdown

 
This morning I have a link to Ali's blog and she has been working with Fimo.
We only have a taster photo for you but you can see it all HERE
 
 
I also have a card to share and it's a little sleeping House Mouse.
The image looks pale in the photo but it's not really, my photograpy skills are lacking!
 
The papers are Echo Park 'Life is Good' and I coloured the image with Copics.
The base card is Bazzill 'French Vanilla' (I love that colour!)
and the embossed dots were made with a Sizzix large dot embossing folder.


I am off today to a sewing class to learn how to make the most of my sewing machine.
I have so many feet for it and no idea how to use them. 
Maybe after today I'll be whizzing up all sorts of things.......I can live in hope anyway :)
 
Thank you so much for joining me today and I hope you have a lovely weekend.
I'd love it if you could come back tomorrow when I'll be sharing my scrapbook page for the next challenge at Creative Craft World.
 
See you then!
Sarah xx 

Saturday, 20 October 2012

Mini kit projects

Happy weekend everyone!
 
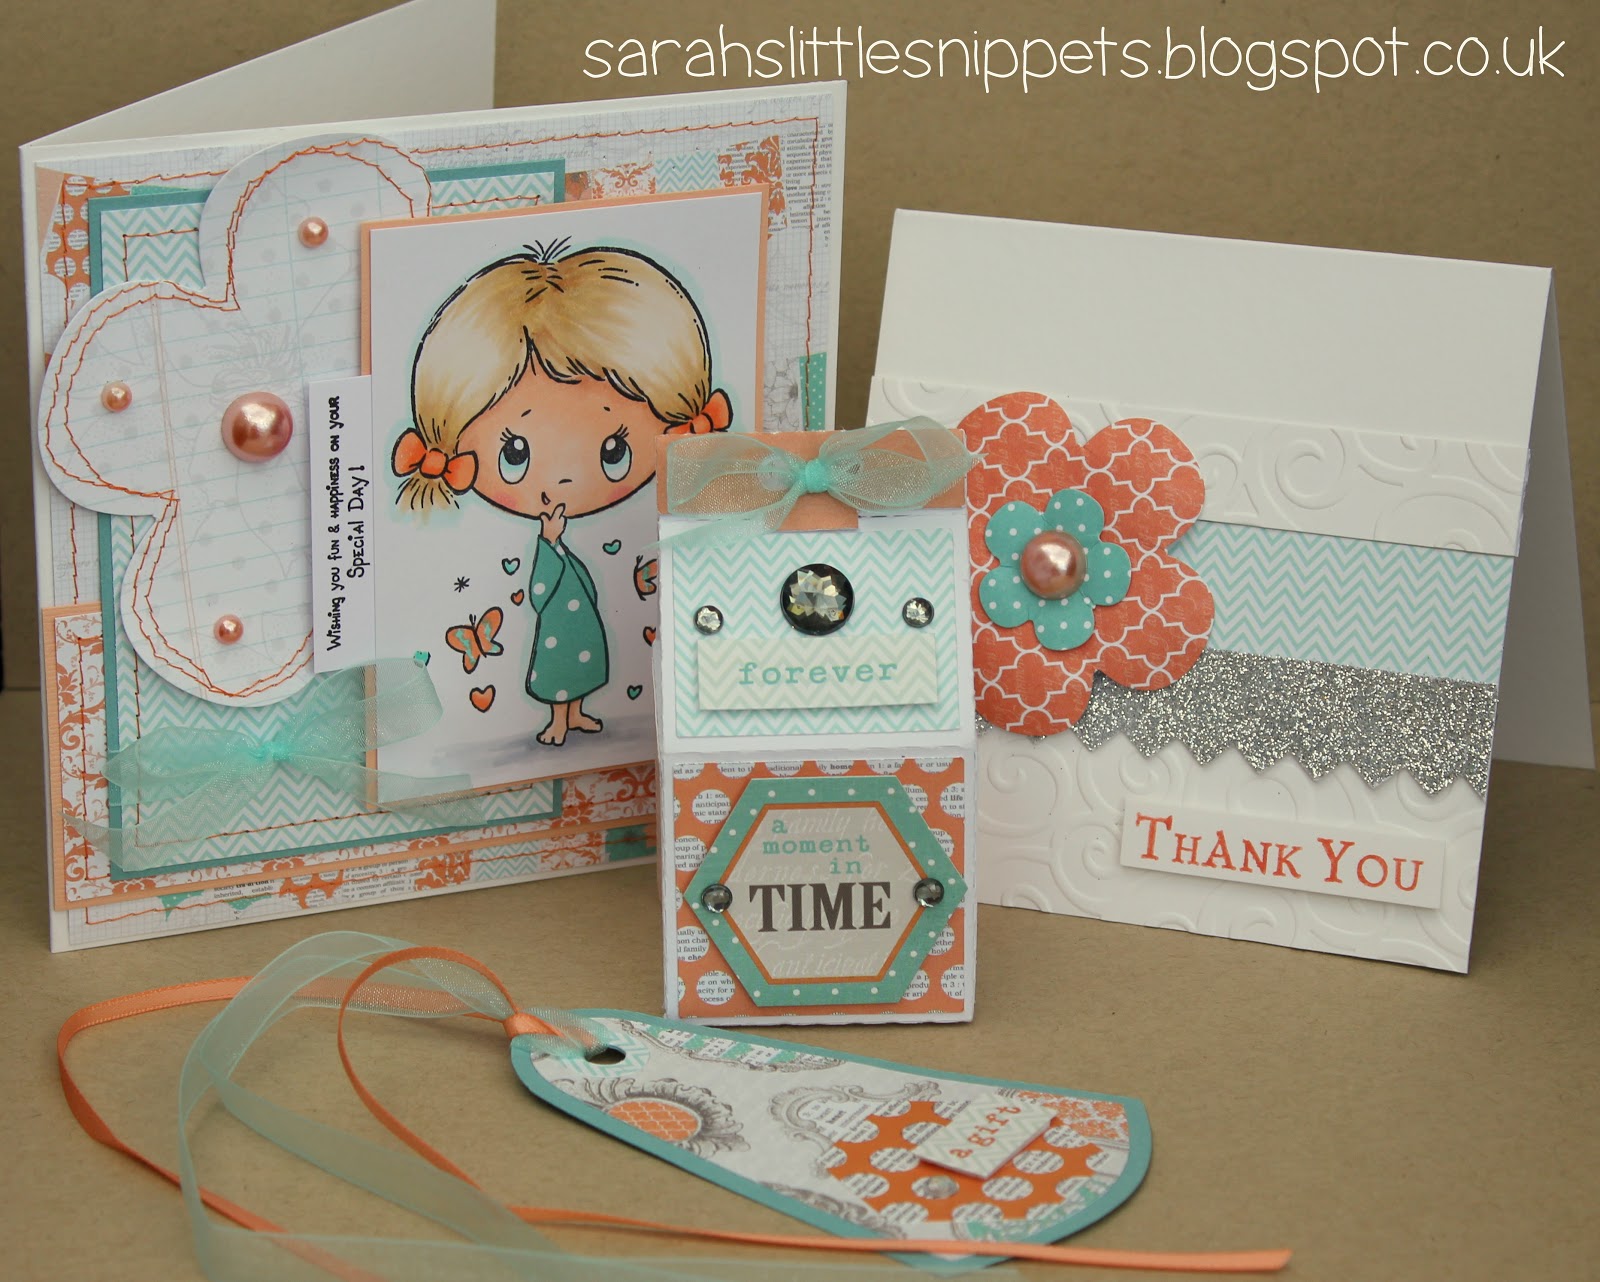
Today I have some projects I made using the October mini kit from Creative Craft World that
Lou very kindly sent me.
It is a mix of beautiful turquoise and orange from the Teresa Collins 'Tell your story' collection
~ you can see (and buy) the kit HERE.
 
 
All four projects and I still have lots left over to make more!


In the kit there are lots of beautiful die cut flowers.  I took the largest of them and sewed messy stitches around the petals with my sewing machine.
The image is a stamp from Crafter's Companion which I coloured with Copics and I took another of the large flowers and paper pieced her dress with it. The pearls are also included in the kit and the ribbon is from my stash.
The sentiment is stamped and was a freebie with a magazine(from last year I think).
 
close up of the layers on the card

 
 This card is very simple to make. I embossed the bottom of the card with a Cuttlebug 'swirls' embossing folder and added a strip of paper and a strip of glitter card from the kit.
I shaped the die cut flowers, layered them together and adhered them to the card with foam pads.
The sentiment is by Papermania and is stamped with a Stampin' Up marker.
 
 This mini carton was cut out with the Cameo and covered with paper from the kit. I then added stickers and gems which are also included in the kit.
I haven't put anything in the box yet but it would make a lovely little treat box filled with sweets or a scented candle.
 
...and lastly I made a tag, which I cut out with the Cameo.
I added a layer of patterned paper and a hexagon sticker (from the sticker sheet also in the kit) and a clear adhesive gem.
 
To enter the challenge, all you have to do is make a project with bling on it and make it smaller than 12x12".
The winner will be chosen by the Design Team and the prize is a fab mini kit, a generous discount at
Creative Craft World and a Guest Design Team spot.
So why not get creating!
 
Thanks so much for joining me today
and I'll be back soon with more.
Take care and enjoy the rest of your weekend.
Sarah xx
 
I'd like to enter the following challenges:
Make it Monday ~ anything goes
Stampavie #179 ~ stitches (1st card)
Perfect Sentiments ~ happy birthday/anniversary (1st card)
Lady Anne's challenges ~ anything goes (1st card)
Inky Impressions ~ anything but a card (Mini carton)
 

Thursday, 18 October 2012

Sympathy card.

Good morning!
 
It's turned very cold and wet here, so it's time for the winter woollies I think!
 
I'm back this morning with a card to share and I always find these ones difficult.
It's a sympathy card for a friend whose husband died suddenly.
 

 I made a 12cm card blank and using an extra square of white card, I stamped the flower using a Unity stamp.  I coloured the leaf with Copic markers and added tiny green gems to the circles.
Then I wrapped some SU ribbon around it and placed the sentiment (computer generated) on top with foam pads.  I added this square to the card front with double sided tape.
Then finished with a printed insert on the inside.
 
 
Thank you for visiting today
and I'll be back on Saturday with 4 projects using CCW's October mini kit.
 
Take care
Sarah xx

Saturday, 15 September 2012

Rosie by Digistamp Boutique

Hello again!
 
It's so easy to neglect your blog when life gets busy, isn't it?
 
My poor wee daughter is only back to school two weeks and is off sick already.
She had a miserable night on Wednesday so I kept her off school on Thursday and Friday as she really wasn't fit to go.
At the beginning of the week she was invited to go to her wee friend's birthday party, which was today and she was adamant that she was going.
'But you're not fit', I said.
'Oh I am mummy', was the reply. 'I'm as fit as a fillet!'
 
Needless to say, she got going to the party with a pocket full of tissues, and had a whale of a time.
So it's back to school on Monday!
 
Here's the card I made for her wee friend Rosie.
 
I know this card is pink, pink, pink!
But I deny all responsiblity for it, lol....Phoebe chose everything and I just coloured the image.
I have no idea what make the papers are, I bought them years ago from Poundstretcher when they used to do scrapbooking kits.
 
She wanted Rosie from Digistamp Boutique and she wanted her to have blond hair to match her friend :)


 The little crown is a brad from Making Memories and Phoebe has been begging to use it every time we craft, so you can imagine her delight when we were able to put it on Rosie's head!


The number '6' is cut with a Cuttlebug die 'Red tag sale' and I raised it on foam pads. The name 'Rosie' is stamped with Regal Rose SU ink using Elzybells alphabet stamps.
The ribbon is Dovecraft.


That's it for tonight!
I'm off to bed with a hot toddy (Lemsip, honey & whisky)...I think I've caught Phoebe's bug :(

I hope you're all having a relaxing weekend
and thank you for joining me here.
I'm so sorry I haven't got caught up with commenting yet but there just aren't enough hours in the day to fit everything in...
I will catch up with you soon though :)

Take care,
Sarah xx

I'd like to enter this card in these challenges:
Jellypark challenges ~ all about the children
Digistamp Boutique ~ Sept monthy challenge
Digitally sweet ~ anything goes with flowers
QKR stampede ~ birthday celebration
Dutch Dare CC ~ sugar & spice
Make it Monday ~ linky party
 

Monday, 3 September 2012

Graduation card

Hello again!
 
I'm still playing catch up with the cards I've made over the summer
and the one I'm sharing today is the Graduation card I made for my nephew.
 
 
I used a fab wee freebie image from  Digistamp Boutique's Facebook page and I coloured it with Copics.
The papers are by My Mind's Eye and they're called Kraft Funday Happy Days.
They were all layered on a white card blank.


The sentiment is printed on kraft card and I raised the centre with pinflair glue gel.
 
 
To personalise it for my nephew I added titles to the books using wordart.
He graduated in Pharmacy so I squeezed that title onto the top book :)
After fussy cutting around the coloured image I raised it on kraft card with foam pads.
 
Thanks again for coming to visit!
I'll be back tomorrow with a card I made for my Mum's birthday.
 
Take care
Sarah xx
 
I'd like to enter this card in the following challenges:
Make it Monday #105 ~ linky party anything goes
Hooked on Craft #24 ~ cards for men
PPMC #55 ~ create a square card
The cutie pie CB #26 ~ no flowers
The squirrel and the fox #25 ~ one for the men
Digistamp Boutique ~ monthly competion using DSB image


Friday, 20 July 2012

Cards using CCW's July mini kit

Good morning everyone!

I've been missing for a while haven't I?
It's been very busy at home with the children and poor wee Mac (our puppy) has been very unwell
after a visit to the vet but I'll tell you more about it in another post.
I'm still very cross with the vet and don't want to say something I'll regret!

As it's the 20th of the month it's time for the new mini challenge at Creative Craft World.
This time instead of a mini book, I've made some cards.
You can get the mini kit here on CCW's website - it's a bargain at £7.99!

We'd love it if you made a card or project this month and entered it in our challenge here.

For this first card I decided to make it easel style.
There are lots of gorgeous flowers in the kit but I forgot to use them and made my own punched ones.
I found the pack of flowers under my scoring board when I was tidying up afterwards......

I found these Lili of the Valley images in one of my storage baskets and I think they were a free gift from a magazine (must have been ages ago!) and I can't remember which one.
I'm not usually a fan of fairies or angels on cards but I do think she's very pretty and I enjoyed adding glamour dust to her wings ;)
The brown ribbon and white card are from my stash and everything else is found in the kit.

Edited to add: I think I better clarify :)....angel & fairy images are not my favourites on cards...
but.... the tooth fairy is VERY popular and welcome in our house at the minute! 


This next card is made using the card and papers in the kit.
I cut the butterfly with the Cameo and added seed beads to the body with glossy accents.

 I hand cut the banner and stamped the sentiment - I think it was a woodware clear stamp.


...and now for my first Christmas card this year!

It wasn't intentional though....the little image is another freebie and when I had her coloured I thought it looked quite Christmassy so I printed the sentiment on the computer and popped it on foam pads.

To give a little sparkle I added 3 red gems under the sentiment.
The ribbon, card and paper are from the kit.


The little image and sentiments on this next card are from DigiStamp Boutique.
The flowers and leaves are handcut and I rolled the flowers and twisted and tweaked them into shape.
I doodled lines on the leaves with a fineliner pen.

 The image is coloured with Copics.
The cardstock, papers and twine are from the kit.
I'd like to enter it in the Digistamp Boutique monthly challenge.


I really enjoyed making these cards and I'm pleased at how they turned out.
I hope you like them too :)

 we'd love to see what you make!

I hope to be back blogging properly very soon.
I have lots of projects to share but it's hard getting the time to upload them to the computer!
Thank you so much for your comments even though I haven't had time to reply back
I really do appreciate them :)
Have a lovely day
Hugs, Sarah