Showing posts with label nestabilities. Show all posts

Tuesday, 20 November 2012

4 cards using CCW's November Mini kit

Hello again!
I just remembered last night that I had to post these cards for the new mini challenge at
We've been so involved with the Christmas Countdown that the regular challenges have been a bit forgotten about.
We'd love you to take a moment and enter your projects.
 
Lou very kindly sent me this month's mini kit to have a play with and with the gorgeous mix of colours, I was able to make a male card as well as more feminine cards.
 

 This cute little mouse is from The Paper Shelter, the sentiment is a Daisy Bucket stamp and the brad is K&Co.
 
 The sentiment on this card is computer generated using 'LoosieScript' and the oval is cut with Nestabilities.

 I 'm sorry I can't remember the make of this stamp.  To save on space I removed all my stamps from their wooden blocks and I never made a note of the names!
It's coloured with Koh-i-Noor woodless pencils.
The button is by Fancy Pants and I tied twine through it. 
The brads were stuck on with pinflair glue gel after I removed the pins from the back of them.
I find that if I'm placing brads close together on card it can be hard to get them in a straight line.
Also the card crinkles when I pierce holes closely together so I find gluing them on gives a neater finish :)
The sentiment is computer generated using 'PhontPhreak's Handwriting'.
 
The flower stamp on this card is by Elzybells and the button is American Crafts.
Everything else is from the kit.
 
Thank you for reading both my posts today,
I'm a little behind in my commenting but I will be round to visit you soon :)
I  hope you have a lovely day
and if you pop back tomorrow, I'll have a link to Sue's project.
 
Take care,
Sarah xx

I'd like to enter some of these in the following challenges:
Loves Rubberstamps ~ fun with ribbons
Oldie But A Goodie ~ anything but Christmas (Sailing card...stamp, brads, button, twine, more than 6 months old)
Incy Wincy ~ hip to be square (Sailing card)
Crafty Cardmakers ~ more than 1 punch/die cut (Flowers/butterfly card...2 die cut circles, 2 punched butterflies)
Whoopsi Daisy ~ die cuts and punches (Get well soon card... die cut oval, punched flowers & Flowers/butterfly card...2 die cut circles, 2 punched butterflies)
 

Saturday, 10 November 2012

'cool company' Christmas card

With Christmas fast approaching I have another card to share today.
It's only the 3rd Christmas card I've made so far, so I'd need to get my skates on!
 
I've been trying to use up some of my forgotten/older stash for my cards this year.
I have no room to store anything new!
 
Supplies used
White card ~cut and scored to A6 size
Patterned Paper ~ DCWV Christmas multi stack (6x6")
Red card ~ cut with Nestabilites labels 8 die
Green card ~ embossed with Cuttlebug snowflake folder
Stamp ~ Penny Black 3743K 'cool company'
Ink ~ Memento black
Coloured with Copics
Red/White ribbon, Christmas twine & Green star button
Stickles 'star dust'
for the dots of snow in the background, but they haven't shown up too well in the photo.
 
 
....continuing on the Christmas Countdown....
I hope you've been enjoying the lovely festive projects shared by the DT
We're now on day 10 and Morag has a winter scrapbook page here
 
 
and that's it from me today!
I hope you're all enjoying your weekend :)
I have an appointment at the hospital this morning for a nerve conduction study
for Carpal Tunnel syndrome.
I'm dreading it a bit because I don't know what to expect and it sounds possibly painful??
Maybe it won't be as bad as I think :)
I'll let you know how it goes....
 
All the best
Sarah xx
 
I'd like to enter this card in the following challenges:
Penny Black Saturday ~ cute Christmas
One Stop Craft ~ anything goes
Krafty hands ~ Christmas
2 Sisters ~ favourite Christmas stamp
CSAYL ~ anything goes
Fun with shapes & more ~ the 1st snow (Christmas/winter, white base colour)

Monday, 5 November 2012

Christmas decorations

Hello everyone!
 
I hope you had a good weekend :)
As we continue with the Christmas countdown at Creative Craft World
it's my turn to share a project and I have chosen to make some decorations for Christmas.
 
I used my Silhouette for these to show that the machine is not just for papercrafting.
You can cut fabric with it and although I didn't cut the felt for my decorations (I think it would be too dusty)
I made templates with the Silhouette designs.
 
Here's a photo tutorial so hopefully you will want to make your own!
 
To start with I cut out the designs from a sheet of 12x12" card
 
Then I kept the sheet of negative shapes to trace around.
 
To make this little lady...scroll on down.
 
 Lay the shape over black felt and trace around using a light coloured pencil.
 
 Lay the traced piece of felt on top of a 2nd piece of black felt (for the back and front)
and cut them out together.
 
Trace and cut out the other pieces of felt the same way.
I used black brads for eyes and stitched a nose with orange embroidery thread and added a red heart before sewing the white tummy to the black front piece with running stitches.
Sew the feet on the front piece as well.
Next lay the back and front pieces together, putting a length of doubled ribbon or twine for the hanging loop in between the pieces at the top.
Sew all around the shape leaving a small gap for stuffing.
Lightly stuff with toy stuffing and sew the gap closed.
And that's it finished!
 
 
The basic instructions are the same for all the felt decorations and you can embellish as you like.
 

 For the fabric hearts, I used a cream linen type material and used my heart nestabilites die to trace around the shape.  I then laid two pieces of fabric, right sides together and stitched following the traced line ~ make sure you leave a gap for turning right side out.  Then stuff firmly, sew up the gap and decorate with buttons and twine.


I hope you enjoyed this tutorial and that it made sense!
If there's anything that's not clear, just email me and I'll try to help.
 
If you don't have a Silhouette you can always use a roller die cutting machine (Cuttlebug or Sizzix)
or even draw your own templates.
 
Thank you for visiting today
and if you come back tomorrow, I'll have the link to Lou's blog where she is sharing a gorgeous Christmas layout.
 
Take care
Sarah xx

Wednesday, 29 August 2012

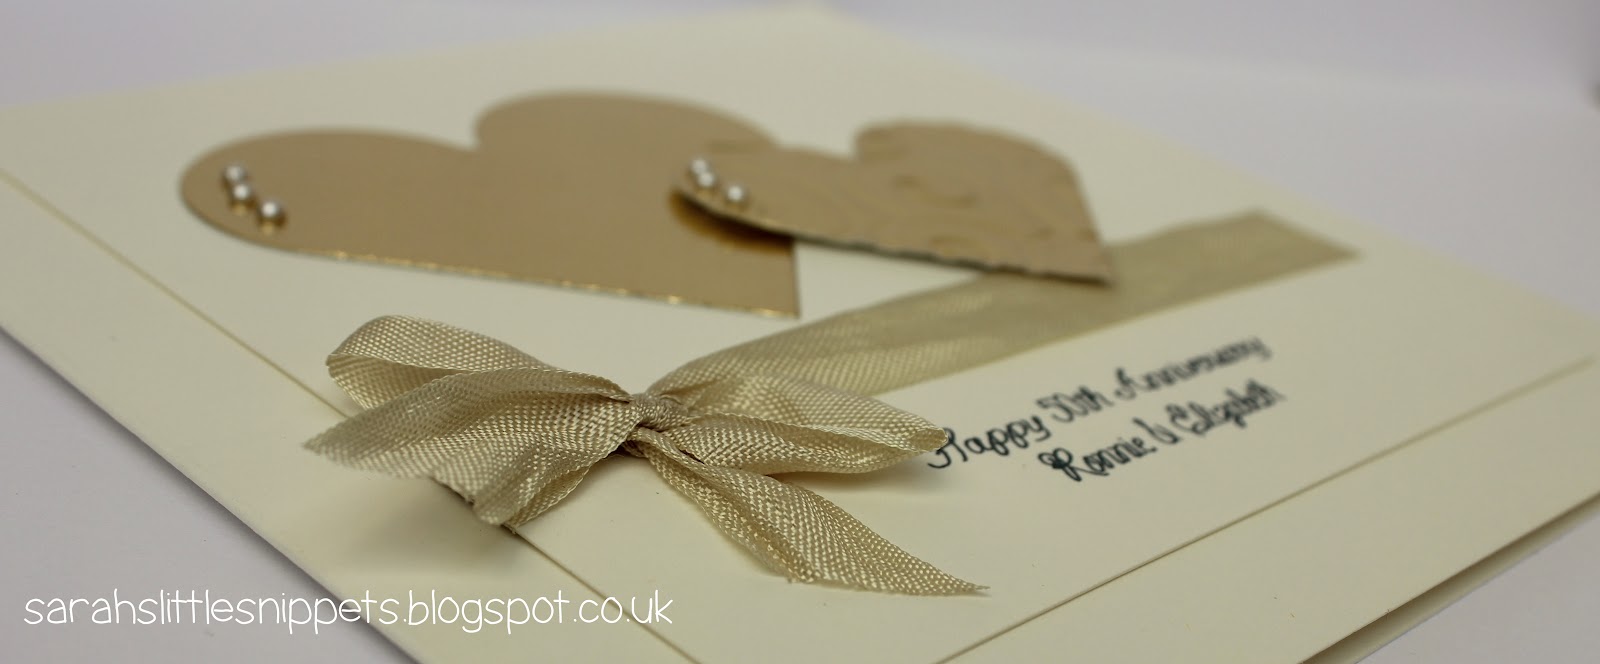
Golden Wedding Anniversary

Hello again!
 
Today I have a personalised anniversary card which I was asked to make.
 
To make the card I cut and creased a 15x15cm card blank from a sheet of A4 smooth cream card.
Next I printed the sentiment using the computer on a 13x13cm cream square and tied seam binding ribbon around it, finishing with a bow. 
 
 
I layered the square on the card blank and cut 2 different sized hearts from gold card using Nestabilities dies.
I embossed one with a cuttlebug swirls embossing folder in the Big Shot.
Then I adhered the larger heart flat on the card and raised the embossed heart (slightly overlapping the other) with foam pads.
To finish I added 3 tiny pearls to each of the hearts.
 
 
Regular readers of my blog will know that I'm not too keen on working with gold card
but you know what?
It's growing on me!
I love this card and you might see more gold creeping in from time to time :)
 
I hope you have a lovely day whatever you do
and I'll be back soon with more projects.
Sarah xx
 
Ps. Pop over to Creative Craft World for some exciting news about our birthday blog hop starting tomorrow.

Friday, 20 July 2012

Cards using CCW's July mini kit

Good morning everyone!

I've been missing for a while haven't I?
It's been very busy at home with the children and poor wee Mac (our puppy) has been very unwell
after a visit to the vet but I'll tell you more about it in another post.
I'm still very cross with the vet and don't want to say something I'll regret!

As it's the 20th of the month it's time for the new mini challenge at Creative Craft World.
This time instead of a mini book, I've made some cards.
You can get the mini kit here on CCW's website - it's a bargain at £7.99!

We'd love it if you made a card or project this month and entered it in our challenge here.

For this first card I decided to make it easel style.
There are lots of gorgeous flowers in the kit but I forgot to use them and made my own punched ones.
I found the pack of flowers under my scoring board when I was tidying up afterwards......

I found these Lili of the Valley images in one of my storage baskets and I think they were a free gift from a magazine (must have been ages ago!) and I can't remember which one.
I'm not usually a fan of fairies or angels on cards but I do think she's very pretty and I enjoyed adding glamour dust to her wings ;)
The brown ribbon and white card are from my stash and everything else is found in the kit.

Edited to add: I think I better clarify :)....angel & fairy images are not my favourites on cards...
but.... the tooth fairy is VERY popular and welcome in our house at the minute! 


This next card is made using the card and papers in the kit.
I cut the butterfly with the Cameo and added seed beads to the body with glossy accents.

 I hand cut the banner and stamped the sentiment - I think it was a woodware clear stamp.


...and now for my first Christmas card this year!

It wasn't intentional though....the little image is another freebie and when I had her coloured I thought it looked quite Christmassy so I printed the sentiment on the computer and popped it on foam pads.

To give a little sparkle I added 3 red gems under the sentiment.
The ribbon, card and paper are from the kit.


The little image and sentiments on this next card are from DigiStamp Boutique.
The flowers and leaves are handcut and I rolled the flowers and twisted and tweaked them into shape.
I doodled lines on the leaves with a fineliner pen.

 The image is coloured with Copics.
The cardstock, papers and twine are from the kit.
I'd like to enter it in the Digistamp Boutique monthly challenge.


I really enjoyed making these cards and I'm pleased at how they turned out.
I hope you like them too :)

 we'd love to see what you make!

I hope to be back blogging properly very soon.
I have lots of projects to share but it's hard getting the time to upload them to the computer!
Thank you so much for your comments even though I haven't had time to reply back
I really do appreciate them :)
Have a lovely day
Hugs, Sarah

Saturday, 30 June 2012

Home Sweet Home

Good morning everyone!

It's time for a new challenge at Sweet Stampin' today
and it's also my final day as a guest designer...

I have really enjoyed the challenges this month and I'd like to thank all the Sweet Stampin' girls for making me feel so welcome :)

The challenge this week is 'scallops'


For this card I used the new Echo Park 'So happy together' paper pad
and the Dots & Stripes 'Soda fountain' essentials collection.
The image is from Squiggle Stamps coloured with Copics and the sentiment is a Kaisercraft stamp.
I doodled faux stitching around the squares with a Sigma Micron 02 black pen.

After making the card I realised that the roof of the house has scallops!
It wasn't intentional though lol.

Copic colours used - Yellows: Y21,Y17         Greens: G00,G21      Blues: B02,BG05
Pinks/Reds: RV10,R32,R35     Background: BG10       Blender: 0

I pierced 4 holes through the gingham ribbon and spotty paper and then added white brads to hold the ribbon in place.

There are some wonderful prizes to be won so click here for some inspiration and to link up your project.  Don't forget to include some stamping!

Thanks for stopping by today and a big hello to my new followers.
You're very welcome!
I'll have more projects to share soon and I'm going to introduce you to the newest member of our family......to those who know me ~ don't faint with shock when you see him! lol
Sarah xx

Wednesday, 27 June 2012

Card and box gift set for teacher

Good Morning!

I'm back again with the little gift Phoebe gave to her teacher yesterday.
It was really fun to make and is made with a cut file from My Time Made Easy.


Using the Cameo I cut the box from a sheet of 12x12" yellow card and before assembling it I added a 2" strip of Cosmo Cricket 'Material Girl' paper along the bottom. Next I added a strip of 'apple' patterned ribbon.
Following the instructions sent with the file I taped the box together and curled the petals at the top with a bone folder.
It's best to use a really strong double sided tape for the box ~ I use this one.


 I filled the box with sweets and tied the top closed with 3 lengths of Divine twine.

I cut two apples with the Cameo and layered the little pieces together adding some detail with Stampin' Up markers.  Then I glued them to the back and front of the pencil top.

 I added text to the little banner using print and cut with the Cameo and wrapped it around the pencil. This is the text on the back.


I used matching paper for the card, and the Wryn image and sentiment are from Tiddly Inks.
I coloured the image with Copics and then fussy cut around it.
Next I cut a white rectangle from white card, sponged distress inks (Spiced Marmalade and Worn Lipstick) around the edges and layered the Wryn image on top with foam pads.
I added glamour dust to the icing on the cupcake and glossy accents to the cherry on her head.
(although you can't see it in the photo very well!)


I also cut the sentiment with an oval nestabilities die and sponged it with the same distress inks while still in the die.
Before layering the card together, I tied seam binding around the measuring tape paper and popped a red button on the bow.


The card is 6"x6" and the box is just slightly taller.

It's just a simple gift but I wanted to let Mrs Lockhart know that Phoebe really enjoyed school this year ~ and that means a lot to me!
  She has taught primary 3 for quite a few years and then had to change to teach primary 1 this year so it can't have been easy!

Thanks for coming to visit again today!
I better try and get something done before I've to start the school runs ~ the day goes so quick doesn't it?

Hope you're having a good one :)
Take care
Sarah xx

I'm entering this in the following challenges:
MIM ~ anything goes linky party
Scrapbook Sisters ~ anything goes
City Crafter Challenge ~ make a gift
PTT ~ anything goes
Bunny Zoes ~ girls girls girls
Daisy Doodles ~ anything goes
My Grafico ~ bright summer colours
Sentimental Sundays ~ cute and girly
The Squirrel & the Fox ~ make it sparkle
Great Impressions ~ die cuts or punches
Creative Belli ~ anything but a card (everything is old!)

Tuesday, 26 June 2012

Teacher card and gift

Good Afternoon!

Only a day and a half of school left and then no more packed lunches or homeworks to do
for 9 whole weeks :))

As the children have given their gifts to the teachers, I can now share them here.

This is what Caleb gave to his.
He has had a temporary teacher since Easter as his usual teacher went off on maternity leave.
It's the first time he's had a male teacher and he has loved it. It has also been a real change for me to make a male themed card and present!

 The image is from Tiddy Inks and I coloured it with Copics
Then I cut it out with a rectangle nestie and the blue layer with a scalloped nestie.
The papers are from a gorgeous Me and My Big Ideas paper pad.

 I added shiny card candy to the top of the banner.
The sentiment is computer generated using 'bracketfeet' font.

 This adorable little mouse is included as an extra when you buy the 'genius' digi stamp.
I added the sentiment from a Stampin' Up set positioning it with the stamp-a-ma-jig.


This is a box I made with the Cameo! 
You can also buy the file for other machines or print a pdf pattern and cut it out yourself.
You can buy it at My Time Made Easy.
 I used 2 sheets of Bazzill embossed dot card to make the box and Me and My Big Ideas paper for the t-shirt.

 I added text to the badge using print and cut with the Cameo and cut extra layers in white and blue card.
I printed 'from Caleb' in size 6 font on the computer and used the SU jewellery tag punch to cut it out.
Then tied Divine twine around the box.

 I layered the bottom of the box with tissue paper and filled with chocolate eclair sweets.
Silly me forgot to take a photo of the box opened!

 This last photo gives an idea of the size.  Sometimes it's hard to tell isn't it?
The card is approx 6"x 6" and the box is roughly the same height and is approx 2" deep.

We originally were going to go with a shirt and tie idea but the teacher is young so we thought this would suit him better :)

Now that the workbooks are coming home from school we've been having a good laugh at some of Caleb's sentences until I came across this one....
'There is loads of fluff under my mat' ......LOADS!!!!

Seeing my horrified expression Caleb meekly said,
'Well I had to think of a sentence with the word fluff in it'.....

Thank you for stopping by my blog today!
I haven't got caught up on commenting yet as I've been making a project for a blog hop on 3rd July.
I am excited about it and I hope you'll love my project when you see it too!

I'll be back tomorrow with the gift set for Phoebe's teacher.
Take care :)
Sarah xx

I'd like to enter this in the following challenges:
Daisy Doodles ~ anything goes
Crafty Boots ~ sport
Desmet Designs ~ for the men & boys
Divas by Design ~ die cuts
Paper Make-Up Stamps ~ anything goes (must use digi)
Incy Wincy ~ anything goes
Love to Create ~ anything goes
Cutie Pie challenge ~ one for the boys
Robyn's Fetish ~ no flowers anywhere
Allsorts ~ dies to die for
Creative Belli ~ anything but a card (entering the box only)
Make it Monday ~ anything goes linky party
Simon Says Stamp ~ anything but a card

Saturday, 16 June 2012

Fun in the sun at Sweet Stampin'

Good Morning,

That's another week flown by and I have my next GDT card for Sweet Stampin'

The theme this week is 'Summer Fun'

Looking at our British weather you might find it hard to remember what the sun looks like!

But let's brighten up our day with some fun summer cards :)

This is the one I made...

The little digi image was a freebie from Digistamp Boutique last year which I coloured with Copics.
Then I cut it out with rectangle nestabilities dies.
The patterned paper is one of my favourite summer papers and it's the 'Snorkel' collection
by Cosmo Cricket.
I cut the waves and the sun using the Silhouette. Then to finish off I tied baker's twine around the card and tied a bow through the button.


I added glossy accents to the goggles and sunglasses and some stardust stickles around the sun.

I have loads to try and catch up on today...I still haven't attempted the teacher's cards yet...
it's Father's day tomorrow and I haven't started that yet....
a graduation card for my nephew...
birthday cards....
I've a list as long as your arm and the more I look at it, the more tired I feel...
Do you ever get days like that?  Maybe I'm just in a lazy phase.....lol  :)

I hope you all have a great weekend and I'll be back on Monday to share my Father's day cards
(providing I get them made of course......)
All the best,
Sarah xx

I'd like to enter this in the following challenges:
MIM #93 ~ anything goes
Divas by Design #39 ~ summer theme
Just keep on creating #2 ~ anything goes
Freshly brewed #100 ~ anything goes
The Paper Shelter #68 ~ anything goes
Stamp & Create ~ bold & bright
Fashionista #3 ~ simply summer
Craft Your Passion #114 ~ anything goes

Saturday, 9 June 2012

Enjoy Your Day card ~ Penny Black stamp


Good Morning :)

It's my second GDT card for Sweet Stampin',
and this week it's another great challenge, one of my favourites :)

It's stitching!

We'd love to see some faux, hand or machine stitching on your projects.

I thought I'd try out one of the fancy stitches on my machine (they rarely get used otherwise)
but it looks like I'd definitely need more practise turning corners!
It's much easier to sew on fabric than card..... lol
Most of the elements I've used on this card, I've had for a while.
  The papers are Bo Bunny 'Persuasion' and Bo Bunny 'double dot'
The image is this stamp by Penny Black and I coloured her with Copic markers.
Skin ~ E00, E11, R20       Hair ~ E29, E31, E57       Dress RV000, RV02, RV04 RV10, YG03, YG11
Shadow & Ground ~ BG10, C3, C5
Blender Pen 0

 I stamped the image on white card and cut it out using Nestabilities Labels  8.
While the card was still in the die, I sponged around the edges with Tumbled Glass and Spun Sugar distress inks.
The sentiment is computer generated with 'atype' font, then I trimmed each word to the same size and added faux stitching around the edges.
The pink brads are Basic Grey and the ribbon is from my stash.

I added Glamour Dust to her jewellery, her bag, the bottom of her dress and the tails on her scarf.
Once I get started with a glue pen it's hard to stop!

I hope you enjoy my card today and will enter the challenge yourself.
I'd love to see what you create :)

Thank you for stopping by my blog today.
Have a great weekend  :)
Take care
Sarah xx

I'd like to enter this in the following challenges:
Craft Punked ~ happy birthday/celebration
Crafty Ann's ~ it's a girl thing
Frosted Designs ~ stitching
Totally Papercrafts ~ doodle on it (around the sentiment)