Tuesday, 6 November 2012

Day 6 and a birthday card

Good morning!
I'm back again today with another link
and this time it's for Lou's lovely Christmas scrapbook page.
You'll find it HERE with all the details.


My card today was another rush job, this time to send to Australia...
I'm getting into a bad habit of leaving things to the last minute!
It was for my wee nephew's birthday and although it's pretty simple I was pleased with it in the end :)

I used Woodware 'peeking over' stamps and I decoupaged the horse and sheep for some dimension.
Layered it on yellow card, added doodled stitching around the outside
and tied some twine around the top.  It was coloured with Copics.
 
That's it from me today.
I will be back tomorrow with a link to Trish's Christmas cards.
 
I'll also be sharing a card I've made for my nephew's 18th birthday this weekend.
Thank you so much for stopping by,
Take care
Sarah xx

I'd like to enter this card in the following challenges:
The Squirrel and the Fox ~ flowers, hats or horses
Make it Monday ~ anything goes
The Crafty Pad ~ anything goes
Kaboodle Doodles ~ anything goes

Monday, 5 November 2012

Christmas decorations

Hello everyone!
 
I hope you had a good weekend :)
As we continue with the Christmas countdown at Creative Craft World
it's my turn to share a project and I have chosen to make some decorations for Christmas.
 
I used my Silhouette for these to show that the machine is not just for papercrafting.
You can cut fabric with it and although I didn't cut the felt for my decorations (I think it would be too dusty)
I made templates with the Silhouette designs.
 
Here's a photo tutorial so hopefully you will want to make your own!
 
To start with I cut out the designs from a sheet of 12x12" card
 
Then I kept the sheet of negative shapes to trace around.
 
To make this little lady...scroll on down.
 
 Lay the shape over black felt and trace around using a light coloured pencil.
 
 Lay the traced piece of felt on top of a 2nd piece of black felt (for the back and front)
and cut them out together.
 
Trace and cut out the other pieces of felt the same way.
I used black brads for eyes and stitched a nose with orange embroidery thread and added a red heart before sewing the white tummy to the black front piece with running stitches.
Sew the feet on the front piece as well.
Next lay the back and front pieces together, putting a length of doubled ribbon or twine for the hanging loop in between the pieces at the top.
Sew all around the shape leaving a small gap for stuffing.
Lightly stuff with toy stuffing and sew the gap closed.
And that's it finished!
 
 
The basic instructions are the same for all the felt decorations and you can embellish as you like.
 

 For the fabric hearts, I used a cream linen type material and used my heart nestabilites die to trace around the shape.  I then laid two pieces of fabric, right sides together and stitched following the traced line ~ make sure you leave a gap for turning right side out.  Then stuff firmly, sew up the gap and decorate with buttons and twine.


I hope you enjoyed this tutorial and that it made sense!
If there's anything that's not clear, just email me and I'll try to help.
 
If you don't have a Silhouette you can always use a roller die cutting machine (Cuttlebug or Sizzix)
or even draw your own templates.
 
Thank you for visiting today
and if you come back tomorrow, I'll have the link to Lou's blog where she is sharing a gorgeous Christmas layout.
 
Take care
Sarah xx

Sunday, 4 November 2012

Day 4 Christmas Countdown

 
Just a quick post from me this morning!
 Our Christmas Countdown is continuing over at Creative Craft World
and today Sue is sharing a tutorial for Reindeer noses.
Why not pop over to her blog HERE to have a look.
 
a sneak peek!
 
 
I'll be back tomorrow with some felt Christmas decorations
and I'd love you to join me.
Enjoy the rest of your weekend :)
Sarah xx

Saturday, 3 November 2012

Scrapbook challenge at CCW

Hello again!
 
It's time for a new scrapbook challenge at Creative Craft World
and we have a lovely sketch from Sue.
 
This is my take on it using Cosmo Cricket 'Happy Trails' paper.
I layered it on brown Bazzill card and zig zag stitched around the edge of the green paper.
I also stitched the strips of paper at the top and bottom with messy straight stitched lines.
Regular readers of my blog will know that we got a new puppy in June just as the children were finishing school for the summer holidays.
So.... 6 months on, I thought it was about time I did a scrapbook page about him.
My friends were shocked that I agreed to the children having a dog
(I was definitely not a dog lover) but this wee rascal has stolen my heart :)
 
I must tell you the story about how he came to us.
I was looking on Gumtree for a small puppy and I came across an ad for a little Lhasa Apso/Yorkie pup who was ready to be homed.  I contacted the owner who had another buyer interested so we had to wait to see if he would be available to us or not.
After a couple of days we got a phone call to say the puppy was ours and she could bring him to us that evening.
  When she arrived, she brought in a little bundle of fur and we were smitten.
While we were talking I was convinced I had seen her somewhere before.
After going through different places we might have met, nothing rang a bell.
She showed us a picture of her wee son and I knew I had seen him somewhere before.
Somehow the conversation turned to crafting and she said, "my mum teaches craft classes"
She said her mum was Linda Walker, and then the penny dropped.
I am a follower of her mum's blog and her mum had posted wedding pictures and that's how I recognised her and her son!
It's a small world.....
 
 
To make the page I used the Silhouette Cameo
and here's a screen shot of how I did it. 
I like to crop my photos using the Studio software and arrange them on the page.
That way I know exactly what size they will be and then I can fiddle about with the arrangement.
Then I will just print them out and cut them with the guillotine if there are straight edges and other times I will cut them out with the Cameo.
 
 I used print and cut for the journaling printing it on matching patterned paper.
Then I inked the edges with 'Tea Dye' distress ink.
I love the little bone paper clip that I found in my stash - I knew I'd find a use for it one day!
 
 I cut the title from brown card and added a little paw print brad at the top of the photo.
 
Instead of tying thread through my buttons
I cut a sliver of paper, threaded it through and taped it at the back.
Quick and easy!!
 
We'd love to see what you do with the sketch so why not link up your scrapbook page HERE.
You'll find all the details of the challenge there too.
 
I'm afraid that was a long post today!
Thank you for visiting and if you come back tomorrow I will have the link
Sue's blog where she has made some reindeer noses for the Christmas countdown.
 
I'm off now to nurse my poor wee daughter Phoebe.
Yesterday morning she erupted in lots of spots - chickenpox!
Thanks goodness for Calamine cream Doublebase gel :)
 
Take care and have a lovely weekend.
Sarah xx

I'd like to enter this in the following challenges:
Make it Monday ~ anything goes
Anything goes ~ anything goes
Raise the Bar ~ anything goes
Die Cuttin Diva's ~ anything goes
MAWTT ~ stitching
The Happy Scrappers ~ autumn

Friday, 2 November 2012

Day 2 of Christmas Countdown

 
This morning I have a link to Ali's blog and she has been working with Fimo.
We only have a taster photo for you but you can see it all HERE
 
 
I also have a card to share and it's a little sleeping House Mouse.
The image looks pale in the photo but it's not really, my photograpy skills are lacking!
 
The papers are Echo Park 'Life is Good' and I coloured the image with Copics.
The base card is Bazzill 'French Vanilla' (I love that colour!)
and the embossed dots were made with a Sizzix large dot embossing folder.


I am off today to a sewing class to learn how to make the most of my sewing machine.
I have so many feet for it and no idea how to use them. 
Maybe after today I'll be whizzing up all sorts of things.......I can live in hope anyway :)
 
Thank you so much for joining me today and I hope you have a lovely weekend.
I'd love it if you could come back tomorrow when I'll be sharing my scrapbook page for the next challenge at Creative Craft World.
 
See you then!
Sarah xx 

Thursday, 1 November 2012

Christmas Countdown and a card

Good morning everyone,
 
I have to apologise for being a bad blogger...life is just busy with the children at the moment.
 
But... I have some exciting news!
At Creative Craft World, it has become a yearly tradition to have a Christmas project every day for the month of November.
 
 
I will be posting a link every day to one of the DT blogs and I hope you will visit them
to see the exciting goodies they have made.
My own projects will be shared over the next 4 Mondays.
 
To start us off today,
Sue has made some fabulous Christmas tree decorations
and you can find the tutorial on how to make them HERE
and there's also a prize to be won.


I also have a card to share today!
Phoebe was invited to a 6th birthday party on Saturday and I left it to the last minute to make the card so I hastily threw this together on Saturday morning...not a good idea!
I was stressed and Phoebe was 15 minutes late.... not that she even noticed!
 I cut the shaped card, paper, sentiment and butterflies with the Cameo.
Then tied some pink gingham ribbon in a bow and topped with a pink button.
 
As part of the present I bought this pink fluffy pencil case and made a personalised zipper pull.
This was much to Phoebe's relief....Phoebe has an identical pencil case and Rachel loved it so much that she took it home from school and was reluctant to give it back.
In the end (after a week of pleading) Phoebe told her if it wasn't brought in the next day that I was going to have to tell her Mum and teacher what she'd done and she would be in a lot of trouble!
Thankfully the pencil case was returned the next morning :)
 
 
It's made from felt and is lightly padded. I cut the 'R' from white felt using a Sizzix alphabet die,
then ironed it on with bondaweb and added a couple of 'x' stitches.
 
 
Now I have to make Phoebe a zipper pull too!
 
Thank you for joining me today.
I'd love you to come back tomorrow for the link to Ali's Christmas project.
 I might even have another of my own projects too...
Take care
Sarah xx
 
I'd like to enter my card in the following challenges:
In the Pink ~ clean and simple pink (If mine is not CAS enough please delete it!)
Flutterby Wednesday ~ anything goes but must have butterfly or fairy on it
Nutcrafters ~ Ribbon or twine
Simon Says Stamp ~ shaped cards
Die Cuttin Diva's ~ anything goes (must use a die cut)
Make it Monday ~ anything goes (papercrafts)
 

Saturday, 20 October 2012

Mini kit projects

Happy weekend everyone!
 
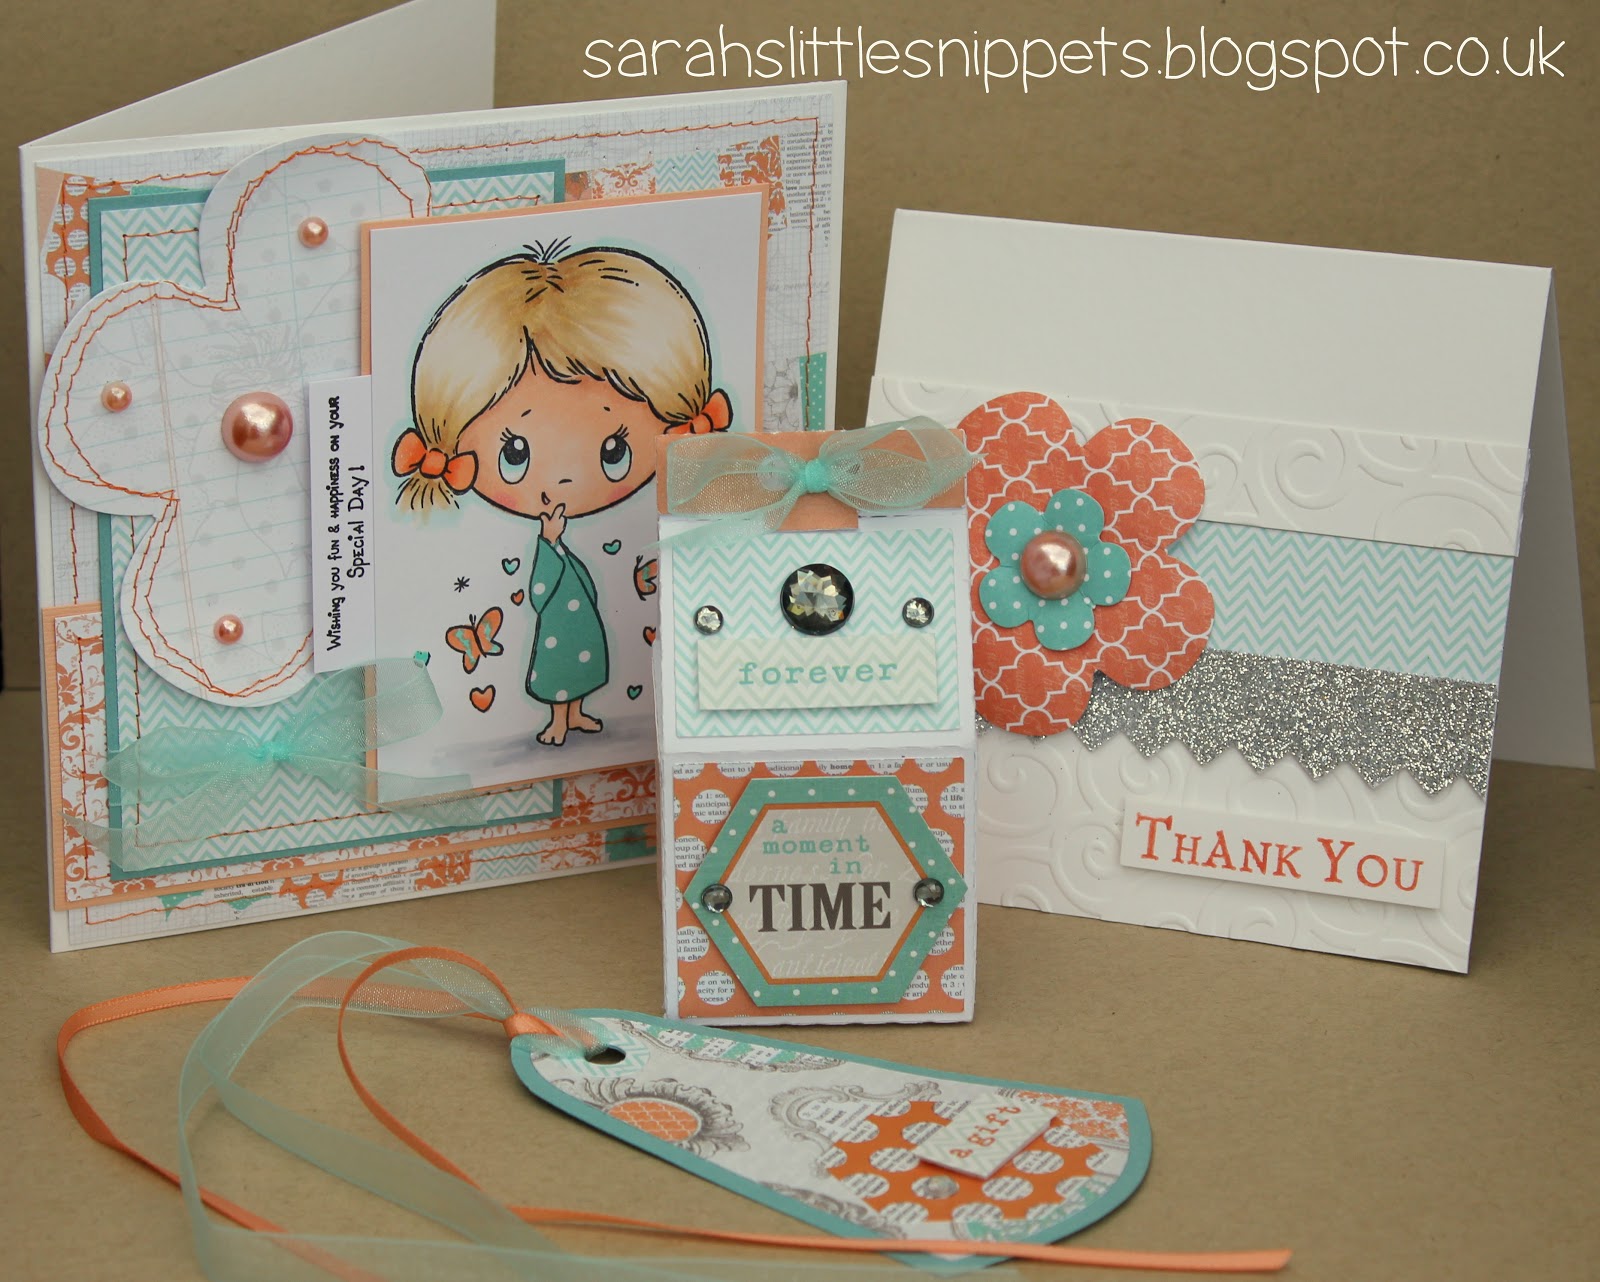
Today I have some projects I made using the October mini kit from Creative Craft World that
Lou very kindly sent me.
It is a mix of beautiful turquoise and orange from the Teresa Collins 'Tell your story' collection
~ you can see (and buy) the kit HERE.
 
 
All four projects and I still have lots left over to make more!


In the kit there are lots of beautiful die cut flowers.  I took the largest of them and sewed messy stitches around the petals with my sewing machine.
The image is a stamp from Crafter's Companion which I coloured with Copics and I took another of the large flowers and paper pieced her dress with it. The pearls are also included in the kit and the ribbon is from my stash.
The sentiment is stamped and was a freebie with a magazine(from last year I think).
 
close up of the layers on the card

 
 This card is very simple to make. I embossed the bottom of the card with a Cuttlebug 'swirls' embossing folder and added a strip of paper and a strip of glitter card from the kit.
I shaped the die cut flowers, layered them together and adhered them to the card with foam pads.
The sentiment is by Papermania and is stamped with a Stampin' Up marker.
 
 This mini carton was cut out with the Cameo and covered with paper from the kit. I then added stickers and gems which are also included in the kit.
I haven't put anything in the box yet but it would make a lovely little treat box filled with sweets or a scented candle.
 
...and lastly I made a tag, which I cut out with the Cameo.
I added a layer of patterned paper and a hexagon sticker (from the sticker sheet also in the kit) and a clear adhesive gem.
 
To enter the challenge, all you have to do is make a project with bling on it and make it smaller than 12x12".
The winner will be chosen by the Design Team and the prize is a fab mini kit, a generous discount at
Creative Craft World and a Guest Design Team spot.
So why not get creating!
 
Thanks so much for joining me today
and I'll be back soon with more.
Take care and enjoy the rest of your weekend.
Sarah xx
 
I'd like to enter the following challenges:
Make it Monday ~ anything goes
Stampavie #179 ~ stitches (1st card)
Perfect Sentiments ~ happy birthday/anniversary (1st card)
Lady Anne's challenges ~ anything goes (1st card)
Inky Impressions ~ anything but a card (Mini carton)
 

Thursday, 18 October 2012

Sympathy card.

Good morning!
 
It's turned very cold and wet here, so it's time for the winter woollies I think!
 
I'm back this morning with a card to share and I always find these ones difficult.
It's a sympathy card for a friend whose husband died suddenly.
 

 I made a 12cm card blank and using an extra square of white card, I stamped the flower using a Unity stamp.  I coloured the leaf with Copic markers and added tiny green gems to the circles.
Then I wrapped some SU ribbon around it and placed the sentiment (computer generated) on top with foam pads.  I added this square to the card front with double sided tape.
Then finished with a printed insert on the inside.
 
 
Thank you for visiting today
and I'll be back on Saturday with 4 projects using CCW's October mini kit.
 
Take care
Sarah xx

Tuesday, 16 October 2012

Age cards....

A little bit later than planned....
but just to let you know I'm still around....
here's a couple of cards!!
 
This card was for my lovely friend Donna who has finally caught up with me in age (for a few months anyway!!)
I cut out the large felt butterfly with a Tim Holtz die and the smaller one was cut by hand.

A very simple card for my nephew.


I have a few Christmas projects on the go for Creative Craft World and I will be sharing them very soon.
I will definitely be back on Saturday with my projects using this month's mini kit.
 
Thank you so much for visiting and for staying with me as I muddle my way through things at the minute.
I will try and get  back on track as soon as possible.
Hope you are all keeping well.
Sarah xx

Saturday, 6 October 2012

Monthy scrapbook challenge

Good morning!
 
I hope you're keeping well :)
 
The past couple of weeks have been so busy here.
My youngest brother and his family came over from Australia for a short holiday and it has been brilliant to catch up.
I've met my 2 nephews and baby niece for the first time!
It's such a pity they return home today, but they're already planning another trip over next year for Christmas.
 
I'm just popping in today with my scrapbook page for the new challenge at Creative Craft World this month.
 
 
I feel as if I'm always scrapping my younger two but Lydia always disappears when there is a camera about, so I don't have many photos of her. I managed to sneak this one when she was off guard.....it was taken in the spring when we had a picnic for my Dad's birthday.
 
The papers are Crate Paper Bliss and I kept the embellishments quite simple.
The flourish is by Prima and it's all layered on Bazzill french vanilla cardstock.
 
The scrap map
 
I made a little journalling tag to slip behind the photo.  Still to fill it in though!


I tried to think of a fun title but all that came to mind was Hippie Chick....
I knew Lydia wouldn't appreciate it so I went for her age instead.
It's cut out with the Silhouette Cameo from pink Bazzill dot card.
The little wooden hearts are by Studio Calico and I coloured them with a pink Copic marker.

 
For all the details of the scrap map challenge at Creative Craft World click here
and you can find more inspiration from the design team too!
 
Thank you so much for joining me here today.
I will be back on Monday with a new project
but for today I'm off to the airport to say goodbye.....
 
Have a lovely weekend
and take care :)
Sarah xx