Wednesday, 29 August 2012

Golden Wedding Anniversary

Hello again!
 
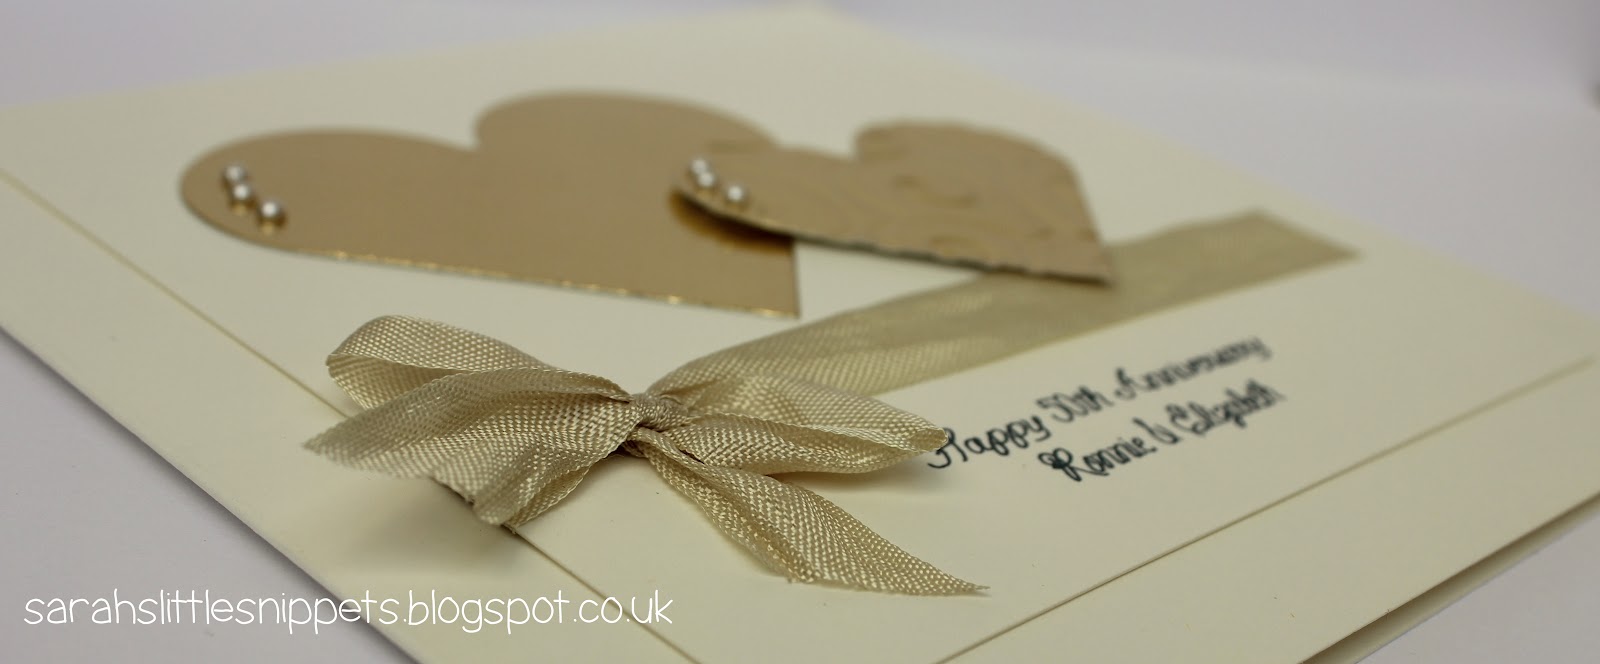
Today I have a personalised anniversary card which I was asked to make.
 
To make the card I cut and creased a 15x15cm card blank from a sheet of A4 smooth cream card.
Next I printed the sentiment using the computer on a 13x13cm cream square and tied seam binding ribbon around it, finishing with a bow. 
 
 
I layered the square on the card blank and cut 2 different sized hearts from gold card using Nestabilities dies.
I embossed one with a cuttlebug swirls embossing folder in the Big Shot.
Then I adhered the larger heart flat on the card and raised the embossed heart (slightly overlapping the other) with foam pads.
To finish I added 3 tiny pearls to each of the hearts.
 
 
Regular readers of my blog will know that I'm not too keen on working with gold card
but you know what?
It's growing on me!
I love this card and you might see more gold creeping in from time to time :)
 
I hope you have a lovely day whatever you do
and I'll be back soon with more projects.
Sarah xx
 
Ps. Pop over to Creative Craft World for some exciting news about our birthday blog hop starting tomorrow.

Monday, 27 August 2012

3-2-1 with Less is More

Good afternoon!
 
With the summer nearly over and the children returning to school on Friday
it's time for me to get back to blogging!
 
I love the Less is More challenges and Make it Monday and although I tried to get time to play along this summer it just didn't happen but on Saturday I had a little free time and this is what I made.
 
 
The challenge for LIM this week is a recipe and I used 3 words - 2 animals - 1 ribbon.
 
The base card is 14x14cms tent fold and I layered a pink 11x11cms square on top.
The little elephant is cut with a Sizzix die from an Echo Park 'hello summer' paper pad.
I inked the edges with TH antique linen distress ink and added a black brad for her eye.
The word 'sorry' is an Elzybells stamp (unfortunately not available anymore) and the 'I forgot' is part of a Personal Impressions stamp which I inked with an SU marker.
The wee bird is cut from a sheet of paper from the EP pad.

 
 I layered the elephant and bird with foam pads and I added two pads on top of each other just under the ear to prop it up a bit higher. Then I glued a strip of ric rac ribbon just underneath to 'ground' them.
 
 
When I finished that card (and making the most of my 'free time'...)
I made one for a boy.
 
The base of this one is cream card and I layered Bazzill kraft card on top.
The elephant is cut from an Echo Park 'note to self' paper pad.
My recipe this time is 3 words - 2 doodled lines - 1 animal
 
 
By this stage I should have been back to my 'mum' duties but I had been asked to make a baby card and I thought these little elephants would be perfect!
The photo is not great and the card is already away so I can't retake it but you'll get the idea :)
 
It's for twins Edward and Ruby.
 
This time it's on a 7x5" white card blank and I printed the sentiment on the computer
using 'annie use your telescope' font.
The names are stamped using Elzybells alphabet stamps with versafine black ink.
I added clear dew drops to look like bubbles.
 
That's it for today!
 but I'm going to schedule more posts for this week.
I have been doing quite a bit of sewing over the summer
and have also been to classes to make some christmas projects .
Rather than mix the papercrafts and sewing on this blog, I've created a new blog just for sewing.....Richard is laughing....
he says if I can't keep up with one blog how will I manage two!
Well, I'll just have to prove him wrong won't I!  lol
 
My new blog is dillydoodle (if anyone is interested click here!)
Here's a wee peek of my latest project...
 
 
Thank you for coming to visit today :)
See you soon
Sarah xx
 

Saturday, 4 August 2012

New scrap map at CCW

Hello again!

Oh dear, I'm not much good at blogging in the summer......
At the minute I've come down with the flu so I'm writing this post in fits and starts.

As it's the first Saturday in the month (can you believe it's August already!!) we have a new scrap map challenge at Creative Craft World.

This is my take on the sketch

 I used the 'Echo Park Hello Summer' kit and for once I didn't use my Cameo!
I tried to do some paint splatters (lol) with pink paint but I think more of it ended up on my poor laptop than on the page....

The sketch

I cut nine 1½" squares from 5 sheets of the double sided papers and inked the edges with antique linen distress ink. After adhering them to the page I added various sized buttons from Fancy Pants.


The photo is of  Phoebe crossing a wooden bridge at a beauty spot near our home.  She was petrified of the water rushing underneath it so Caleb crossed first and encouraged her from the other side. 
I can remember being afraid of this same bridge as a child and I'm still not keen on crossing it now!

The banner underneath the photo and the sentiments are stickers from the Echo Park kit.


The title is also made with stickers from the kit and I added a doodled string with black pen.  I pierced holes at the 'ends' of the string and put red brads through to 'pin' the string to the page.
To frame the whole page I added faux stitching ¼" from the edge using my Tim Holtz ruler as a guide.

I haven't got round to adding the journaling to the page yet but I made this tag to hide behind the photo.  I cut one of the journaling tags from a sheet of paper in the kit and matted it on to green card.  Using my SU tab punch, I punched a tab from the chevron paper and taped it to the top of the tag.  I hand cut a heart and added 2 mini gems for a little bit of bling!

Don't forget there's still time to enter the mini monochrome challenge at CCW too.
You can find it here.

Thank you for coming to visit my blog today,
I can't promise I'll be back soon but I will be back as soon as I can :)
I hope you have a great weekend!
Sarah xx

Friday, 20 July 2012

Cards using CCW's July mini kit

Good morning everyone!

I've been missing for a while haven't I?
It's been very busy at home with the children and poor wee Mac (our puppy) has been very unwell
after a visit to the vet but I'll tell you more about it in another post.
I'm still very cross with the vet and don't want to say something I'll regret!

As it's the 20th of the month it's time for the new mini challenge at Creative Craft World.
This time instead of a mini book, I've made some cards.
You can get the mini kit here on CCW's website - it's a bargain at £7.99!

We'd love it if you made a card or project this month and entered it in our challenge here.

For this first card I decided to make it easel style.
There are lots of gorgeous flowers in the kit but I forgot to use them and made my own punched ones.
I found the pack of flowers under my scoring board when I was tidying up afterwards......

I found these Lili of the Valley images in one of my storage baskets and I think they were a free gift from a magazine (must have been ages ago!) and I can't remember which one.
I'm not usually a fan of fairies or angels on cards but I do think she's very pretty and I enjoyed adding glamour dust to her wings ;)
The brown ribbon and white card are from my stash and everything else is found in the kit.

Edited to add: I think I better clarify :)....angel & fairy images are not my favourites on cards...
but.... the tooth fairy is VERY popular and welcome in our house at the minute! 


This next card is made using the card and papers in the kit.
I cut the butterfly with the Cameo and added seed beads to the body with glossy accents.

 I hand cut the banner and stamped the sentiment - I think it was a woodware clear stamp.


...and now for my first Christmas card this year!

It wasn't intentional though....the little image is another freebie and when I had her coloured I thought it looked quite Christmassy so I printed the sentiment on the computer and popped it on foam pads.

To give a little sparkle I added 3 red gems under the sentiment.
The ribbon, card and paper are from the kit.


The little image and sentiments on this next card are from DigiStamp Boutique.
The flowers and leaves are handcut and I rolled the flowers and twisted and tweaked them into shape.
I doodled lines on the leaves with a fineliner pen.

 The image is coloured with Copics.
The cardstock, papers and twine are from the kit.
I'd like to enter it in the Digistamp Boutique monthly challenge.


I really enjoyed making these cards and I'm pleased at how they turned out.
I hope you like them too :)

 we'd love to see what you make!

I hope to be back blogging properly very soon.
I have lots of projects to share but it's hard getting the time to upload them to the computer!
Thank you so much for your comments even though I haven't had time to reply back
I really do appreciate them :)
Have a lovely day
Hugs, Sarah

Sunday, 8 July 2012

Less is More.....Gold

Good afternoon everyone :)

It's been another couple of weeks since I  last entered the LIM challenge
and as I was at home yesterday for the first Saturday in ages, I was determined to make a card.

The challenge this week is to use 'Gold' on your card.
I think I've only ever made a card with gold on it once before and that was for a Golden Wedding anniversary so I don't think it's my favourite colour!

I definitely found this a challenge.
I didn't like the first card I made so I did another....I'm not too keen on it either
but I'll take the plunge and share them both ~ warts and all!

1st card
For this one, I stamped the sentiment and then punched tiny flowers with SU boho blossoms punch from gold card.  Next I arranged them in a heart shape on the card. (I used my largest nestabilities heart die as a template)
Then I added opal liquid pearls to the centres.

2nd card
For this card I cut 2 flourishes from gold card using Tim Holtz elegant flourishes die.
I  then embossed them with the swiss dots embossing folder and glued them to the base card.
I stamped text on two Prima flowers and added a gem brad through the centre.
Next I stamped a (Kaisercraft) sentiment with versamark ink and sprinked it with gold detail embossing powder.  I layered it on gold card and adhered it to the card. To finish I added tiny dots of liquid pearls around the flourishes.

To enter the LIM challenge,  just click here.

I'm looking forward to visiting all your blogs later.
Enjoy the rest of your weekend :)
Take care
Sarah xx

Saturday, 7 July 2012

Wedding Day scrapbook page

Good Morning :)

Happy Saturday to you,  I hope your weekend is going well.

As it's the first Saturday in the month we have a new scrap map for you at
Creative Craft World.

This is my page

As it's our 17th wedding anniversary tomorrow I thought I would make a wedding page this month.
The time has flown by and it seems like yesterday we were walking down the aisle!

The papers are Bo Bunny 'Persuasion'.....


The pebbles are Prima and I thought the colours went well with the papers.


For the left hand corner of the page I punched tiny flowers with SU Boho flowers punch and added tiny pearls to the centres.
My little nephew and neice were pageboy and flowergirl and they are all grown up now.
My nephew has just graduated as a pharmacist!


The leaves/flourishes and the border were cut with the Cameo and I added tiny pearls among them.


This is the scrap map for this month and we would love you to enter your layouts here.

The challenge runs for a month until the 4th August.


I hope you have a wonderful weekend
and I'll be back soon :)

Take care!
Sarah xx

Friday, 6 July 2012

Get Well Soon

Good Morning :)

Just a quick post this morning....
between the children and the puppy I don't have time for much else at the minute!

I made these cards a couple of weeks ago but forgot to upload them here.


I cut out all the elements of this card with the Cameo and I shaped the leaves and flower before adding them to the card with Pinflair dimensional glue. 
The sentiment is a clear stamp by Kaisercraft and it is inked with an SU marker.


After making the 6"x6" card, I thought I'd make a couple of smaller ones and used card candy for the centre of the flower instead of a button. I also glued the leaves and flower flat in these cards.
The butterfly trails were cut with the Cameo as well and you can find the cutting file
in the Silhouette America store.


All three cards together.


Thank you for popping in today :)

I'll be back tomorrow with my scrapbook page
and details of this month's scrap map challenge at CCW.

Take care
Sarah xx

Tuesday, 3 July 2012

UKS Blog Hop with Creative Craft World - an altered Recipe Box

Good Morning!

I hope you're keeping well today:)
I have to warn you....this is a long post!

It's the day of the UKS Blog Hop and I have made a project for Creative Craft World.
I'll keep it a surprise until you scroll on down..... :)

I've created a shopping list for the project at the bottom of this post
AND
as a special offer today only,
Creative Craft World are offering a huge 20% discount off everthing in store when you use the code UKSBlogHop
AND
if you place an order using the code, you have the chance to win one of CCW's fabulous kits.
AND
MME Howdy Doody Collection is on special offer today too!
(you'll see why later...)

When you visit the Creative Craft World shop you'll find everything on the left hand sidebar and remember to enter the code at the checkout!

and now for my project...

First you need a box with a lid.
This one is from Lidl (I think these Formil tablets are the best washing tablets ever!)
It's a good strong and sturdy box and it has the added bonus of having little tabs to keep the box closed.


Lightly sand the outside of the box with fine sandpaper ~ just enough to take the shine off it and make it easier for the paint to stick to it. 


 Next add a coat of gesso primer and two coats of white acrylic paint.
You really only need to do the edges of the outside and all 4 sides inside but I got carried away and covered the whole lot...!


When the paint is dry, you can cover the box with the paper.

I used My Mind's Eye Howdy Doody collection to create a whitewashed wood effect.
I measured all the sides of the box and cut the pieces from Beautiful Whitewash paper. I then adhered them to the box with this Stix 2 tape along the edges and a spread of tacky glue in the middle.
I cut two rectangles to fit inside the lid and the bottom of the box with
Beautiful Roses paper using the reverse side. 


I picked the heart and decorative round buttons from the Lovely Pins & Buttons set for the front of the box.
Because the box stays closed with the tabs the buttons are mostly decorative but I wrap the twine around them just for added security.

To attach the buttons, I sewed them on with Like twine. I placed the buttons on the box and marked through the holes with a pencil.  Then I pierced the holes with a pricking tool and sewed the buttons on, tying off the turquoise one with small knots at the back.


I sewed the heart button on and left two long lengths of twine and tied a bow twice at the front so it won't open. I clipped one of the lengths shorter and used the other for wrapping around the two buttons.


This is the finished outside of the box and I'll show the lid in more detail further down the post.

For the front I added two 'Lovely Small Stickers' to the bottom left corner and then cut a rolling pin with the Cameo and adhered it over the top.  I added 'baked with love' using print and cut.


For the back and sides I cut the flowers from 'Happy Decorate' paper and dry embossed them on the back with a paper shaper tool.  I adhered them to the box with Pinflair glue gel.
I dotted Papermania purple pearls among the flowers to match the MME rhinestones on the top.


I really enjoyed making the top of the box!
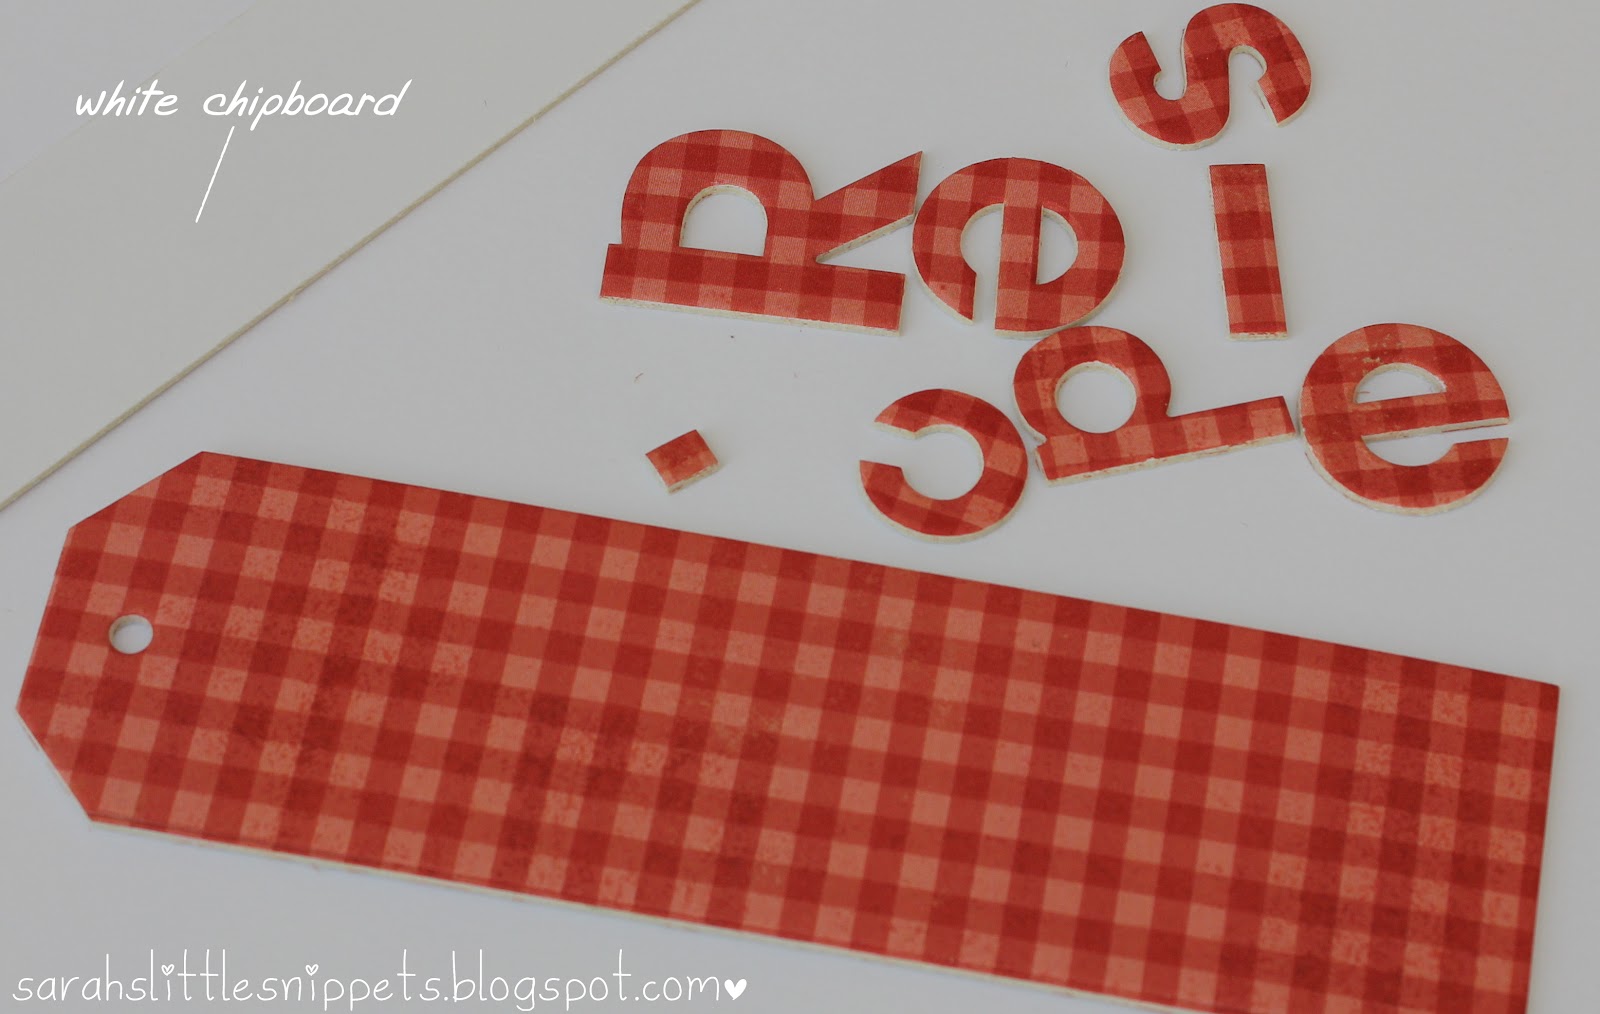
To make the letters, I glued the gingham paper to white chipboard (I got it from The Papermill Shop a long long time ago) and cut the letters and tag out with Cuttlebug 'Red Tag Sale' dies.
I layered the letters onto another piece of white chipboard on top of the tag and threaded lengths of 'Like Twine' through the hole at the end. Then I glued it all to the top of the box.

I'm not really a cook but I love baking! So I thought this would make a perfect box for all my sweet recipes :)  I took two stickers from the 'Beautiful Layered Stickers' set and added them just above the letters.  Then I tucked 2 pins underneath the round sticker, cut the rhinestone flourish in half and adhered it as shown in the photo.


The flowers were cut from 'Beautiful Roses' paper, dry embossed and shaped and then adhered on the top with Pinflair glue gel.


Inside the lid I added the 'Happy Wood Die Cut'  which I sprayed with Mister Huey misting spray in Calico White.
When it was dry, I stamped 'from the kitchen of'' using a Stampendous clear stamp
and then stamped ‘Sarah’ with Doodlebug alphabet stamps.
For the inside I made little divider cards and decorated them with the Howdy Doody papers.
I added embellishments from the list and stamped little sayings from various 'cooking themed' stamp sets.


As there is so much detail on these cards it is difficult to explain everything but if there's anything you'd like to know just email me or leave a comment (my address is on the side bar).


I think this post is already reaching mammoth proportions!


I cut the kraft divider card with the Cameo and doodled faux stitching back and front with a micron pen. 
So I can quickly find the recipe I need, I printed a numbered recipe list on white card and taped it to the back of each card.


This is one of the recipe cards I made in Word, using WordArt and text boxes.
The font is Blessings through Raindrops.
This recipe is one of my husband's favourites!


Even though the embellishements make the box top heavy, it is still sturdy enough to stay upright when the lid is open.


THANK YOU!
for making it all the way to the bottom of this long post.

It took me nearly as long to write the instructions as it did to make it.....lol

This little box has been a pleasure to make and I hope it has given you some inspiration.
They make fab presents.

Please send me a link or a photo if you do make one.
I'd really love to see it :)

I'm going to need some recipes to fill the box so it would be fantastic if you could send me your favourites! 

SHOPPING LIST ~ these are a real bargain today! Just remember the code UKSBlogHop for an extra 20% off the price.
2 Beautiful Whitewash
2 Beautiful Roses
1 Happy Decorate
1 Like Ledger
1 Like Twine
1 Lovely Pins & Buttons
1 Beautiful Rhinestones
1 Happy Wood Die Cut
1 Lovely Small Stickers
1 Beautiful Layered Stickers
1 Baby large Stickers
Baby Journal Card
Beautiful Journal card
Kraft card

 To follow the blog hop, you'll find all the details on the Creative Craft World blog here.

Thanks for for taking the time to visit today
and I'll be back soon :)
Take care
Sarah xx

I'd like to enter this in the following challenges:
Make it Monday #96 ~ anything goes
CBN Mon #1 ~ anything goes
Stampalot ~ what's your passion? ~ (mine is definitely altering things!)
Tuesday Alchemy #21 ~ anything goes