Wednesday, 14 November 2012

Pink Christmas Card

Back with my 2nd post today and I have a pink Christmas card.
A while ago I won a voucher to spend in The Paper Shelter and I've had great fun spending it.
There are so many digis to choose from, I hardly knew which ones to pick!
 
This is the one I've used for my card today.
 
It's a precoloured image but it also comes with just the outline for you to colour yourself.
My crafting time is limited at the minute so the precoloured image is very handy!
I inked around the edges of the image with Versamark and embossed with WOW embossing powder.
I also heat embossed a strip of pink card and then cut the snowflake with a Tim Holtz die.
It's really sparkly in real life!
I added Stickles to the snow on the log and around her feet.
Then I layered it on pink card, tied twine around and finished with a pink button.
Then layered it all on a pink card blank with foam pads.
 
Thank you for stopping by my blog today,
Don't forget to stop by tomorrow for Trish's Christmas planner!
Enjoy the rest of your day :)
 
Take care
Sarah xx
 
I'd like to enter this card in the following challenges:
In The Pink ~ pink CAS (I hope it's CAS enough!)
Bearly Mine ~ pink Christmas
Crafty Sentiments ~ Christmas
Hooked on Craft ~ Christmas no red/green

Day 14 and it's Origami Santas!

Hello again!
We're almost halfway through our Christmas Countdown at Creative Craft World
and Sue has some festive origami santas to share today.
They look like great fun and if you pop over HERE, you'll find out how to make them!
 
 
Tomorrow Trish has a notebook/planner which she has decorated using her Silhouette.
It really is gorgeous, so do come back and see it :)
 
I'll be back later this morning with a 'pink' Christmas card.
Sarah xx

Tuesday, 13 November 2012

Envelope Pocket mini book

Hello everyone,
My project today is one I was asked to make for my friend who retired from teaching this year.
We met through crafting and she has been so good to me...like a second Mum!
Her daughters' asked me to make something that would hold notes/tags from people who had written
little anecdotes about their Mum.
 
I decided to go with a pocket book made from envelopes.
....this was my 2nd attempt....the 1st ended up in the bin....
 
I hardly know where to start to explain how I made it....lol
 
It's made with 5 pieces of chipboard - the front, bottom, back, top and flap.
I covered the pieces with My Mind's Eye 'Wild Asparagus' paper
leaving a 5mm gap between the joins.
The front flap was cut using a Tim Holtz 'on the edge bracket die' and I added
a magnetic closure on the inside of the flap and on the outside of the front before covering with paper.
 
 
The inside is made with envelopes joined together accordian style.
I took nine kraft envelopes (I find PaperMill luxury C6 really good quality) sealed them and then cut off one end.  Then with a circle punch, cut a large notch out of the cut end.
I inked around the edges with vintage photo distress ink and let dry.
Then taped the envelopes one on top of each other with DS tape.
 
 
I added the lace around the front of the album before taping the envelopes
to the inside on the back and front.
The flowers are Prima and the metal corners are from Forgetmenot Papercrafts in Belfast.
I added two little pins and a sprinkling of adhesive pearls around the flowers.
 
 
I printed the word 'memories' on matching paper and added it to the metal (Tim Holtz) frame.
I put the brads through the chipboard before covering the inside so the metal pieces wouldn't show.
If the book is now filled with the tags, I'll see if I can get a photo to show it finished!
 
I found it a challenge to make....on my first attempt the paper kept splitting at the joins.
I think the paper was just too wet and I was stretching it too much.
Apart from all that, I was pleased with it when I had it finished and I know that my friend loves it too and that's the main thing!
................................................
And now for the link to the next project.
It's day 13 and Lou has a gorgeous Christmas journal to share.
We only have a sneak peek and I'm dying to see inside.
You can find it HERE
 
 
Thank you for visiting today and a big 'hello' to welcome my new followers!
Tomorrow I'll have a link to Trish's Christmas project
 and maybe even have something of my own too :)
 
Have a lovely day,
Take care,
Sarah xx
 
I'd like to enter this album in the following challenges:
MIM ~ anything goes
Lady Anne's Challenges ~ anything goes
Love to Create ~ fancy edges
Stamps & Fun = creativity ~ anything goes
Tuesday Alchemy ~ anything goes
Oldie but a Goodie ~ anything but Christmas (all except the flowers are more than 6 months old)
Papertake Weekly ~ flower power

Monday, 12 November 2012

Christmas treat bags

Good morning everyone,
 
I hope your weekend went well.
It's my turn again to create a project for Creative Craft World's
Christmas Countdown.
 
I like to make the children's teachers a little handmade gift at Christmas,
so this year I thought I would make some pretty packaging for some chocolates.
 
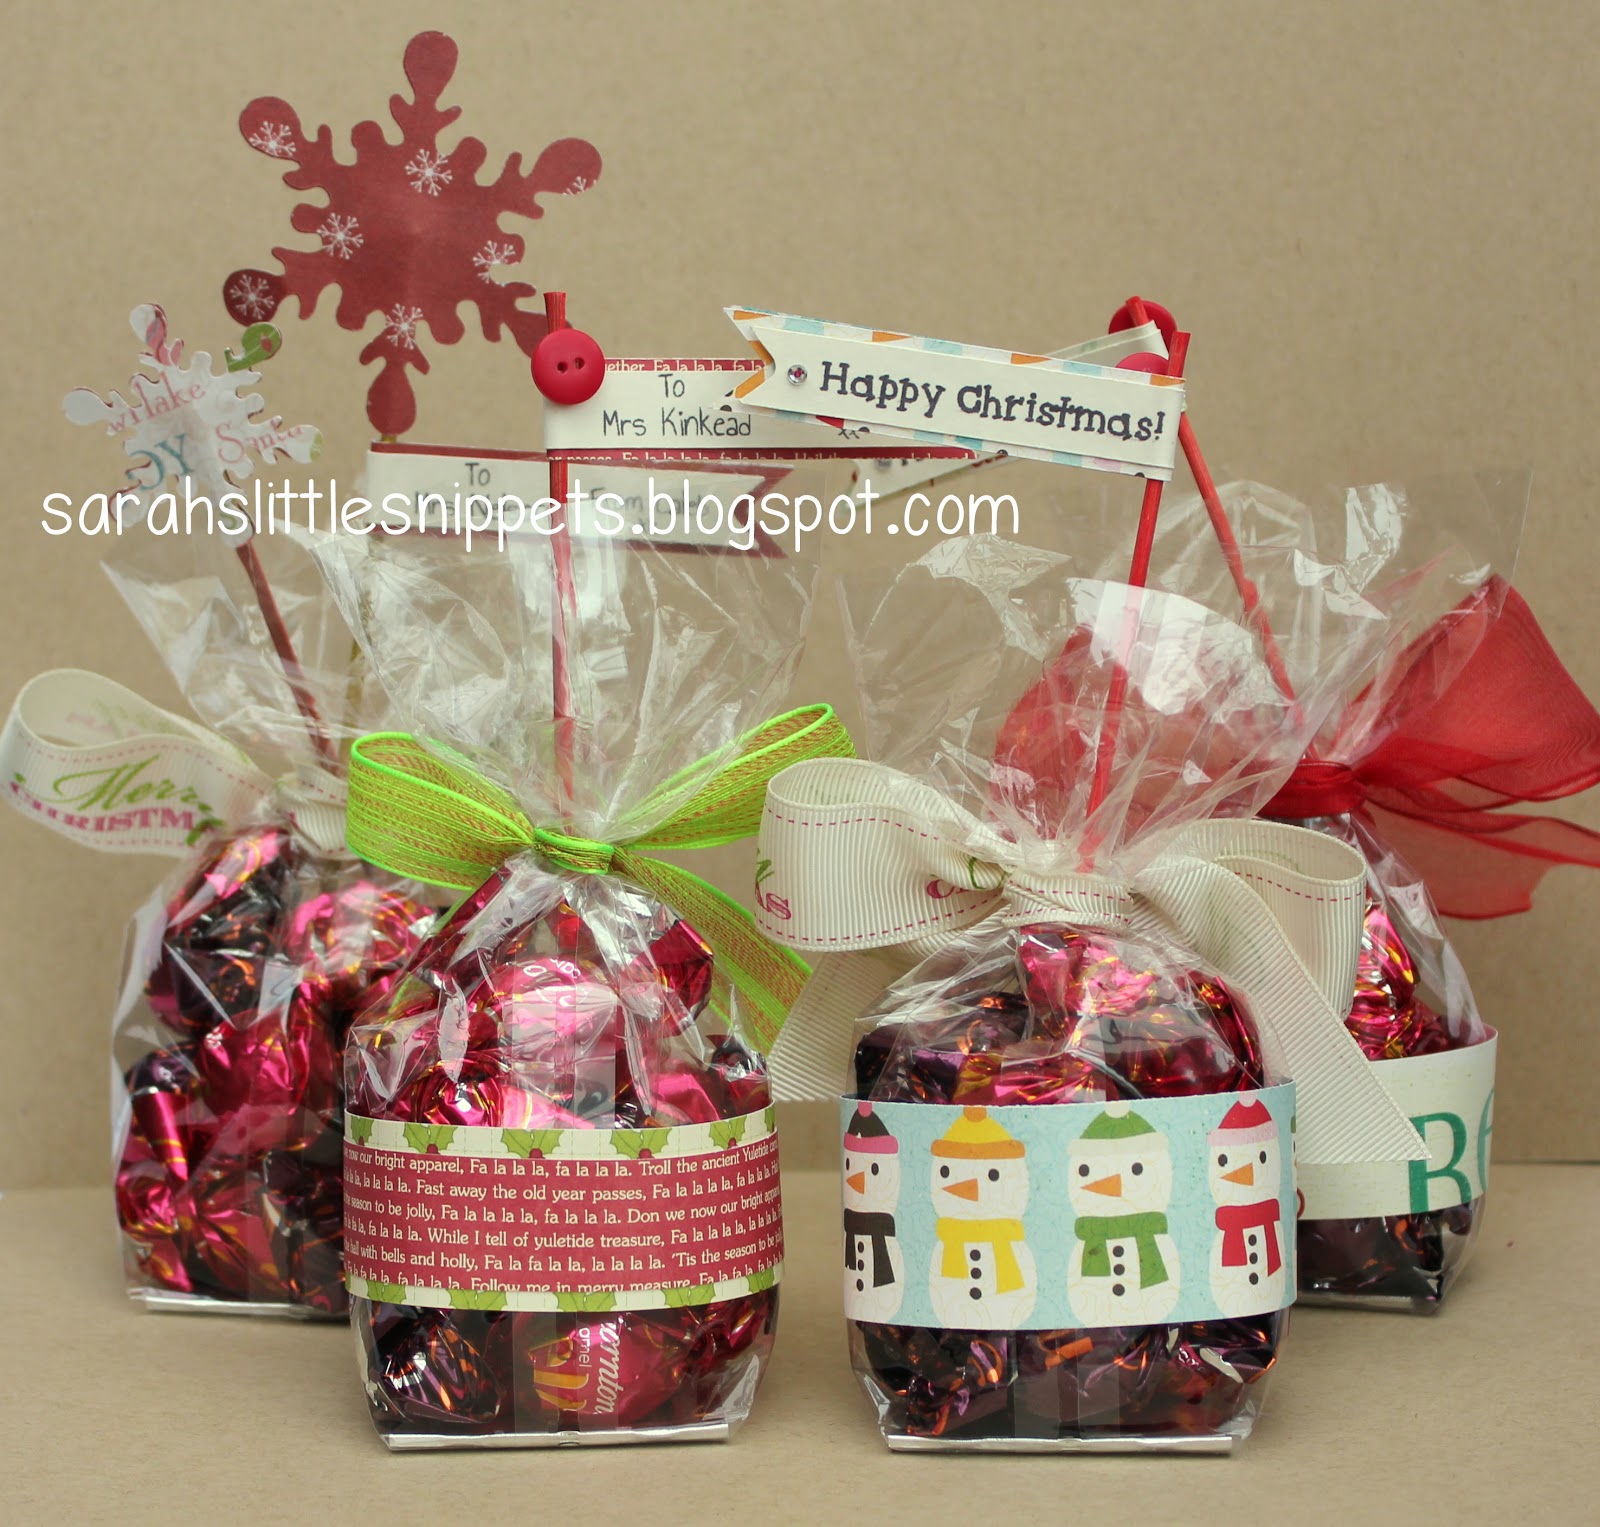
and here they are....
 
They are very easy to make!
 
You just take a cello bag (it's better if you can get one with a gusseted bottom or one with card in it like I have) and fill with chocolates.
It's very tempting having chocolates on my desk and I have to say they are YUMMY!!
 
For this bag, I just tied the top with ribbon and then made some toppers
with snowflakes cut out with my Silhouette Cameo.
Next, I cut two wooden skewers to size and coloured them with Copics.
Then layered the snowflakes with the stick in the middle and finished it with a button and some gems.
The banner with the sentiment was also cut out with the Silhouette,
wrapped around the stick and held in place with wet glue.
 
Regular readers of my blog may recognise this little gingerbread man from HERE.
 
I used the same cutting file and just reduced it in size before cutting him out of kraft card.
I layered two lenghs of Christmas paper together (one narrower than the other) and wrapped them around the bag, with the join at the front.
I covered the join with the gingerbread man, popping him up with foam pads.
The banner was made with matching paper with the sentiment on one side
and the to/from details on the other side along with a matching button.


 This 'Merry Christmas' ribbon is available to buy at Next!
 
 The back of the bags
 
The little banner - on one side 'Happy Christmas', on the other it's personalised with the teacher's name.
A wooden skewer, trimmed to size and coloured with a red Copic pen.
 
Supplies list
cellophane bags ~ with a gusset or a firm bottom (teehee...)
I got mine from a chocolate factory.
ribbon
chocolates ~ I used Thorntons Praline melts and Caramel melts
wooden skewers
various Christmas papers
buttons and gems
 
I hope you have enjoyed these little treat bags today,
and if you pop back tomorrow I'll have a link to Lou's blog where she will have a tutorial for a Christmas journal.
 
I'll also have a little project of my own that I made way back in the summer
but I'm only able to share it now, as it had to be kept secret!
 
Once again, thank you for stopping by today,
and I'll be catching up with you all later :)
Take care,
Sarah xx
 
I'd like to enter these in the following challenges:
MIM ~ always anything goes
Crafty Bloggers Network ~ Christmas anything goes
Forever Friends ~ ribbon and/or twine 
 

Sunday, 11 November 2012

Day 11 Christmas Countown

Hi everyone,
Thank you for your good wishes yesterday for my hospital appointment.
I'm glad to say the nerve conduction tests were nowhere near as painful as I'd imagined,
they just stung a bit!
Unfortunately they confirmed the diagnosis of Carpal Tunnel syndrome
and it has progressed past the stage that wearing splints could help.
My next option would be steroid injections into the wrists or surgery.
I'm not keen on either but I'll have to wait and see what my own Dr says after he gets the report.
I just wish it wasn't so painful at night....
 
Anyway, enough of my problems!
 
I'm here to tell you of a fab idea Sue has for using up your older Christmas papers
to make envelopes.
You'll find the tutorial here.
 
Tomorrow it's my turn again and I'll be sharing some cello treat bags for Christmas.
They're part of the teachers' gifts for this year so I hope none of them are looking at my blog...
 
Thanks for popping in today
and hopefully I'll see you back again tomorrow :)
Enjoy the rest of your weekend,
Sarah xx

Saturday, 10 November 2012

'cool company' Christmas card

With Christmas fast approaching I have another card to share today.
It's only the 3rd Christmas card I've made so far, so I'd need to get my skates on!
 
I've been trying to use up some of my forgotten/older stash for my cards this year.
I have no room to store anything new!
 
Supplies used
White card ~cut and scored to A6 size
Patterned Paper ~ DCWV Christmas multi stack (6x6")
Red card ~ cut with Nestabilites labels 8 die
Green card ~ embossed with Cuttlebug snowflake folder
Stamp ~ Penny Black 3743K 'cool company'
Ink ~ Memento black
Coloured with Copics
Red/White ribbon, Christmas twine & Green star button
Stickles 'star dust'
for the dots of snow in the background, but they haven't shown up too well in the photo.
 
 
....continuing on the Christmas Countdown....
I hope you've been enjoying the lovely festive projects shared by the DT
We're now on day 10 and Morag has a winter scrapbook page here
 
 
and that's it from me today!
I hope you're all enjoying your weekend :)
I have an appointment at the hospital this morning for a nerve conduction study
for Carpal Tunnel syndrome.
I'm dreading it a bit because I don't know what to expect and it sounds possibly painful??
Maybe it won't be as bad as I think :)
I'll let you know how it goes....
 
All the best
Sarah xx
 
I'd like to enter this card in the following challenges:
Penny Black Saturday ~ cute Christmas
One Stop Craft ~ anything goes
Krafty hands ~ Christmas
2 Sisters ~ favourite Christmas stamp
CSAYL ~ anything goes
Fun with shapes & more ~ the 1st snow (Christmas/winter, white base colour)

Friday, 9 November 2012

Day 9 CCW festive project

Good morning!
 
Thank goodness it's Friday :)
It's another quick post from me this morning with a reminder o
Creative Craft World's Christmas Countdown.
 
Today Ali is sharing a gift holder which you can find here.
 
I may be back later today with a project of my own, but if not,
I'll have one for Saturday.
Take care,
Sarah xx

Thursday, 8 November 2012

Christmas card with Barry Bear

Hello again!
This is my second post this morning and here's the Christmas card
I said I would share when I got a photo of it :)
 
 
 I love kraft and white together for Christmas along with traditional red and green.
So for this card I stamped white dots on the base card and added strips of patterned paper then tied satin ribbon around the top and finished with a snowflake button.
 

This little teddy is a digi from The Stamp Fairy and he is actually standing beside a birdhouse but for this card I cut it off.  I love this wee image so much you'll be seeing more cards with him soon!
He is coloured with Copics and raised with foam pads.
I added Stickles 'star dust' to his hat and bobble on the top.
 
 
It's a beautiful morning here today and my Mum
very kindly came over to help me with the housework
and then took away a big basket of ironing to do, just so I can get my DT projects finished.
Isn't she lovely!
 
That's it for me today, it's been lovely to have you vist :)
See you tomorrow
Take care,
Sarah xx
 
Supplies used
Bazzill kraft card
DP ~ Three Bugs in a Rug 'Let it Snow'
Digi image ~ The Stamp Fairy
Sentiment ~ Playtime font
Background stamp ~ Unity
White Ink ~ Elzybells pigment ink
Stickles 'Star Dust'
Snowflake button ~ Dress it up
Satin ribbon
Copics ~ C1,3,5...E53,31,33...R00,20,32,35,46,37
 
I'd like to enter this card in the following challenges:
Ready Teddy Go ~ don't be square
Whimsy Stamps ~ traditional Christmas colours
Bearly Mine ~ anything goes
Just keep on creating ~ anything goes Christmas
Oldie but a Goodie ~ spots & stripes (DP, ribbon & button all older than 6 months)
Sweet Stampin ~All that glitters

Day 8 Christmas Countdown

I have a really quick post this morning
with a link to our Guest Designer Natalie's project.
You'll find all the details HERE on the Creative Craft World blog.
 
She has made a Christmas banner and from what I can see in the photo, it looks lovely.
 
 
I had a Christmas card to share this morning, but when I took the photos of it yesterday
the lighting was terrible and the photos just weren't right.
So I'm going to try and retake them again this morning and post the card later.
 
Sarah xx

Wednesday, 7 November 2012

18th Birthday card

Hello again!
 
Can you believe I'm managing to schedule a post every day!
It's amazing what you can do when you put your mind to it, isn't it?
( The housework has been put on hold though....lol)
 
This weekend is one of my nephew's (I have 10 of them!) 18th birthday.
As well as having a party with his friends he is having another party for family.
Sadly we won't be able to go because my brother (Nathan's dad) is in the middle of chemotherapy
treatment and Phoebe's chicken pox could be extremely dangerous for him.
 
This is the card I've made to send to Nathan.
Earlier in the year, I won a challenge at Ladybug Crafts Ink and my prize was a voucher for the shop.
I love digi images so that's what I bought with my voucher.  As soon as I saw this image it reminded me of my nephew and I knew it would be perfect for his birthday.

The papers are Echo Park 'Note to self'.  I didn't intend the card to have as many layers but they're covering up a few mistakes... things stuck in the wrong place and then the paper tearing as I removed them...you know how it is!  lol
The large star though is to cover up a sentiment on the background paper that I don't think Nathan would appreciate....
When I stuck the image down I realised that beside it,
it said in bold orange writing 'one thing after another'.
Well, Nathan like many teenagers gets into mild scrapes and lately it has been 'one thing after another' so I didn't think he'd appreciate it pointed out to him on his birthday!
 
The number and stars are cut with the Silhouette
and the sentiment is computer generated using 'Oleo' font.
I coloured the image with Copics.
Skin: E00, 11.....Hair: E51,53,33, YR20
Trousers: B93,45....Railings & Ground: C1,3,5
Cap:R17, YR07

a close up of the layers

I also have a reminder of the Christmas Countdown over at Creative Craft World.
Today is day 7 and it's Trish's turn to share some stunning Christmas cards
she's made using her Silhouette.
 
Here's a little peek.....pop over to her blog HERE for the tutorial.
 
I know I always say it but I really do appreciate you stopping by my blog.
Your comments are a treat to read :)
 
I'll be back again tomorrow
with another Christmas link and maybe a project of my own to share too.
Take care!
Sarah xx
 
I'd like to enter my card in the following challenges:
Cards for men ~ anything goes
Ladybug crafts Ink ~ In the office  (does the string wrapped around the star count?)
Lexi's Creations ~ special birthday
The Pink Elephant ~ favourite colouring medium (Copics)
Kaboodle Doodles ~ anything goes
Make it Monday ~ anything goes
Here come the Boys ~ Die cuts/punches
Allsorts ~ for men only