Wednesday, 29 February 2012

Mother's Day card

I thought it was about time I used my Stampin' Up stuff......I've been hoarding it for far too long!

I made this card using Springtime Vintage paper on a naturals ivory card base.
I used the Baby Blossoms stamp set to stamp the background and then fussy cut the flowers from a sheet of paper.  I embossed the back of the flowers with a petal shaping tool and glued them to the card with pinflair dimensional glue.

 The ribbon is Mellow Moss taffeta and the sentiment is from Elzybells stamped with Chocolate Chip ink.


Oh my poor tooth!
After all the worrying and stressing.... I was just getting ready to leave the house this morning when I got a phone call from the surgery.......the dentist was off sick!
and the appointment was cancelled.....
Talk about being relieved......then estatic.......until I realised......I've got to go next week instead....!

I'm pleased to say the tooth fairy came last night, much to Phoebe's relief.
Having tucked her into bed early I was surprised to hear what can only be described as 'wrecking noises' coming from her room. When I went to investigate, I found her with her curtains opened and trying to open the window! 'Just making sure the fairy can get in', was her explanation......after telling her the fairy was small enough to slip under the door, she settled down to sleep.
Next morning she informed me that when Peppa Pig lost her tooth, the tooth fairy had to come through the window.....and that's why she was opening hers.......

Thanks for joining me today!
Sarah xx

Tuesday, 28 February 2012

Quick and easy thank you card

Hello everyone!

I had 101 things needing done today but I ended up having a play instead :o

A lot of it ended up in the bin, but I've kept this one.....
....it reminds me of summer!

 The base card is linen effect from the Papermill shop.  The coloured card and ribbon are Stampin' Up.
The sentiment is stamped with Chocolate Chip ink.

I punched two flowers with the Boho Blossoms punch, layered them and pierced a hole in the centre to put a brad through.

Phoebe came out of school beaming from ear to ear today and clutching a little clear poly bag.
Inside was her tooth!
My baby lost her first tooth today and is eagerly awaiting bedtime for the tooth fairy to come......
why do they have to grow up so fast? 

Speaking of teeth, I have a dental appointment in the morning and I really don't want to go!
I fractured a filling months ago and I've been putting it off ever since....
I know if I don't get it fixed it will eventually cause problems.....
I'm a coward where fillings are concerned :(
 it is true that dental nurses make the worst patients.....

I hope you all had a lovely day today
and thank you for visiting!
I'll be back tomorrow with a Mother's Day card.
Sarah xx

Monday, 27 February 2012

Gingham baby girl card


Good afternoon!

Thank you for all your good wishes on Saturday, we had a delicious meal and birthday cake :)

I have a little baby card today made with gingham card I bought in Forgetmenot Papercrafts in Belfast. 
I'd like to enter it in the Less is More challenge again but if it's not CAS enough just let me know!


I was poking through my scraps box again and found this baby paper ~ I think it's DCWV Nana's nursery and I cut some circles from it. I punched a scalloped border from white scrap card and added it along the top and a thin plain strip along the bottom too. The sentiment is inked with Certainly Celery and Regal Rose Stampin' Up markers and the stamp is from Elzybells (sadly closed) The little hearts were punched with a mini xcut punch. The tulle and ribbon are scraps as well.

Thanks for visiting today!
Sarah xx

Saturday, 25 February 2012

Less is More challenge - Don't scrap it!

I finally got Richard's card made.....on his birthday - how bad is that!

Thankfully the Less is More challenge this week was just what I needed for inspiration - it's to use your scraps and I'm sure like everyone else, I have loads of them :)

I mentioned in my last post how I was trying to think of something funny/sarcastic to put on the card but I didn't quite manage it!  He thought it was funny anyway (helped by the quote inside that my lovely cousin Vicky gave me!)
I would take a picture only I didn't have time to print an insert and my writing is terrible!


 The ribbon is from my scrap tub, papers from the scrap drawer (except the card base) chipboard is scrap as well.  Says a lot about me giving my husband a card made of scraps  lol (I do love him really ;))

I covered chipboard with brown card and cut out the numbers with the Cuttlebug 'red tag sale' die.  Then stamped them using the blotches? stamp from Stampin' Up French Foliage set using white ink.  I'm sorry I can't remember where I got the brads from - there wasn't any packaging with them. The white card is embossed with the Stampin' Up square lattice embossing folder (my favourite!)

Here's a wee pic of my ribbon scraps - they're usually for the children to have a rummage through...

and my scrap drawers, I'm afraid I'm a bit of a hoarder and keep tiny pieces as well....


I'm off now for a yummy birthday lunch ~ no calorie counting for me today :)

Thank you for visiting
I'll be back this evening to catch up with you all!
Sarah xx

Baby Gift Bag

Hi everyone!

Hope you're all well and enjoying the warm weather :) It's lovely to see our daffodils making an appearance and it'll soon be time to cut the grass ~ I love spring!

This is the baby Gift Bag I made to match the baby card here
To make the tag, I punched card and paper with varying sizes of Woodware circle punches and layered them together. The name Fionn - pronounced Finn (I think it's old Irish spelling) is die cut with the Cameo.  For the ribbon handles I used seam binding.


I've made a tutorial on how to make the gift bag here.

It's Richard's birthday tomorrow and I am so late making his card.......
I haven't even started it yet.....I've been putting it off for so long ~ it's his 40th and as I'm 13 weeks older than him, he has been teasing me all this time that he is still 'only' in his '30's'!!! lol
I was trying to come up with something funny/sarcastic but it's not happening!!!
Any ideas???

I think the trouble is.......it bothers me more that I'm 40 than it does him.......lol

See you soon
Sarah xx

Edited to add: I've just realised I didn't get this posted until after 12 o'clock last night ~ his birthday is today. eeeeek!

Tutorial for a Gift Bag using A4 card.

I get asked quite often how I make my gift bags so I thought I would do a tutorial :)

There are a lot of photos but I've tried to make it as simple as possible and hopefully the pictures will explain it better than I can write it! If there's anything that is not clear, let me know and I'll try to help :)

It's made with 2 sheets of A4 card scored EXACTLY the same.


To start, lay your card portrait (short edge to the top) on your scoring board


Score at 5cm and 19 cm


Turn the card 90 degrees
anti-clockwise so the card is landscape.


Score at 21cm and 29cm.


Score at 25cm, down as far as 12cm from the top edge.


Score from the 12cm mark to the corner of the score lines to the left and right. You should have a triangle shape.
I have marked the score lines with a pencil so you can see them clearly.


Cut the card as shown in the picture.


Cut from the bottom up to the first score line.


Fold the top downwards along the score line and fold the bottom upwards along the score line. 


Fold two of  the vertical score lines towards the left.


Fold the centre score line back as shown in the picture.


Fold the triangle score lines back.


Turn the card over so the outside is facing up and apply tape to the small flap on the left.
Lay the two pieces of card side by side as shown in the picture.

Tape both together making sure to line up the top and bottom fold lines.
You can now stamp or embellish your bag.

Turn it over so the inside is facing up.


Fold the left side over and fold the right side over.


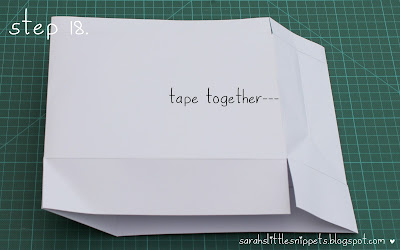
Tape together, lining up the score lines.
Fold the top of the bag over creasing with a bone folder to give a crisp edge.
Apply extra strong tape to the bottom as shown.  I use Stix 2 double sided tape - it's very sticky and almost impossible to separate once it's stuck down.
Apply tape to the rest of the flaps as shown.
Tape the bottom three flaps together.
Tape the last flap closed.
Now it's time to make the holes.  Make a pencil mark at 1cm down from the top and 6cm from each side.
Punch the holes with a Cropadile or similar hole punch. Repeat on the other side.
Cut 2 pieces of ribbon the same size and tie a knot in one end of each. Thread the ribbon through the hole from the inside of the bag. 
Thread it back through the second hole and tie a knot in the end to secure.
To make the bottom of the bag stronger, cut a piece of card 20.5cm x 7.5cm and tape it to bottom of the bag on the inside.
and that's it!

As this is a sample bag I haven't stamped or embellished it but at the end of this post I have included photos of some I've made before.

You can make larger or smaller sizes by just adjusting the measurements - just remember to start with 2 pieces of card or paper the same size.

I hope you find this tutorial helpful and if you do use it to make a bag don't forget to show me!!

Have fun :)
Sarah xx


made with 12"x12" paper


Thursday, 23 February 2012

Card for Grandson's 4th birthday

I know I said I would post a gift bag and tutorial today, but......when I went to edit my photos last night they weren't very clear, so I'm going to redo them today and hopefully I will have it ready for tomorrow :)

Mum asked me to make a card for my wee nephew who lives in Australia and because she prefers to give large cards I've made this one A5.  The image is a digi from Sassy Cheryl's digis.  The paper is from a K&Co - Hopscotch paper pad I've had for ages.

I've missed entering the challenges over at Less is More so I'm joining in again :)
 It's punches/die cuts theme this week and I've punched the circles on my card.

Copic Colours
Hair & Bear - E31, E50, E.53
Skin - E00, E11, E20
T-shirt - R05,R17,R27
Trousers & Cap - B93, B95, B97
Shoes - E31, E37, E57
Cap & Patches on bear - YG91, YG95

 I doodled dots around the circles with Marina Mist Stampin' Up marker.
The sentiment is computer generated using MTF sweet cheeks and MTF playtime fonts.

I'd also like to enter this in Papertake Weekly - get krafty
and Delightful Challenges - use pattern paper.

Thanks for visiting :)
Have a lovely day!
Sarah xx

Wednesday, 22 February 2012

40th Birthday card

Hi everyone :)

It's my friend's 40th birthday tomorrow and this is the card I've made for her.
The papers I've used are Echo Park - Victoria Gardens. The sentiment and age are cut out with the Silhouette Cameo and layered on a journaling card (from the reverse side of one of the papers).  The flourishes are die cut with the Marianne frames and swirls die in the Big Shot and the flowers are Green Tara.  I added a tiny strip of paper through the holes of the button instead of thread.


I'm off now to try and get a birthday card made before the children come home from school
~ the dishes and housework will have to wait!

Thank you for visiting today
I'll be back tomorrow with a gift bag for a baby
(and a tutorial for it, if I can get my photos sorted and the instructions written up in time!).
Take care
Sarah xx
I'd like to enter this in the following challenges
Lollipop Crafts - anything goes
Divas by design - bling it up
Simon Says Stamp - use 3 different papers
My Mum's Craft Shop - buttons & ribbons

Supplies 
Card blank 15x15cms
DP - Echo Park - Victoria Gardens
Bazzill card - pink
Dies - Marianne D Creatables - Frames and swirls
Ribbon - Poppicrafts
Adhesive gems
Flowers - Green Tara
Button - from stash

Monday, 20 February 2012

Mini Challenge at Creative Craft World

Hi everyone :)

It's the 20th of the month and that means it's time for the new challenge over at Creative Craft World.
I was given this month's gorgeous kit to work with and was delighted with the amount of goodies in it. It's great value for money!
This is what I have made with it (and I even have enough left over to make a few cards).  The only items I added to the kit were white card, some beads and a sheet of chipboard.

There are quite a few photos....

The book is made from an A4 sheet of chipboard, cut to size and covered in paper.   I wanted the patterned papers to match on the front and back, so I cut two 6"x6" sheets of paper in half and used plain bazzill card for the spine.

The mini kit from Creative Craft World

The title, butterflies and flowers were die cut using the Cameo.

I added a glue dot to the centre of the flower and spiralled the twine around it.  The quotes are computer generated and I found them on twopeasinabucket.com.

 The pink flower was a little bright for my photograph so I misted it with Mister Huey's misting spray in Calico white to soften the colour.  I added buttons to each of the tags which I cut out with the Cameo.


The cute little chicken sticker was included in the kit.


The butterflies were punched with the Martha Stewart butterfly punch and the wings raised up with pinflair glue gel. 

I cut the tiny flowers from a sheet of paper and added them to this page. 

The little butterfly is also a sticker. 

More Martha Stewart punched butterflies on this page.  

I love the quote on this last page :)  To tone the lilac flower with the background paper and the snowdrops in the photograph, I sprayed it with Mister Huey's mist in Calico white.  I added the different sizes of adhesive pearls to just about everything in this book - there were so many I just couldn't resist!

I added pink pearl beads to the twine between each page to allow room for the embellishments.

The tags (not finished yet!)  I added buttons to one side and flowers to the other.


 I really enjoyed making this book and I hope it will inspire you to have a go at making your own!

We would love it if you added your creations to the challenge this month.  You can make any project you like with a spring theme (cards, mini scrap page, book, altered item etc.) so long as it is less than 12"x12" in size.

I'd like to say hello to my new followers - you're very welcome!
Also, thank you to everyone who has left comments - it means a lot :)

Enjoy your day,
Sarah xx

I'd like to enter this project in
Make it Monday - anything goes
Pollycraft Monday - ribbons and buttons


Supplies
Mini kit - Creative Craft World
Chipboard
White card
Beads
Butterfly punch -Martha Stewart
Mini heart punch - x-cut
Ink for edges of card - Distress ink - Old paper
Quotes - various fonts
The size of the book is 6.5" x 3.5"