Showing posts with label CAS. Show all posts

Saturday, 22 February 2014

A little update

Hi everyone
 
Just in case you've been wondering where I've disappeared to....
I'm still here but just haven't been able to blog.
 
I had carpal tunnel surgery late yesterday afternoon and although it's a 'bit' painful today, I hope in a few weeks I'll be fully recovered.
Then I just have to get the same done on my right hand and I'll be back creating properly again.
 
I can't wait!!
 
 
Here are some New Year cards I made using a free digi stamp downloaded from DigiStampBoutique.
The papers are from My Mind's Eye 'Miss Caroline Dilly Dally' collection


A belated Happy New Year
and thanks for visiting!
 
Take care,
Sarah xx

Thursday, 28 February 2013

Sweet sixteen

Hello again!
 
I thought it was about time I updated this blog.....
Life has been challenging lately mainly due to my back problem and carpal tunnel in my hands but I'll get through it :)
 
A few challenges I should have told you about earlier although they run for a month so plenty of time to get creating :)
The first one is the mini challenge at Creative Craft World.
The theme is 'ANYTHING GOES' and it can be any project so long as it is smaller than 12"x12"
There is a fabulous prize to be won and the winner is chosen by the Design Team.
 
The second challenge is also at Creative Craft World and it's the Beat the Christmas Rush one.
If you'd like to get ahead with your Christmas cards this year then this challenge is for you!
 
I also have a card to share today.
It was my lovely daughter's 16th birthday last week and this is the card I made her.
Very quick and simple.
It was also my hubby's birthday too but he had to make do with a bought card :o

The papers are MME 'On the bright side' 6x6 pad and the 16 is cut out with the Silhouette Cameo.
I covered some chipboard with matching paper and cut out a heart with a Sizzix die.
The font is MTF cupcake.
 
 
Although I've been quiet on the blogging front all that will change over the weekend!
I've had the opportunity to play with the new March scrap kit (on sale from 1st March at CCW)
and I have 3 new scrapbook pages to share.
I'll upload them over the next few days and as Saturday sees the new scrap map challenge I'll also have a page to share for that too.
 
Thank you all for your support lately, I've had some lovely emails and comments and I appreciate them all.
 
Take care,
Sarah xx

Friday, 25 January 2013

New Christmas challenge at CCW

Good morning!
 
I hope by now those of you dealing with the terrible snow storms are over the worst of it.
We've been very fortunate here with just a little sprinkling of snow.
 
I'm back today to tell you about a new monthly challenge over at Creative Craft World.
For those of you who want to get a head start on your Christmas cards this will be perfect for you.
The challenge is called BtCR (Beat the Christmas Rush) and the idea is to create some Christmas cards each month and add them to the linky HERE.
By the time 25th November comes round you could have all your cards ready in time for posting in December!
 
This is a card I made as a Christmas thank you.
The image is a digi stamp from Tiddly Inks.
 
I coloured it with Copics and tied some twine around the centre to look like a present.
I stamped the sentiment (Stampin' Up) and punched it out with the Tiny Tags punch.
To add a little sparkle I outlined parts of the image with Stickles glitter glue.
 

Thank you so much for visiting today.
And to all my followers thank you for sticking with me.
I haven't been able to blog lately with my health playing up and other things having to take priority
but I hope to be back soon when everything settles down.
 
Hope you have a lovely day,
Take care.
Sarah xx

Wednesday, 28 November 2012

Sparkle with LIM

Hello everyone,
I've been trying to get time since Saturday to play in the Less Is More
challenge this week and I finally managed it this morning :)
Chrissie & Jen are looking to see Glamour & Glitz!
 
I love glitter and all sorts of sparkly things so I couldn't miss this one :)
I have made a quick little Christmas card.

I love using kraft card for Christmas cards and this one is 12x12cms.
I stamped a little Elzybells robin, coloured him with copics and added Glamour dust underneath him
and a few dots of it around him. I also added white dots (inkessentials pen) around the frame.
The stamp is from a little clear set by Hampton Art.

-------------
 
Keeping with the Christmas theme, we are down to our last few projects over at
Creative Craft World....November has flown by!
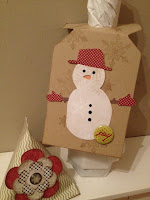
Today Lou has a bottle tag and gift carton to share.
Here's a little peek and you can find out how to make them here.
 
Thanks for popping in today
and I'll be back tomorrow with a link to Sue's project.
I have a couple of birthday cards to share soon but I have to wait in case they see them on my blog!
Take care,
Sarah xx

Wednesday, 21 November 2012

Notecard

Hello everyone!
 
I have a little notecard to share today using bits and pieces I cut with the Silhouette.
 
 
I added tape just along the top of the scallop strips and turned the scallops up slightly
to add a little dimension.
The stamp is by Clear Expressions (Hampton Art)
 
 
~~~~~~~~
 
I also have the link to Sue's blog
where she has made a beautiful wreath for the Christmas Countdown at Creative Craft World.
We only have a sneak peek but you can see it all and the tutorial here.
I can't wait to see it!
 
 
Thank you for stopping by today and if you come back tomorrow
I'll have a link to Susi's blog where she will have some homemade treats to eat!
 
Take care,
Sarah xx


Monday, 19 November 2012

Jingle Bells, clean & simple Christmas card

Good morning everyone!
That's another weekend over...I hope you had a good one :)
 
We are continuing with the Christmas Countdown at Creative Craft World
(the DT have made festive projects for every day of November)
and it's my turn today.
 
I have made a clean & simple Christmas card which is based on the theme at Less is More this week.
It's to use 'hardware' on your card.


I bought the little bells from Meiflower at the craft show on Thursday and couldn't resist using them on my card today.
I cut and scored a white card blank and then cut another piece of white card and embossed it with snow dots embossing folder (not sure of the proper name but it's by Cuttlebug!)
Then I pierced holes on each side of this card for the brads.
 
 
I made jump rings from silver wire, put them on the bells and threaded them on the beaded string.
I tied the 'string' around the brads and then inserted them in the holes securing at the back.
The sentiment is computer generated using MTF Sweet Cheeks font, which I cut into a tag and tied a bow at the top.
I then layered it all on the base card with foam pads.
 
I hope you're enjoying our festive projects and I hope you'll come back tomorrow
when I'll have the link to Lou's blog for her project.
 
Thanks so much for popping in!
I hope you have a lovely Monday :)
Take care,
Sarah xx
Edited to add: I'm over the moon that the super talented Lisa M has chosen this project as her pick of the week at MIM!! I love my cabinet and it's nice that someone else does too :)

Edited to add again: I've just discovered that Lalkygirl has chosen this project as her pick of the week!! Do check out her beautiful cards and projects here :)

I am so happy today :)
 
I'd like to enter this card in MIM ~ linky party
 

Wednesday, 14 November 2012

Pink Christmas Card

Back with my 2nd post today and I have a pink Christmas card.
A while ago I won a voucher to spend in The Paper Shelter and I've had great fun spending it.
There are so many digis to choose from, I hardly knew which ones to pick!
 
This is the one I've used for my card today.
 
It's a precoloured image but it also comes with just the outline for you to colour yourself.
My crafting time is limited at the minute so the precoloured image is very handy!
I inked around the edges of the image with Versamark and embossed with WOW embossing powder.
I also heat embossed a strip of pink card and then cut the snowflake with a Tim Holtz die.
It's really sparkly in real life!
I added Stickles to the snow on the log and around her feet.
Then I layered it on pink card, tied twine around and finished with a pink button.
Then layered it all on a pink card blank with foam pads.
 
Thank you for stopping by my blog today,
Don't forget to stop by tomorrow for Trish's Christmas planner!
Enjoy the rest of your day :)
 
Take care
Sarah xx
 
I'd like to enter this card in the following challenges:
In The Pink ~ pink CAS (I hope it's CAS enough!)
Bearly Mine ~ pink Christmas
Crafty Sentiments ~ Christmas
Hooked on Craft ~ Christmas no red/green

Monday, 12 November 2012

Christmas treat bags

Good morning everyone,
 
I hope your weekend went well.
It's my turn again to create a project for Creative Craft World's
Christmas Countdown.
 
I like to make the children's teachers a little handmade gift at Christmas,
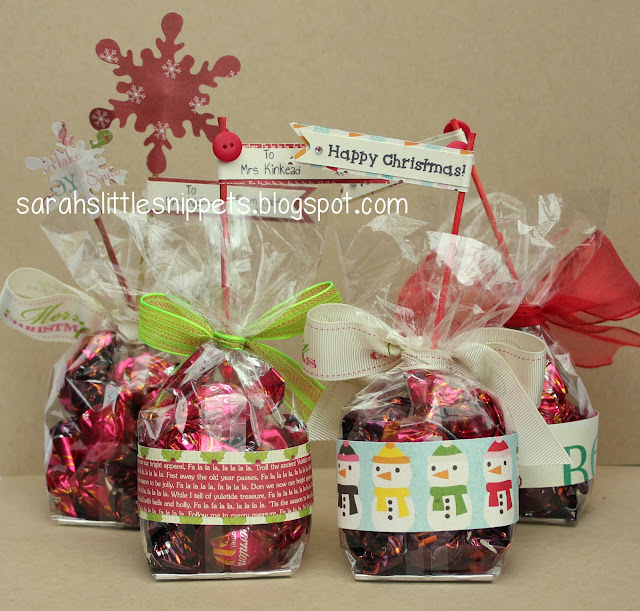
so this year I thought I would make some pretty packaging for some chocolates.
 
and here they are....
 
They are very easy to make!
 
You just take a cello bag (it's better if you can get one with a gusseted bottom or one with card in it like I have) and fill with chocolates.
It's very tempting having chocolates on my desk and I have to say they are YUMMY!!
 
For this bag, I just tied the top with ribbon and then made some toppers
with snowflakes cut out with my Silhouette Cameo.
Next, I cut two wooden skewers to size and coloured them with Copics.
Then layered the snowflakes with the stick in the middle and finished it with a button and some gems.
The banner with the sentiment was also cut out with the Silhouette,
wrapped around the stick and held in place with wet glue.
 
Regular readers of my blog may recognise this little gingerbread man from HERE.
 
I used the same cutting file and just reduced it in size before cutting him out of kraft card.
I layered two lenghs of Christmas paper together (one narrower than the other) and wrapped them around the bag, with the join at the front.
I covered the join with the gingerbread man, popping him up with foam pads.
The banner was made with matching paper with the sentiment on one side
and the to/from details on the other side along with a matching button.


 This 'Merry Christmas' ribbon is available to buy at Next!
 
 The back of the bags
 
The little banner - on one side 'Happy Christmas', on the other it's personalised with the teacher's name.
A wooden skewer, trimmed to size and coloured with a red Copic pen.
 
Supplies list
cellophane bags ~ with a gusset or a firm bottom (teehee...)
I got mine from a chocolate factory.
ribbon
chocolates ~ I used Thorntons Praline melts and Caramel melts
wooden skewers
various Christmas papers
buttons and gems
 
I hope you have enjoyed these little treat bags today,
and if you pop back tomorrow I'll have a link to Lou's blog where she will have a tutorial for a Christmas journal.
 
I'll also have a little project of my own that I made way back in the summer
but I'm only able to share it now, as it had to be kept secret!
 
Once again, thank you for stopping by today,
and I'll be catching up with you all later :)
Take care,
Sarah xx
 
I'd like to enter these in the following challenges:
MIM ~ always anything goes
Crafty Bloggers Network ~ Christmas anything goes
Forever Friends ~ ribbon and/or twine 
 

Thursday, 8 November 2012

Christmas card with Barry Bear

Hello again!
This is my second post this morning and here's the Christmas card
I said I would share when I got a photo of it :)
 
 
 I love kraft and white together for Christmas along with traditional red and green.
So for this card I stamped white dots on the base card and added strips of patterned paper then tied satin ribbon around the top and finished with a snowflake button.
 

This little teddy is a digi from The Stamp Fairy and he is actually standing beside a birdhouse but for this card I cut it off.  I love this wee image so much you'll be seeing more cards with him soon!
He is coloured with Copics and raised with foam pads.
I added Stickles 'star dust' to his hat and bobble on the top.
 
 
It's a beautiful morning here today and my Mum
very kindly came over to help me with the housework
and then took away a big basket of ironing to do, just so I can get my DT projects finished.
Isn't she lovely!
 
That's it for me today, it's been lovely to have you vist :)
See you tomorrow
Take care,
Sarah xx
 
Supplies used
Bazzill kraft card
DP ~ Three Bugs in a Rug 'Let it Snow'
Digi image ~ The Stamp Fairy
Sentiment ~ Playtime font
Background stamp ~ Unity
White Ink ~ Elzybells pigment ink
Stickles 'Star Dust'
Snowflake button ~ Dress it up
Satin ribbon
Copics ~ C1,3,5...E53,31,33...R00,20,32,35,46,37
 
I'd like to enter this card in the following challenges:
Ready Teddy Go ~ don't be square
Whimsy Stamps ~ traditional Christmas colours
Bearly Mine ~ anything goes
Just keep on creating ~ anything goes Christmas
Oldie but a Goodie ~ spots & stripes (DP, ribbon & button all older than 6 months)
Sweet Stampin ~All that glitters

Tuesday, 6 November 2012

Day 6 and a birthday card

Good morning!
I'm back again today with another link
and this time it's for Lou's lovely Christmas scrapbook page.
You'll find it HERE with all the details.


My card today was another rush job, this time to send to Australia...
I'm getting into a bad habit of leaving things to the last minute!
It was for my wee nephew's birthday and although it's pretty simple I was pleased with it in the end :)

I used Woodware 'peeking over' stamps and I decoupaged the horse and sheep for some dimension.
Layered it on yellow card, added doodled stitching around the outside
and tied some twine around the top.  It was coloured with Copics.
 
That's it from me today.
I will be back tomorrow with a link to Trish's Christmas cards.
 
I'll also be sharing a card I've made for my nephew's 18th birthday this weekend.
Thank you so much for stopping by,
Take care
Sarah xx

I'd like to enter this card in the following challenges:
The Squirrel and the Fox ~ flowers, hats or horses
Make it Monday ~ anything goes
The Crafty Pad ~ anything goes
Kaboodle Doodles ~ anything goes

Saturday, 20 October 2012

Mini kit projects

Happy weekend everyone!
 
Today I have some projects I made using the October mini kit from Creative Craft World that
Lou very kindly sent me.
It is a mix of beautiful turquoise and orange from the Teresa Collins 'Tell your story' collection
~ you can see (and buy) the kit HERE.
 
 
All four projects and I still have lots left over to make more!


In the kit there are lots of beautiful die cut flowers.  I took the largest of them and sewed messy stitches around the petals with my sewing machine.
The image is a stamp from Crafter's Companion which I coloured with Copics and I took another of the large flowers and paper pieced her dress with it. The pearls are also included in the kit and the ribbon is from my stash.
The sentiment is stamped and was a freebie with a magazine(from last year I think).
 
close up of the layers on the card

 
 This card is very simple to make. I embossed the bottom of the card with a Cuttlebug 'swirls' embossing folder and added a strip of paper and a strip of glitter card from the kit.
I shaped the die cut flowers, layered them together and adhered them to the card with foam pads.
The sentiment is by Papermania and is stamped with a Stampin' Up marker.
 
 This mini carton was cut out with the Cameo and covered with paper from the kit. I then added stickers and gems which are also included in the kit.
I haven't put anything in the box yet but it would make a lovely little treat box filled with sweets or a scented candle.
 
...and lastly I made a tag, which I cut out with the Cameo.
I added a layer of patterned paper and a hexagon sticker (from the sticker sheet also in the kit) and a clear adhesive gem.
 
To enter the challenge, all you have to do is make a project with bling on it and make it smaller than 12x12".
The winner will be chosen by the Design Team and the prize is a fab mini kit, a generous discount at
Creative Craft World and a Guest Design Team spot.
So why not get creating!
 
Thanks so much for joining me today
and I'll be back soon with more.
Take care and enjoy the rest of your weekend.
Sarah xx
 
I'd like to enter the following challenges:
Make it Monday ~ anything goes
Stampavie #179 ~ stitches (1st card)
Perfect Sentiments ~ happy birthday/anniversary (1st card)
Lady Anne's challenges ~ anything goes (1st card)
Inky Impressions ~ anything but a card (Mini carton)
 

Thursday, 18 October 2012

Sympathy card.

Good morning!
 
It's turned very cold and wet here, so it's time for the winter woollies I think!
 
I'm back this morning with a card to share and I always find these ones difficult.
It's a sympathy card for a friend whose husband died suddenly.
 

 I made a 12cm card blank and using an extra square of white card, I stamped the flower using a Unity stamp.  I coloured the leaf with Copic markers and added tiny green gems to the circles.
Then I wrapped some SU ribbon around it and placed the sentiment (computer generated) on top with foam pads.  I added this square to the card front with double sided tape.
Then finished with a printed insert on the inside.
 
 
Thank you for visiting today
and I'll be back on Saturday with 4 projects using CCW's October mini kit.
 
Take care
Sarah xx

Tuesday, 4 September 2012

Felt & paper flower for a special birthday

 
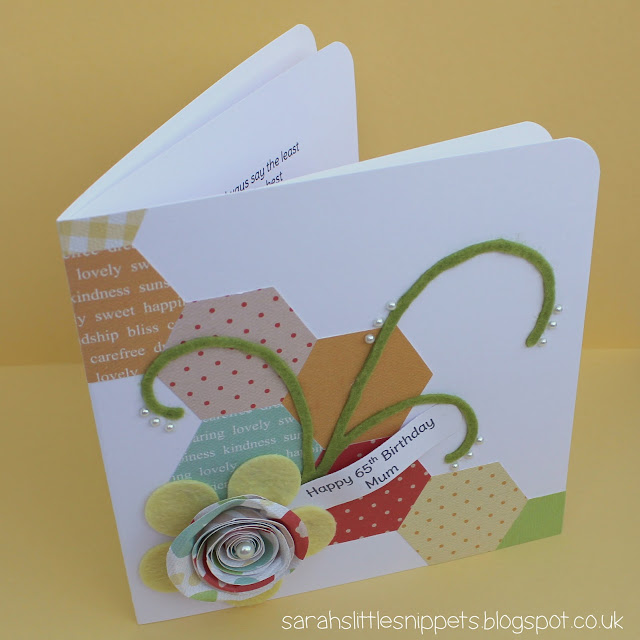
It was my lovely Mum's 65th birthday two weeks ago
and this is the card I made for her.
I was making a Christmas table runner from felt and because I had the felt already out on the table I thought I'd try it out on the card.
I loved the effect and I'm pleased to say, Mum loved her card too :)


 Sizzix, Nestablilities, and Cuttlebug dies cut through felt very well and I used Sizzix dies for the flower and the flourish.
The hexagons are from a sheet of Echo Park paper (Sweet Day) and I cut them out individually and arranged them on the card blank.


I cut a rough spiral from a circle of patterned paper and rolled it into a flower and layered it on top of the yellow felt flower.
The sentiment is printed on the computer using 'Delius' font.


That's it for today,
I'd better go now and rustle up something for tea!

I'd love you to join me tomorrow for my project in Creative Craft World's rainbow blog hop!
I'm also having a prize draw.
Check out all the details here tomorrow (from 7am).

Thanks for visiting today :)
Take care
Sarah xx

I'd like to enter this card in the following challenges:
The pink elephant ~ patterned paper
Ladybug Crafts ~ anything goes
Stamp & Create ~ anything goes
Challenges4everybody ~ anything goes
MIM #105 ~ anything goes
Papertake Weekly ~ anything goes
Tuesday Alchemy ~ anything goes
Sunday, 2 September 2012

30th Birthday

Good morning!
 
I hope you're all having a lovely weekend :)
 
As it's the beginning of September I would normally be sharing a new scrap map for
Creative Craft World but our blog hop started last Thursday and will continue this week, so the scrap map is postponed until next Saturday.
You can check out the details of the blog hop here and there are some fab prizes to be won!
My project will be on Wednesday.....
 
Over the summer I've been asked to make some projects which I'm only able to share after the event has passed and this birthday card is one of them.
 
 
 I didn't have much time to make it as I had to post it to England in time for them to hand deliver it to their daughter in Scotland, so I turned to my trusty Cameo!
The sentiment is printed on the computer (I didn't use print and cut for this one) and then I loaded the 10x10cm square in the Cameo and cut out the '30'
On the 15cm base card I layered swirly pink card near the bottom right corner and then layered the square on top using foam pads for dimension.
 
The butterflies are a mixture of Cameo die cuts and punches and I adhered them with a thin line of glue to the body and then raised the wings. Next I put a tiny blob of pinflair glue gel underneath each wing to keep them raised. To finish I doodled little antenna on each and made a butterfly trail of tiny adhesive gems from Meiflower.
 
I'm glad to say the recipent loved it!
 
Friday was a big day for us as our two youngest returned to school.
 
 
After 9 weeks of school holidays, it's nice to have a little bit of quiet in the house again.....  :)
I made Phoebe a P.E. bag for last year which she wants to use again this year. I never got round to posting it on this blog but if you'd like to see it, you can find it here.
 
Thank you for visiting today
and I'll be back tomorrow with another card.
Sarah xx

I'm entering this card in the following challenges:
Catch the Bug ~ anything goes
Little Red Wagon #148 ~ use a number 
  

Wednesday, 29 August 2012

Golden Wedding Anniversary

Hello again!
 
Today I have a personalised anniversary card which I was asked to make.
 
To make the card I cut and creased a 15x15cm card blank from a sheet of A4 smooth cream card.
Next I printed the sentiment using the computer on a 13x13cm cream square and tied seam binding ribbon around it, finishing with a bow. 
 
 
I layered the square on the card blank and cut 2 different sized hearts from gold card using Nestabilities dies.
I embossed one with a cuttlebug swirls embossing folder in the Big Shot.
Then I adhered the larger heart flat on the card and raised the embossed heart (slightly overlapping the other) with foam pads.
To finish I added 3 tiny pearls to each of the hearts.
 
 
Regular readers of my blog will know that I'm not too keen on working with gold card
but you know what?
It's growing on me!
I love this card and you might see more gold creeping in from time to time :)
 
I hope you have a lovely day whatever you do
and I'll be back soon with more projects.
Sarah xx
 
Ps. Pop over to Creative Craft World for some exciting news about our birthday blog hop starting tomorrow.

Monday, 27 August 2012

3-2-1 with Less is More

Good afternoon!
 
With the summer nearly over and the children returning to school on Friday
it's time for me to get back to blogging!
 
I love the Less is More challenges and Make it Monday and although I tried to get time to play along this summer it just didn't happen but on Saturday I had a little free time and this is what I made.
 
 
The challenge for LIM this week is a recipe and I used 3 words - 2 animals - 1 ribbon.
 
The base card is 14x14cms tent fold and I layered a pink 11x11cms square on top.
The little elephant is cut with a Sizzix die from an Echo Park 'hello summer' paper pad.
I inked the edges with TH antique linen distress ink and added a black brad for her eye.
The word 'sorry' is an Elzybells stamp (unfortunately not available anymore) and the 'I forgot' is part of a Personal Impressions stamp which I inked with an SU marker.
The wee bird is cut from a sheet of paper from the EP pad.

 
 I layered the elephant and bird with foam pads and I added two pads on top of each other just under the ear to prop it up a bit higher. Then I glued a strip of ric rac ribbon just underneath to 'ground' them.
 
 
When I finished that card (and making the most of my 'free time'...)
I made one for a boy.
 
The base of this one is cream card and I layered Bazzill kraft card on top.
The elephant is cut from an Echo Park 'note to self' paper pad.
My recipe this time is 3 words - 2 doodled lines - 1 animal
 
 
By this stage I should have been back to my 'mum' duties but I had been asked to make a baby card and I thought these little elephants would be perfect!
The photo is not great and the card is already away so I can't retake it but you'll get the idea :)
 
It's for twins Edward and Ruby.
 
This time it's on a 7x5" white card blank and I printed the sentiment on the computer
using 'annie use your telescope' font.
The names are stamped using Elzybells alphabet stamps with versafine black ink.
I added clear dew drops to look like bubbles.
 
That's it for today!
 but I'm going to schedule more posts for this week.
I have been doing quite a bit of sewing over the summer
and have also been to classes to make some christmas projects .
Rather than mix the papercrafts and sewing on this blog, I've created a new blog just for sewing.....Richard is laughing....
he says if I can't keep up with one blog how will I manage two!
Well, I'll just have to prove him wrong won't I!  lol
 
My new blog is dillydoodle (if anyone is interested click here!)
Here's a wee peek of my latest project...
 
 
Thank you for coming to visit today :)
See you soon
Sarah xx