Showing posts with label Gift Bag. Show all posts

Monday, 12 November 2012

Christmas treat bags

Good morning everyone,
 
I hope your weekend went well.
It's my turn again to create a project for Creative Craft World's
Christmas Countdown.
 
I like to make the children's teachers a little handmade gift at Christmas,
so this year I thought I would make some pretty packaging for some chocolates.
 
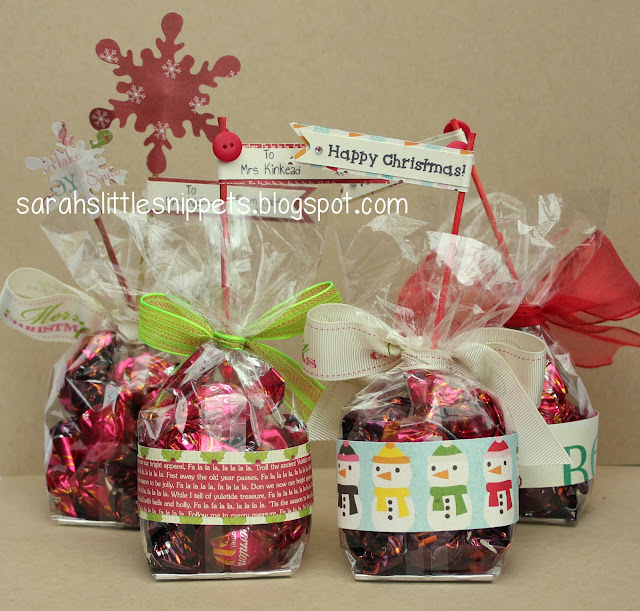
and here they are....
 
They are very easy to make!
 
You just take a cello bag (it's better if you can get one with a gusseted bottom or one with card in it like I have) and fill with chocolates.
It's very tempting having chocolates on my desk and I have to say they are YUMMY!!
 
For this bag, I just tied the top with ribbon and then made some toppers
with snowflakes cut out with my Silhouette Cameo.
Next, I cut two wooden skewers to size and coloured them with Copics.
Then layered the snowflakes with the stick in the middle and finished it with a button and some gems.
The banner with the sentiment was also cut out with the Silhouette,
wrapped around the stick and held in place with wet glue.
 
Regular readers of my blog may recognise this little gingerbread man from HERE.
 
I used the same cutting file and just reduced it in size before cutting him out of kraft card.
I layered two lenghs of Christmas paper together (one narrower than the other) and wrapped them around the bag, with the join at the front.
I covered the join with the gingerbread man, popping him up with foam pads.
The banner was made with matching paper with the sentiment on one side
and the to/from details on the other side along with a matching button.


 This 'Merry Christmas' ribbon is available to buy at Next!
 
 The back of the bags
 
The little banner - on one side 'Happy Christmas', on the other it's personalised with the teacher's name.
A wooden skewer, trimmed to size and coloured with a red Copic pen.
 
Supplies list
cellophane bags ~ with a gusset or a firm bottom (teehee...)
I got mine from a chocolate factory.
ribbon
chocolates ~ I used Thorntons Praline melts and Caramel melts
wooden skewers
various Christmas papers
buttons and gems
 
I hope you have enjoyed these little treat bags today,
and if you pop back tomorrow I'll have a link to Lou's blog where she will have a tutorial for a Christmas journal.
 
I'll also have a little project of my own that I made way back in the summer
but I'm only able to share it now, as it had to be kept secret!
 
Once again, thank you for stopping by today,
and I'll be catching up with you all later :)
Take care,
Sarah xx
 
I'd like to enter these in the following challenges:
MIM ~ always anything goes
Crafty Bloggers Network ~ Christmas anything goes
Forever Friends ~ ribbon and/or twine 
 

Wednesday, 27 June 2012

Card and box gift set for teacher

Good Morning!

I'm back again with the little gift Phoebe gave to her teacher yesterday.
It was really fun to make and is made with a cut file from My Time Made Easy.


Using the Cameo I cut the box from a sheet of 12x12" yellow card and before assembling it I added a 2" strip of Cosmo Cricket 'Material Girl' paper along the bottom. Next I added a strip of 'apple' patterned ribbon.
Following the instructions sent with the file I taped the box together and curled the petals at the top with a bone folder.
It's best to use a really strong double sided tape for the box ~ I use this one.


 I filled the box with sweets and tied the top closed with 3 lengths of Divine twine.

I cut two apples with the Cameo and layered the little pieces together adding some detail with Stampin' Up markers.  Then I glued them to the back and front of the pencil top.

 I added text to the little banner using print and cut with the Cameo and wrapped it around the pencil. This is the text on the back.


I used matching paper for the card, and the Wryn image and sentiment are from Tiddly Inks.
I coloured the image with Copics and then fussy cut around it.
Next I cut a white rectangle from white card, sponged distress inks (Spiced Marmalade and Worn Lipstick) around the edges and layered the Wryn image on top with foam pads.
I added glamour dust to the icing on the cupcake and glossy accents to the cherry on her head.
(although you can't see it in the photo very well!)


I also cut the sentiment with an oval nestabilities die and sponged it with the same distress inks while still in the die.
Before layering the card together, I tied seam binding around the measuring tape paper and popped a red button on the bow.


The card is 6"x6" and the box is just slightly taller.

It's just a simple gift but I wanted to let Mrs Lockhart know that Phoebe really enjoyed school this year ~ and that means a lot to me!
  She has taught primary 3 for quite a few years and then had to change to teach primary 1 this year so it can't have been easy!

Thanks for coming to visit again today!
I better try and get something done before I've to start the school runs ~ the day goes so quick doesn't it?

Hope you're having a good one :)
Take care
Sarah xx

I'm entering this in the following challenges:
MIM ~ anything goes linky party
Scrapbook Sisters ~ anything goes
City Crafter Challenge ~ make a gift
PTT ~ anything goes
Bunny Zoes ~ girls girls girls
Daisy Doodles ~ anything goes
My Grafico ~ bright summer colours
Sentimental Sundays ~ cute and girly
The Squirrel & the Fox ~ make it sparkle
Great Impressions ~ die cuts or punches
Creative Belli ~ anything but a card (everything is old!)

Tuesday, 10 April 2012

Post-it Note Holder and Easter treats

Good Morning!

Just a quick post today

We're hoping to head out to a forest park near our home
so the children can let off steam!
They're hyping about the house this morning after being cooped up yesterday
and they're doing my head in!! lol
Please stay away rain....

I made this post-it note holder last week with some of the papers I had left over from my scrapbook page and I thought it would be handy to keep beside the phone.
 In theory anyway...
Phoebe has a habit of drawing on anything she finds so I might have to hide it :)


 It is very simple and quick to make :)
You need a piece of card 24cms x 15cms then score it at 11, 12 and 13cms on the longest edge.
When you have folded the card, cut two slits roughly 2cms apart to make a pen holder.
(see the photo below for placement)


  You can now decorate it to your heart's content!
I left the inside plain but you could add a quote, or a photo or even make it into a mini layout.
A mini calendar would be useful too....


For the front I added seam binding ribbon and tied a button through it. The butterfly is punched 3 times with a Martha Stewart punch and layered. The word 'notes' are American Crafts Thickers.


 I nearly forgot about these little bags and toppers I made for Phoebe's wee friend and her brother.
I used cello bags (for bookmarks) and filled them with jelly beans.
Then cut the toppers with the Cameo.
The chick and eggs were the same Silhouette file as I used on the treat bags in yesterday's post only this time I cut the names out instead of printing them.


The gorgeous little heart ribbon is by Dovecraft and
I used two strands of blue and white raffia on Timos' topper.


 Sorry!
It wasn't such a quick post after all...

Thank you so much for visiting me today and I'd like to say a big hello to my new followers!
You've all been so kind leaving comments and I love reading them.
I have gained so much from other people sharing on their blogs
 that I'm glad I can share something back :)

I'll be back tomorrow with baby cards for my niece and some knitting...
Have a lovely day :)
Sarah xx

I'd like to enter these in the following challenges
Make it Monday #84 ~ anything goes
Gingerloft Challenge ~ anything but a card
PanPastel Uk ~ sweet treats (Easter sweet bags)
Creative Inspirations ~ Bunnies, Chicks or Eggs (Easter sweet bags)
Lollipop Crafts ~ anything Easter goes (Easter sweet bags)
Creative Monday ~ anything but a card 

Monday, 9 April 2012

Easter treat bags

I hope you're all enjoying your Easter break :)
I don't think we'll be going anywhere today.
Richard has put a disc out in his back and is hobbling about,
so maybe I'll get a chance to do some crafting today :)

I made these little treat bags last week to take with us
when we were visiting with friends.
I was in a bit of a hurry so I just made them in pink and blue.
(how original! lol)

I cut the bag out with the Cameo (but you could easily do it by hand)
Then folded it over and added self adhesive velcro to keep it closed.

I love this little chickie!
It's a cut file from Silhouette and I added the name to the eggshell using print and cut on the Cameo.
Then tied twine around the top to finish it off.
 I filled cellophane bags with chocolate eggs and taped them to the inside with a strip of DS tape.

I made this bag with 2 sheets of Echo Park springtime paper and it was just the perfect size to hold the treat bags :)
You can find the tutorial for it here.

Blog awards!
I am sorry to say I have neglected to mention these.
Linda gave me the versatlie blogger award and Margaret the liebster award
and Jenny gave me the liebster award last year.
I am delighted you think my blog is good enough to have been given these awards
and I really do appreciate them.

Unfortunately I just don't have time to participate but if I were to,
I would have a hard time choosing as there are so many stunning blogs out there!

I had some other exciting news this morning.....I won the monthly challenge at Bunny Zoe's Crafts!
Oh wow £25 to spend guilt free on craft goodies :) Thank you Nikki.

Thank you for joining me today :)
I'll be back tomorrow with a post-it note and pen holder.
Take care
Sarah xx

Saturday, 25 February 2012

Baby Gift Bag

Hi everyone!

Hope you're all well and enjoying the warm weather :) It's lovely to see our daffodils making an appearance and it'll soon be time to cut the grass ~ I love spring!

This is the baby Gift Bag I made to match the baby card here
To make the tag, I punched card and paper with varying sizes of Woodware circle punches and layered them together. The name Fionn - pronounced Finn (I think it's old Irish spelling) is die cut with the Cameo.  For the ribbon handles I used seam binding.


I've made a tutorial on how to make the gift bag here.

It's Richard's birthday tomorrow and I am so late making his card.......
I haven't even started it yet.....I've been putting it off for so long ~ it's his 40th and as I'm 13 weeks older than him, he has been teasing me all this time that he is still 'only' in his '30's'!!! lol
I was trying to come up with something funny/sarcastic but it's not happening!!!
Any ideas???

I think the trouble is.......it bothers me more that I'm 40 than it does him.......lol

See you soon
Sarah xx

Edited to add: I've just realised I didn't get this posted until after 12 o'clock last night ~ his birthday is today. eeeeek!

Tutorial for a Gift Bag using A4 card.

I get asked quite often how I make my gift bags so I thought I would do a tutorial :)

There are a lot of photos but I've tried to make it as simple as possible and hopefully the pictures will explain it better than I can write it! If there's anything that is not clear, let me know and I'll try to help :)

It's made with 2 sheets of A4 card scored EXACTLY the same.


To start, lay your card portrait (short edge to the top) on your scoring board


Score at 5cm and 19 cm


Turn the card 90 degrees
anti-clockwise so the card is landscape.


Score at 21cm and 29cm.


Score at 25cm, down as far as 12cm from the top edge.


Score from the 12cm mark to the corner of the score lines to the left and right. You should have a triangle shape.
I have marked the score lines with a pencil so you can see them clearly.


Cut the card as shown in the picture.


Cut from the bottom up to the first score line.


Fold the top downwards along the score line and fold the bottom upwards along the score line. 


Fold two of  the vertical score lines towards the left.


Fold the centre score line back as shown in the picture.


Fold the triangle score lines back.


Turn the card over so the outside is facing up and apply tape to the small flap on the left.
Lay the two pieces of card side by side as shown in the picture.

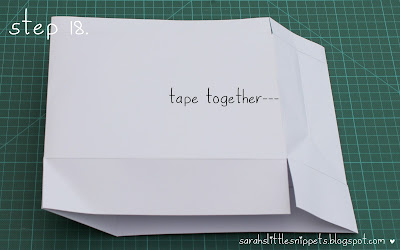
Tape both together making sure to line up the top and bottom fold lines.
You can now stamp or embellish your bag.

Turn it over so the inside is facing up.


Fold the left side over and fold the right side over.


Tape together, lining up the score lines.
Fold the top of the bag over creasing with a bone folder to give a crisp edge.
Apply extra strong tape to the bottom as shown.  I use Stix 2 double sided tape - it's very sticky and almost impossible to separate once it's stuck down.
Apply tape to the rest of the flaps as shown.
Tape the bottom three flaps together.
Tape the last flap closed.
Now it's time to make the holes.  Make a pencil mark at 1cm down from the top and 6cm from each side.
Punch the holes with a Cropadile or similar hole punch. Repeat on the other side.
Cut 2 pieces of ribbon the same size and tie a knot in one end of each. Thread the ribbon through the hole from the inside of the bag. 
Thread it back through the second hole and tie a knot in the end to secure.
To make the bottom of the bag stronger, cut a piece of card 20.5cm x 7.5cm and tape it to bottom of the bag on the inside.
and that's it!

As this is a sample bag I haven't stamped or embellished it but at the end of this post I have included photos of some I've made before.

You can make larger or smaller sizes by just adjusting the measurements - just remember to start with 2 pieces of card or paper the same size.

I hope you find this tutorial helpful and if you do use it to make a bag don't forget to show me!!

Have fun :)
Sarah xx


made with 12"x12" paper