Showing posts with label Tutorial. Show all posts

Monday, 26 November 2012

Christmas Mini Envelope Book Tutorial

Hello everyone,
 
I hope your weekend went well, mine went far too quickly!
Well today is day 26 of the Christmas Countdown at Creative Craft World
and it's a special day for me as it's my birthday :)
 
I have a tutorial today for a little mini album made with envelopes.
I haven't it fully decorated inside but maybe it's just as well as this post
has a lot of photos already.


 I used 3 DL size envelopes and I like to use PaperMill Direct ones but any good quality ones will do.
To start you score each envelope down the middle.
 
Then fold in half (with the flap to the inside)with a bone folder to get a good crease line.
 
 Take a piece of scrap card and trace the outline of the flap.
This will make a template for cutting patterned paper for the flap as you decorate.
 
 Take one envelope for the front cover and lay it flap side down.
Add a strip of double sided tape from left to right approximately halfway down.
Take approx. 1m of ribbon, find the centre and adhere to the tape.
This is your ribbon closure.
 
Now you can decorate the back and front of the envelopes.
 
The paper I used for the front and back cover is Jillibean soup.
I inked all the edges of each envelope with 'Barn Door' distress ink.
 
Measure 1.5 cms in from the spine and 2.5cms from the top and bottom
and mark with a pencil.
Using the large hole in the cropadile punch through the folded envelope.
Using this envelope as a guide, mark the holes in the other 2 envelopes and punch. 
 
Layer the envelopes together and tie ribbon through the holes.
I left one end longer so I can loosen the ribbon if the book becomes a little bulky after decorating.
You can dab some wet glue on the ends to stop the ribbon from fraying. 
 
Before I decorate a book I always gather up as many matching embellishments as I can.
(A great chance to use up that hoarded stash...)
It really does make decorating a book a lot quicker if everything is at hand.
 
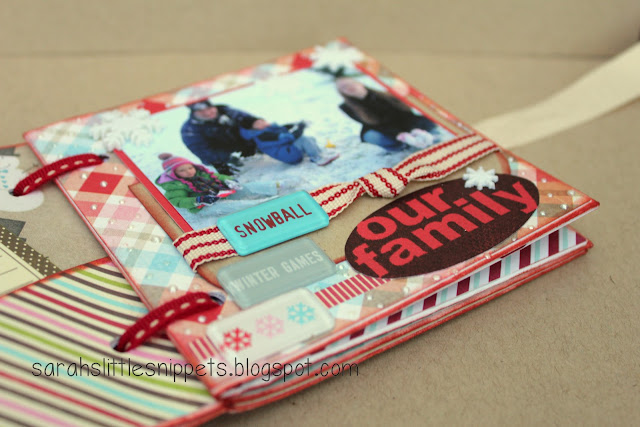
This is the first page of the book, I have tags to make for journaling on the left hand side
and I'll probably add more bits and pieces as I go along :) 
 
The second page is a pic of the family (except me...) enjoying the first snowfall one winter.
I still have to complete the journaling on the left hand side.
You can use the flap of the envelope for tucking in tags and little bits and pieces inside. 
 

When I get the book completely finished I'll post all the photos of the inside
so you will have a better idea of how it all comes together.
 
If you made it to the end of this very long post
THANK YOU!
I hope I have inspired you to have a go at your own little book
and if you do, please post a link in the comments section below - I'd love to see it :)
 
Don't forget to pop back tomorrow for a link to Susi's blog
where she has made some handwarmers.
These are great little things, I've made some for the craft fair coming up
and I've had to hide them because all the family want one :)
 
Take care,
Sarah xx

Edited to add: Rene from Simply Cute has used my tutorial to make a fabulous calendar.  You really must check it out!!!
Click HERE to see it. 

I'd like to enter this in the following challenges:
MIM ~ linky party
Challenges 4 Everybody #8 ~ anything goes
Corrosive Challenges ~ anything goes
CI Paints ~ anything goes
The Squirrel & The Fox ~ anything goes 

Tuesday, 3 July 2012

UKS Blog Hop with Creative Craft World - an altered Recipe Box

Good Morning!

I hope you're keeping well today:)
I have to warn you....this is a long post!

It's the day of the UKS Blog Hop and I have made a project for Creative Craft World.
I'll keep it a surprise until you scroll on down..... :)

I've created a shopping list for the project at the bottom of this post
AND
as a special offer today only,
Creative Craft World are offering a huge 20% discount off everthing in store when you use the code UKSBlogHop
AND
if you place an order using the code, you have the chance to win one of CCW's fabulous kits.
AND
MME Howdy Doody Collection is on special offer today too!
(you'll see why later...)

When you visit the Creative Craft World shop you'll find everything on the left hand sidebar and remember to enter the code at the checkout!

and now for my project...

First you need a box with a lid.
This one is from Lidl (I think these Formil tablets are the best washing tablets ever!)
It's a good strong and sturdy box and it has the added bonus of having little tabs to keep the box closed.


Lightly sand the outside of the box with fine sandpaper ~ just enough to take the shine off it and make it easier for the paint to stick to it. 


 Next add a coat of gesso primer and two coats of white acrylic paint.
You really only need to do the edges of the outside and all 4 sides inside but I got carried away and covered the whole lot...!


When the paint is dry, you can cover the box with the paper.

I used My Mind's Eye Howdy Doody collection to create a whitewashed wood effect.
I measured all the sides of the box and cut the pieces from Beautiful Whitewash paper. I then adhered them to the box with this Stix 2 tape along the edges and a spread of tacky glue in the middle.
I cut two rectangles to fit inside the lid and the bottom of the box with
Beautiful Roses paper using the reverse side. 


I picked the heart and decorative round buttons from the Lovely Pins & Buttons set for the front of the box.
Because the box stays closed with the tabs the buttons are mostly decorative but I wrap the twine around them just for added security.

To attach the buttons, I sewed them on with Like twine. I placed the buttons on the box and marked through the holes with a pencil.  Then I pierced the holes with a pricking tool and sewed the buttons on, tying off the turquoise one with small knots at the back.


I sewed the heart button on and left two long lengths of twine and tied a bow twice at the front so it won't open. I clipped one of the lengths shorter and used the other for wrapping around the two buttons.


This is the finished outside of the box and I'll show the lid in more detail further down the post.

For the front I added two 'Lovely Small Stickers' to the bottom left corner and then cut a rolling pin with the Cameo and adhered it over the top.  I added 'baked with love' using print and cut.


For the back and sides I cut the flowers from 'Happy Decorate' paper and dry embossed them on the back with a paper shaper tool.  I adhered them to the box with Pinflair glue gel.
I dotted Papermania purple pearls among the flowers to match the MME rhinestones on the top.


I really enjoyed making the top of the box!
To make the letters, I glued the gingham paper to white chipboard (I got it from The Papermill Shop a long long time ago) and cut the letters and tag out with Cuttlebug 'Red Tag Sale' dies.
I layered the letters onto another piece of white chipboard on top of the tag and threaded lengths of 'Like Twine' through the hole at the end. Then I glued it all to the top of the box.

I'm not really a cook but I love baking! So I thought this would make a perfect box for all my sweet recipes :)  I took two stickers from the 'Beautiful Layered Stickers' set and added them just above the letters.  Then I tucked 2 pins underneath the round sticker, cut the rhinestone flourish in half and adhered it as shown in the photo.


The flowers were cut from 'Beautiful Roses' paper, dry embossed and shaped and then adhered on the top with Pinflair glue gel.


Inside the lid I added the 'Happy Wood Die Cut'  which I sprayed with Mister Huey misting spray in Calico White.
When it was dry, I stamped 'from the kitchen of'' using a Stampendous clear stamp
and then stamped ‘Sarah’ with Doodlebug alphabet stamps.
For the inside I made little divider cards and decorated them with the Howdy Doody papers.
I added embellishments from the list and stamped little sayings from various 'cooking themed' stamp sets.


As there is so much detail on these cards it is difficult to explain everything but if there's anything you'd like to know just email me or leave a comment (my address is on the side bar).


I think this post is already reaching mammoth proportions!


I cut the kraft divider card with the Cameo and doodled faux stitching back and front with a micron pen. 
So I can quickly find the recipe I need, I printed a numbered recipe list on white card and taped it to the back of each card.


This is one of the recipe cards I made in Word, using WordArt and text boxes.
The font is Blessings through Raindrops.
This recipe is one of my husband's favourites!


Even though the embellishements make the box top heavy, it is still sturdy enough to stay upright when the lid is open.


THANK YOU!
for making it all the way to the bottom of this long post.

It took me nearly as long to write the instructions as it did to make it.....lol

This little box has been a pleasure to make and I hope it has given you some inspiration.
They make fab presents.

Please send me a link or a photo if you do make one.
I'd really love to see it :)

I'm going to need some recipes to fill the box so it would be fantastic if you could send me your favourites! 

SHOPPING LIST ~ these are a real bargain today! Just remember the code UKSBlogHop for an extra 20% off the price.
2 Beautiful Whitewash
2 Beautiful Roses
1 Happy Decorate
1 Like Ledger
1 Like Twine
1 Lovely Pins & Buttons
1 Beautiful Rhinestones
1 Happy Wood Die Cut
1 Lovely Small Stickers
1 Beautiful Layered Stickers
1 Baby large Stickers
Baby Journal Card
Beautiful Journal card
Kraft card

 To follow the blog hop, you'll find all the details on the Creative Craft World blog here.

Thanks for for taking the time to visit today
and I'll be back soon :)
Take care
Sarah xx

I'd like to enter this in the following challenges:
Make it Monday #96 ~ anything goes
CBN Mon #1 ~ anything goes
Stampalot ~ what's your passion? ~ (mine is definitely altering things!)
Tuesday Alchemy #21 ~ anything goes

Saturday, 25 February 2012

Tutorial for a Gift Bag using A4 card.

I get asked quite often how I make my gift bags so I thought I would do a tutorial :)

There are a lot of photos but I've tried to make it as simple as possible and hopefully the pictures will explain it better than I can write it! If there's anything that is not clear, let me know and I'll try to help :)

It's made with 2 sheets of A4 card scored EXACTLY the same.


To start, lay your card portrait (short edge to the top) on your scoring board


Score at 5cm and 19 cm


Turn the card 90 degrees
anti-clockwise so the card is landscape.


Score at 21cm and 29cm.


Score at 25cm, down as far as 12cm from the top edge.


Score from the 12cm mark to the corner of the score lines to the left and right. You should have a triangle shape.
I have marked the score lines with a pencil so you can see them clearly.


Cut the card as shown in the picture.


Cut from the bottom up to the first score line.


Fold the top downwards along the score line and fold the bottom upwards along the score line. 


Fold two of  the vertical score lines towards the left.


Fold the centre score line back as shown in the picture.


Fold the triangle score lines back.


Turn the card over so the outside is facing up and apply tape to the small flap on the left.
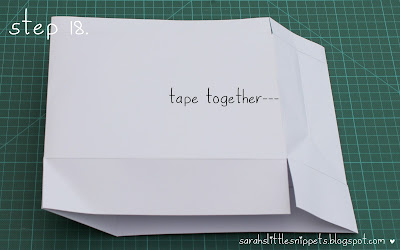
Lay the two pieces of card side by side as shown in the picture.

Tape both together making sure to line up the top and bottom fold lines.
You can now stamp or embellish your bag.

Turn it over so the inside is facing up.


Fold the left side over and fold the right side over.


Tape together, lining up the score lines.
Fold the top of the bag over creasing with a bone folder to give a crisp edge.
Apply extra strong tape to the bottom as shown.  I use Stix 2 double sided tape - it's very sticky and almost impossible to separate once it's stuck down.
Apply tape to the rest of the flaps as shown.
Tape the bottom three flaps together.
Tape the last flap closed.
Now it's time to make the holes.  Make a pencil mark at 1cm down from the top and 6cm from each side.
Punch the holes with a Cropadile or similar hole punch. Repeat on the other side.
Cut 2 pieces of ribbon the same size and tie a knot in one end of each. Thread the ribbon through the hole from the inside of the bag. 
Thread it back through the second hole and tie a knot in the end to secure.
To make the bottom of the bag stronger, cut a piece of card 20.5cm x 7.5cm and tape it to bottom of the bag on the inside.
and that's it!

As this is a sample bag I haven't stamped or embellished it but at the end of this post I have included photos of some I've made before.

You can make larger or smaller sizes by just adjusting the measurements - just remember to start with 2 pieces of card or paper the same size.

I hope you find this tutorial helpful and if you do use it to make a bag don't forget to show me!!

Have fun :)
Sarah xx


made with 12"x12" paper