Showing posts with label family time. Show all posts

Monday, 26 November 2012

Christmas Mini Envelope Book Tutorial

Hello everyone,
 
I hope your weekend went well, mine went far too quickly!
Well today is day 26 of the Christmas Countdown at Creative Craft World
and it's a special day for me as it's my birthday :)
 
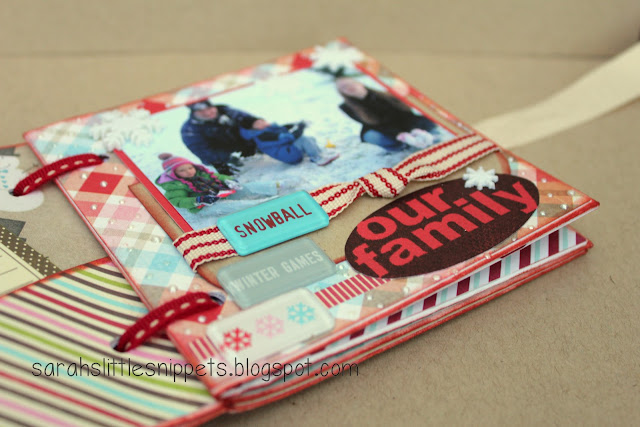
I have a tutorial today for a little mini album made with envelopes.
I haven't it fully decorated inside but maybe it's just as well as this post
has a lot of photos already.


 I used 3 DL size envelopes and I like to use PaperMill Direct ones but any good quality ones will do.
To start you score each envelope down the middle.
 
Then fold in half (with the flap to the inside)with a bone folder to get a good crease line.
 
 Take a piece of scrap card and trace the outline of the flap.
This will make a template for cutting patterned paper for the flap as you decorate.
 
 Take one envelope for the front cover and lay it flap side down.
Add a strip of double sided tape from left to right approximately halfway down.
Take approx. 1m of ribbon, find the centre and adhere to the tape.
This is your ribbon closure.
 
Now you can decorate the back and front of the envelopes.
 
The paper I used for the front and back cover is Jillibean soup.
I inked all the edges of each envelope with 'Barn Door' distress ink.
 
Measure 1.5 cms in from the spine and 2.5cms from the top and bottom
and mark with a pencil.
Using the large hole in the cropadile punch through the folded envelope.
Using this envelope as a guide, mark the holes in the other 2 envelopes and punch. 
 
Layer the envelopes together and tie ribbon through the holes.
I left one end longer so I can loosen the ribbon if the book becomes a little bulky after decorating.
You can dab some wet glue on the ends to stop the ribbon from fraying. 
 
Before I decorate a book I always gather up as many matching embellishments as I can.
(A great chance to use up that hoarded stash...)
It really does make decorating a book a lot quicker if everything is at hand.
 
This is the first page of the book, I have tags to make for journaling on the left hand side
and I'll probably add more bits and pieces as I go along :) 
 
The second page is a pic of the family (except me...) enjoying the first snowfall one winter.
I still have to complete the journaling on the left hand side.
You can use the flap of the envelope for tucking in tags and little bits and pieces inside. 
 

When I get the book completely finished I'll post all the photos of the inside
so you will have a better idea of how it all comes together.
 
If you made it to the end of this very long post
THANK YOU!
I hope I have inspired you to have a go at your own little book
and if you do, please post a link in the comments section below - I'd love to see it :)
 
Don't forget to pop back tomorrow for a link to Susi's blog
where she has made some handwarmers.
These are great little things, I've made some for the craft fair coming up
and I've had to hide them because all the family want one :)
 
Take care,
Sarah xx

Edited to add: Rene from Simply Cute has used my tutorial to make a fabulous calendar.  You really must check it out!!!
Click HERE to see it. 

I'd like to enter this in the following challenges:
MIM ~ linky party
Challenges 4 Everybody #8 ~ anything goes
Corrosive Challenges ~ anything goes
CI Paints ~ anything goes
The Squirrel & The Fox ~ anything goes 

Sunday, 2 September 2012

30th Birthday

Good morning!
 
I hope you're all having a lovely weekend :)
 
As it's the beginning of September I would normally be sharing a new scrap map for
Creative Craft World but our blog hop started last Thursday and will continue this week, so the scrap map is postponed until next Saturday.
You can check out the details of the blog hop here and there are some fab prizes to be won!
My project will be on Wednesday.....
 
Over the summer I've been asked to make some projects which I'm only able to share after the event has passed and this birthday card is one of them.
 
 
 I didn't have much time to make it as I had to post it to England in time for them to hand deliver it to their daughter in Scotland, so I turned to my trusty Cameo!
The sentiment is printed on the computer (I didn't use print and cut for this one) and then I loaded the 10x10cm square in the Cameo and cut out the '30'
On the 15cm base card I layered swirly pink card near the bottom right corner and then layered the square on top using foam pads for dimension.
 
The butterflies are a mixture of Cameo die cuts and punches and I adhered them with a thin line of glue to the body and then raised the wings. Next I put a tiny blob of pinflair glue gel underneath each wing to keep them raised. To finish I doodled little antenna on each and made a butterfly trail of tiny adhesive gems from Meiflower.
 
I'm glad to say the recipent loved it!
 
Friday was a big day for us as our two youngest returned to school.
 
 
After 9 weeks of school holidays, it's nice to have a little bit of quiet in the house again.....  :)
I made Phoebe a P.E. bag for last year which she wants to use again this year. I never got round to posting it on this blog but if you'd like to see it, you can find it here.
 
Thank you for visiting today
and I'll be back tomorrow with another card.
Sarah xx

I'm entering this card in the following challenges:
Catch the Bug ~ anything goes
Little Red Wagon #148 ~ use a number 
  

Monday, 2 July 2012

Our new baby.......

......puppy!!

Just 8 weeks old and a bundle of fun :)


In a moment of weakness I agreed to let the children have a puppy...
but I'm glad I did.
He's a wee Yorkie Apso and we called him Mac.


He's been showered with affection.....sometimes too much!

and it makes him dog tired:)

I'm afraid he's the reason for my lack of comments.
I can't blog and house train him at the same time.....I think he's caught on now what he's supposed to do, so I'll be catching up with you all tomorrow :)

A few days ago I mentioned that I was making a project for a blog hop.
Well, it's all happening tomorrow (Tuesday) so if you have time, come back and see.
There are some great offers to be had and you can see what I've made :)

All the best,
Sarah xx

Friday, 20 April 2012

Mini Scrapbook Album using CCW April mini kit.

Good Morning!

Following the little peek I gave of this yesterday,
here is the finished project! Did you guess what it was?

It's a little mini scrapbook album of my Grandparents Wedding Day.
Sadly, I never got to know either of them as they both died in tragic circumstances before I was born.

When Lou from Creative Craft World sent me this month's mini kit to have a play with,
I was delighted!
It's absolutely gorgeous and packed full of Prima yumminess :)
You can see the kit HERE and at only £7.99 it's a real bargain.
Or even better ~ if you subscribe it's £6.99 + free UK shipping!
You don't have to use the kit to enter the challenge.
All you have to do is make something smaller than 12x12 and add your link here.
It runs for a whole month, so no excuses!!

I've added loads of photos
so I do apologise if it takes a long time to load on your computer.
(especially to my Mum since hers takes forever!)
Regular readers of this blog will know that I am not known for being 'inky' or 'vintagey'
but I've surprised myself and loved getting messy :)

To make the book, I cut white chipboard with a Sizzix originals Album cover and page die
by Brenda Pinnick.
I inked the edges of the pages and photos with Vintage Photo distress ink.

Isn't the 'cherish' charm gorgeous! It's very solid and feels really good quality.


 I cut the flower and black border on this page with the Silhouette Cameo.
The background on this page is cream card which is inked with Vintage Photo distress ink and then stamped with a TH flourish stamp which was stamped off on scrap paper first.
I cut a piece of vellum with a nestabilities die, inked the edges and layered on top.
The envelope is cut with the Cameo and also the black 'lace'.
I'm amazed it cut it out so intricately!
If you're thinking of getting a Cameo all I can say is, you won't regret it!


 I really love the heart button!
It's Prima and was one of  a selection of beautiful buttons in the kit.


 The background on this page is plain Bazzill card which is inked and stamped with a TH script stamp.

The black paper 'lace' on this page is the same cut file that I used on the envelope page only this time I made it bigger.
 I left the back of the book plain so I can add more pages if I want to at a later date.
 Just a close up to show some of the texture on the pages.
There is too much detail on each of the pages to describe properly how I made it.
I think this post is already long enough!
If there's anything you see and you'd like to know how it was done
just send me a email and I'll do my best to help :)

I really enjoyed making this book and it is very special as we have very few photos of my grandparents.  It's good to keep their memory alive :)

In the 1940's
my Grandmother was in hospital and gave birth to a baby girl when she took a kidney infection.
At that time penicillin had just become available and she was given an injection to fight the infection.
Unfortunately she took an allergic reaction and died (aged just 24) leaving a husband and 4 young children. My Dad was only two at the time.

Thank you for taking the time to visit my blog today :)
Why not pop over to the Creative Craft World blog and see what the other DT members have made with this month's kit.
I'm off to the Craft Show in Belfast today and I hope to get some nice goodies
(not that I really need them!)
Take care :)
Sarah xx

I'd like to enter this little book in the following challenges:
C.R.A.F.T ~ wedding/anniversary
Cropstop ~ handmade paper lace
Cute Card Thursday ~ metallica
Creatalicious #33 ~ butterflies and add some flowers
I Brake for Challenges ~ anything but a card
Just keep on Creating ~ anything goes
Allsorts ~ buttons and threads
Make it Monday ~ anything goes
Totally Papercrafts ~ all buttoned up
The Pretty little Ribbonshop ~ to die for
Divas by Design ~ anything but a card
Bunny Zoe's ~ ribbon or twine
Simon says Stamp and show ~ anything goes

Sunday, 11 March 2012

Quick Update

Good morning :)

I'm sorry I haven't been blogging for the past few days,
we've had a sudden family bereavement this week.

And this morning
we're heading to the 'out of hours doctor' with Phoebe.
She's been up most of the night with a throat infection and can hardly speak :(

......but I hope to be back blogging again tomorrow :)

Thanks for visiting!
See you soon.
Sarah xx

Saturday, 24 September 2011

2 months later....

Good Morning!

I really am a disaster with this blog aren't I!  Hopefully I'm back on track now and I'll try and schedule posts more often in the future :)  I don't know where to start to catch up but I've been making various bits and pieces over the summer and I'll share them with you over the next few days.

The highlight of my summer holidiays was catching up with my lovely cousin Vicky of Crafting Clare's paper moments.  She came to Northern Ireland on holiday and took time out to do a Stampin' Up workshop for me.  She also gave me a beautiful gift which you can see here - I could never photograph it to do it justice like Vicky does :)

Here are a couple of cards I made for Mum's birthday August
The branch and the sentiment are both Unity stamps and the stitches are a Wendy Vecchi stamp. The inks are Stampin' Up - Melon Mambo and Old Olive (I think...)


The card from the children - the stamp is Elzybells and the flowers are Prima e-line scrunched up and layered together.  The paper I've had a long time but I think it's Making Memories and the font is 'Stars from our eyes'

 The back of the card

Needle cases made using the pattern from the Sew Pretty Homestyle book
 Needle case open

And finally, this is the little mini book I mentioned at the beginning of the summer.  It's just a little peek as it's not completely finished yet but when it is I will post photos of each of the pages.  I'll be teaching this at a class next month using different papers.


I'd like to say hello to my new followers and thanks for joining me.  Vicky, in a previous post you asked a question about making the bags using A4 card.  They're made using 2 sheets of A4 card both cut and scored exactly the same, folded and taped together. I will try and do a photo tutorial as that might explain it better :)

See you soon
Sarah x

Wednesday, 27 April 2011

Thinking of you, using a digital image

This card is for my Aunt whose husband passed away this time last year and I hope it will give her some comfort to know we're thinking of her.

I used linen card for the base and rounded the top right hand corner.
I printed the sentiment (Jellyka CuttyCupcakes font) on spare card and embossed it along the left edge using a craft concepts embossing folder and the Cuttlebug.
Then I tied pink satin ribbon along the edge of the embossing and rounded the TRH corner of it as well.
I printed the two roses image from A Passion for Stamps and coloured it with Copics.

I have finally managed to do something today that will make cutting out a whole lot easier!!  I can now print and cut with my Craft Robo (only took me 2 years to do it.....) lol
So the Robo cut the roses out in no time :)


I rolled the edges of the roses over a pencil to round them slightly and to give a little dimension. I used pinflair gel to glue them to the card and added 3 tiny pearls.


I hope you all had a lovely Easter ! We went to the beach (Richard and me wearing coats lol) on Easter Monday and it was beautiful. 

We had our first paddle in the freezing sea but when the sea came in higher than anticipated, Richard got his trousers soaked :) Hilarious!!! - though we had to go and buy him new jeans! Next time I'll pack spare clothes for him as well as the children.

Freezing wet legs!

Caleb having fun in the sand dunes

Phoebe building sandcastles
Thanks for stopping by today!
Sarah x

Supplies
Linen card
Craft concepts embossing folder - budding vine
Digital image - A Passion for Stamps
Ribbon
Copics - RV10, RV21
              R11
              YG03, YG06

Monday, 7 March 2011

Catching up

Hi everyone

Just a little update and the reason for lack of projects! Any regular readers of my blog will know I've had ongoing health problems for a while. Well, I had a hysterectomy 2 weeks ago and I'm hoping that's the end of my problems and the beginning of a new me!  You never know, by the summer maybe I'll be taking classes again........!

At the minute though I'm too exhausted (and a bit sore) to be making anything but if I can get Richard to upload some photos from my camera, I'll post some pics of a birthday card I made for Lydia just before I went into hospital.

Finally 'hello' to my new followers! and thank you to everyone else who has stuck by me even though the posts have been so irregular...... sorry!

Hugs (gentle ones only!)
Sarah

Saturday, 24 April 2010

Quick update

I'm sorry I've had nothing to show you these past few weeks but thank you to all who have been checking my blog :)

I went into hospital on Monday for a gynae operation which will hopefully stop my iron levels from depleting so dramatically!  I'll know in a few months if the op has been a success and apart from the extreme tiredness, I'm feeling good :)

I can't wait to get crafting again and hope to have something to show you next week.

Sunday, 21 February 2010

Thank you card and envelope


Now that the birthday's over, it's time to send out thank you cards.  This is what we came up with but because they're small we had to make the envelopes as well.

The base card is soft yellow cut to make a card measuring 11 x 7.5cms. The heart is a Unity stamp with some wire and beads tied around it.  The sentiment is Unity as well as the post box stamp on the envelope - I'm loving Unity at the moment and am waiting for the next Kit of the Month to arrive any day now :)

These next two cards were made by Lydia's friends ~ aren't they beautiful!
I think it's amazing they both used MME bloom & grow papers - they didn't know what each other was using.....

From Joanna
From Jessica

And finally...some photos from Lydia's birthday.  She hates any fuss and didn't want a party so we arranged a surprise meal at her favourite restaurant.  As an extra surprise Richard's parents met us there, the children don't see them as often as they'd like for they live too far away.

She was pretty embarrassed here, (sorry Lydia!) they played 'Happy Birthday' music through the speakers as they brought the cake, and all the other diners sang too. (he he)

Caleb was having a whale of a time taking pictures (most had to be deleted!!) he managed to get everyone in this photo but missed half of Granda Jim's face.

A family photo - it's rare for us to have one of these.

Thanks for stopping by ~ it was a long post today...x