Showing posts with label Mini Book. Show all posts

Monday, 26 November 2012

Christmas Mini Envelope Book Tutorial

Hello everyone,
 
I hope your weekend went well, mine went far too quickly!
Well today is day 26 of the Christmas Countdown at Creative Craft World
and it's a special day for me as it's my birthday :)
 
I have a tutorial today for a little mini album made with envelopes.
I haven't it fully decorated inside but maybe it's just as well as this post
has a lot of photos already.


 I used 3 DL size envelopes and I like to use PaperMill Direct ones but any good quality ones will do.
To start you score each envelope down the middle.
 
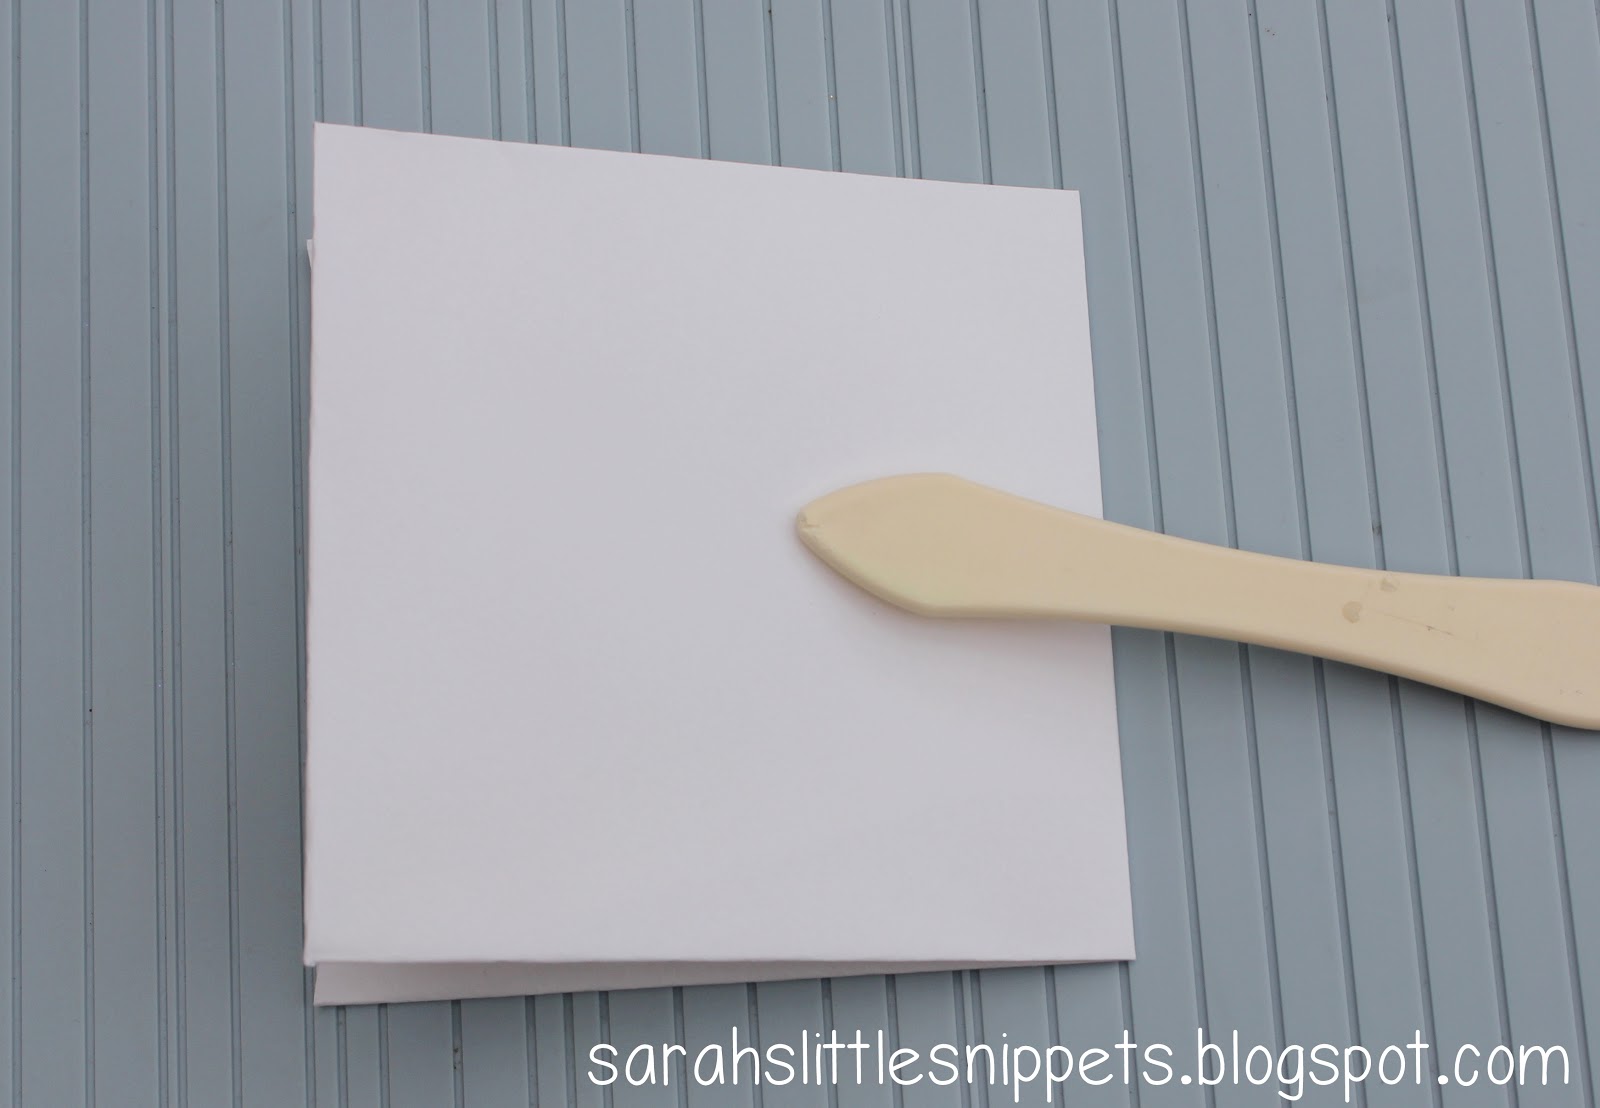
Then fold in half (with the flap to the inside)with a bone folder to get a good crease line.
 
 Take a piece of scrap card and trace the outline of the flap.
This will make a template for cutting patterned paper for the flap as you decorate.
 
 Take one envelope for the front cover and lay it flap side down.
Add a strip of double sided tape from left to right approximately halfway down.
Take approx. 1m of ribbon, find the centre and adhere to the tape.
This is your ribbon closure.
 
Now you can decorate the back and front of the envelopes.
 
The paper I used for the front and back cover is Jillibean soup.
I inked all the edges of each envelope with 'Barn Door' distress ink.
 
Measure 1.5 cms in from the spine and 2.5cms from the top and bottom
and mark with a pencil.
Using the large hole in the cropadile punch through the folded envelope.
Using this envelope as a guide, mark the holes in the other 2 envelopes and punch. 
 
Layer the envelopes together and tie ribbon through the holes.
I left one end longer so I can loosen the ribbon if the book becomes a little bulky after decorating.
You can dab some wet glue on the ends to stop the ribbon from fraying. 
 
Before I decorate a book I always gather up as many matching embellishments as I can.
(A great chance to use up that hoarded stash...)
It really does make decorating a book a lot quicker if everything is at hand.
 
This is the first page of the book, I have tags to make for journaling on the left hand side
and I'll probably add more bits and pieces as I go along :) 
 
The second page is a pic of the family (except me...) enjoying the first snowfall one winter.
I still have to complete the journaling on the left hand side.
You can use the flap of the envelope for tucking in tags and little bits and pieces inside. 
 

When I get the book completely finished I'll post all the photos of the inside
so you will have a better idea of how it all comes together.
 
If you made it to the end of this very long post
THANK YOU!
I hope I have inspired you to have a go at your own little book
and if you do, please post a link in the comments section below - I'd love to see it :)
 
Don't forget to pop back tomorrow for a link to Susi's blog
where she has made some handwarmers.
These are great little things, I've made some for the craft fair coming up
and I've had to hide them because all the family want one :)
 
Take care,
Sarah xx

Edited to add: Rene from Simply Cute has used my tutorial to make a fabulous calendar.  You really must check it out!!!
Click HERE to see it. 

I'd like to enter this in the following challenges:
MIM ~ linky party
Challenges 4 Everybody #8 ~ anything goes
Corrosive Challenges ~ anything goes
CI Paints ~ anything goes
The Squirrel & The Fox ~ anything goes 

Tuesday, 13 November 2012

Envelope Pocket mini book

Hello everyone,
My project today is one I was asked to make for my friend who retired from teaching this year.
We met through crafting and she has been so good to me...like a second Mum!
Her daughters' asked me to make something that would hold notes/tags from people who had written
little anecdotes about their Mum.
 
I decided to go with a pocket book made from envelopes.
....this was my 2nd attempt....the 1st ended up in the bin....
 
I hardly know where to start to explain how I made it....lol
 
It's made with 5 pieces of chipboard - the front, bottom, back, top and flap.
I covered the pieces with My Mind's Eye 'Wild Asparagus' paper
leaving a 5mm gap between the joins.
The front flap was cut using a Tim Holtz 'on the edge bracket die' and I added
a magnetic closure on the inside of the flap and on the outside of the front before covering with paper.
 
 
The inside is made with envelopes joined together accordian style.
I took nine kraft envelopes (I find PaperMill luxury C6 really good quality) sealed them and then cut off one end.  Then with a circle punch, cut a large notch out of the cut end.
I inked around the edges with vintage photo distress ink and let dry.
Then taped the envelopes one on top of each other with DS tape.
 
 
I added the lace around the front of the album before taping the envelopes
to the inside on the back and front.
The flowers are Prima and the metal corners are from Forgetmenot Papercrafts in Belfast.
I added two little pins and a sprinkling of adhesive pearls around the flowers.
 
 
I printed the word 'memories' on matching paper and added it to the metal (Tim Holtz) frame.
I put the brads through the chipboard before covering the inside so the metal pieces wouldn't show.
If the book is now filled with the tags, I'll see if I can get a photo to show it finished!
 
I found it a challenge to make....on my first attempt the paper kept splitting at the joins.
I think the paper was just too wet and I was stretching it too much.
Apart from all that, I was pleased with it when I had it finished and I know that my friend loves it too and that's the main thing!
................................................
And now for the link to the next project.
It's day 13 and Lou has a gorgeous Christmas journal to share.
We only have a sneak peek and I'm dying to see inside.
You can find it HERE
 
 
Thank you for visiting today and a big 'hello' to welcome my new followers!
Tomorrow I'll have a link to Trish's Christmas project
 and maybe even have something of my own too :)
 
Have a lovely day,
Take care,
Sarah xx
 
I'd like to enter this album in the following challenges:
MIM ~ anything goes
Lady Anne's Challenges ~ anything goes
Love to Create ~ fancy edges
Stamps & Fun = creativity ~ anything goes
Tuesday Alchemy ~ anything goes
Oldie but a Goodie ~ anything but Christmas (all except the flowers are more than 6 months old)
Papertake Weekly ~ flower power

Friday, 8 June 2012

Mini Badge Book

Good Afternoon!

Oh my goodness the days are flying by! Where does the week go???
The children were off school for a few days for the Jubilee
and during that time the Olympic torch also passed by.
A very memorable long weekend!

I've completed a lot of projects lately but with other commitments I just haven't had time to blog them. 
I thought I'd better make a start today!

Every month Creative Craft World sells a 12"x12"large kit and a 6"x6" mini kit.
They're excellent value and well worth a look here!
It was my turn last month to make the projects for June's large kit.
I made 2 scrapbook layouts, a mini badge book and altered a notebook.

This is the mini badge book...

It's made with clear name badges that I bought in 'Around a Pound'
The paper inside is approx 4"x 3" and the finished book size is  41/2" x 3"


The papers throughout the book are all from the kit ~ I love cutting bits and pieces from paper and layering them :)
 I stamped the word 'growing up' with Doodlebug alphabet stamps.
The butterfly is punched with a Martha Stewart punch and I added tiny gems on it's body.
 The theme of the book is Phoebe and I'll explain why at the end of the post!
She was born by elective c/s one week early and this photo was taken the day she came home from hospital. She had a full head of black hair and it was so thick she had to have it blow dried.
I can't believe it was nearly SIX years ago! 

 My little rascal!
My niece (Phoebe's cousin)  had a baby girl when Phoebe was 18 months old and this photo was taken the day we went to see her.  Such excitement!
(I wasn't too keen on being a Great-Auntie though....)
I added doodling around the words to make them stand out a bit more and mini gems to the strips of patterned paper.

 Aww, I remember this day ~ my 'baby' started nursery school.
She loved it even though it was only for 2 hours a day!
I used EKSuccess edger punch for a notebook look and the butterflies and flowers were cut with the Silhouette.  Stamping was with the Doodlebug stamps again.

The reason for the theme of the book is to do with this photo....
Regular readers of my blog will know that I had a bit of a reaction to new tablets a while back and I wasn't quite 'with it'.
During that time Phoebe's teacher had been sending home notes in her homework diary asking for 4 photos of birth, toddler, nursery and P1 which I hadn't read (and neither had her Dad)
When I finally discovered the notes I had a bit of a flurry to find some (I'm not organised where my photos are concerned and they are on various computers)
The most recent one, I had to take that morning before school and print it off, which is why her hair is flying loose in the photo and then I tied it in bunches while the photo was printing.
You can imagine the morning I had....

Anyway....Since I had all the photos together and I knew I had this project to do,
rather than search for more photos I resized them and printed them off again.

The 'you are 5' letters are AC Thickers (in the kit) and I coloured them with a pale green Copic marker.  The jar image had a heart hanging on it and I cut around it with a craft knife and slipped the photo under it ~ I hope that makes sense!

For the back of the book I used a Woodware stamp from this set.
All the pages are tied together with peach ribbon from the kit and seam binding from my stash.

The kit!

Thank you for making it to the end of this very long post!
If you're interested in the other projects I'll be posting them very soon.

Tomorrow though, I'll be back with my next GDT card for Sweet Stampin'.
Hope you have a great weekend!
Take care
Sarah xx
I'd like to enter this in the following challenges:
Crafty Ribbons#21 ~ butterflies & bows
MAWTT ~ anything but a card
Just keep on creating ~ anything goes
Papertake Weekly ~ anything goes
Bunny Zoe's ~ anything goes
Make it Monday ~ anything goes
Inspire Me Fridays ~ anything goes

Friday, 20 April 2012

Mini Scrapbook Album using CCW April mini kit.

Good Morning!

Following the little peek I gave of this yesterday,
here is the finished project! Did you guess what it was?

It's a little mini scrapbook album of my Grandparents Wedding Day.
Sadly, I never got to know either of them as they both died in tragic circumstances before I was born.

When Lou from Creative Craft World sent me this month's mini kit to have a play with,
I was delighted!
It's absolutely gorgeous and packed full of Prima yumminess :)
You can see the kit HERE and at only £7.99 it's a real bargain.
Or even better ~ if you subscribe it's £6.99 + free UK shipping!
You don't have to use the kit to enter the challenge.
All you have to do is make something smaller than 12x12 and add your link here.
It runs for a whole month, so no excuses!!

I've added loads of photos
so I do apologise if it takes a long time to load on your computer.
(especially to my Mum since hers takes forever!)
Regular readers of this blog will know that I am not known for being 'inky' or 'vintagey'
but I've surprised myself and loved getting messy :)

To make the book, I cut white chipboard with a Sizzix originals Album cover and page die
by Brenda Pinnick.
I inked the edges of the pages and photos with Vintage Photo distress ink.

Isn't the 'cherish' charm gorgeous! It's very solid and feels really good quality.


 I cut the flower and black border on this page with the Silhouette Cameo.
The background on this page is cream card which is inked with Vintage Photo distress ink and then stamped with a TH flourish stamp which was stamped off on scrap paper first.
I cut a piece of vellum with a nestabilities die, inked the edges and layered on top.
The envelope is cut with the Cameo and also the black 'lace'.
I'm amazed it cut it out so intricately!
If you're thinking of getting a Cameo all I can say is, you won't regret it!


 I really love the heart button!
It's Prima and was one of  a selection of beautiful buttons in the kit.


 The background on this page is plain Bazzill card which is inked and stamped with a TH script stamp.

The black paper 'lace' on this page is the same cut file that I used on the envelope page only this time I made it bigger.
 I left the back of the book plain so I can add more pages if I want to at a later date.
 Just a close up to show some of the texture on the pages.
There is too much detail on each of the pages to describe properly how I made it.
I think this post is already long enough!
If there's anything you see and you'd like to know how it was done
just send me a email and I'll do my best to help :)

I really enjoyed making this book and it is very special as we have very few photos of my grandparents.  It's good to keep their memory alive :)

In the 1940's
my Grandmother was in hospital and gave birth to a baby girl when she took a kidney infection.
At that time penicillin had just become available and she was given an injection to fight the infection.
Unfortunately she took an allergic reaction and died (aged just 24) leaving a husband and 4 young children. My Dad was only two at the time.

Thank you for taking the time to visit my blog today :)
Why not pop over to the Creative Craft World blog and see what the other DT members have made with this month's kit.
I'm off to the Craft Show in Belfast today and I hope to get some nice goodies
(not that I really need them!)
Take care :)
Sarah xx

I'd like to enter this little book in the following challenges:
C.R.A.F.T ~ wedding/anniversary
Cropstop ~ handmade paper lace
Cute Card Thursday ~ metallica
Creatalicious #33 ~ butterflies and add some flowers
I Brake for Challenges ~ anything but a card
Just keep on Creating ~ anything goes
Allsorts ~ buttons and threads
Make it Monday ~ anything goes
Totally Papercrafts ~ all buttoned up
The Pretty little Ribbonshop ~ to die for
Divas by Design ~ anything but a card
Bunny Zoe's ~ ribbon or twine
Simon says Stamp and show ~ anything goes

Tuesday, 6 March 2012

Mini scrapbook using My Mind's Eye - Alphabet soup papers

Gosh, this morning has just flown by!
You know how time goes and you look back and think - what did I do all day?
You know you were busy but just can't list all that you were doing......

Today I have a mini scrapbook to share which I just love....mainly because it's so personal to me and isn't of any theme in particular.  It mostly contains photos of my own children, my nephews and great niece taken last year.

The book itself is made from one sheet of 12"x12" cardstock scored, cut and folded (and taped together).....if anyone would be interested in a tutorial...just email me and I'll see what I can do.
The front and back covers are chipboard covered in paper...you could use thick card instead though.
The tree, grass & title are cut with the Silhouette, and the monkey, bee & hearts are cut from a sheet of patterned paper. The ribbon is East of India...l Iove their ribbons....

I doodled around each of the embellishments with black pen to make them 'pop' off the page and then added glossy accents to the 'apples' on the tree

~~~

The completed size of the book is 4"x4" approx

The first pages are of Phoebe's 4th birthday.  I used rub-ons for the sentiment on the tag, stamped the crowns and cut them out, and the photo, frame and other embellishments were cut out with the Silhouette.

~~~

Climbing a tree.
Again the embellishments were cut with the Silhouette, rub-ons for the wording and I drew around the word 'memories' to be able to see it clearer.

~~~

My lovely nephews and great niece along with my own two at a local park in the summer.
I added some stickers, did some stamping along with adding embellishments cut out with the Silhouette.

~~~

We have a beautiful forest park quite near our home which we love to visit when we get the chance. It's a great way for the kids to let off steam without bumping in to too many people!
 There are buttons, stickers and rub-ons on these pages.
~~~

At the park there's a lovely landscaped area which has a bridge over a koi pond....it's always a favourite place to meet up.
 The banner on the left was stamped with a Maya Road mini set and the wording is individual letter stamps by Doodlebug. The inks are Stampin' Up. The shaped photos are cut using the 'print & cut' feature on the Silhouette. The acrylic letters (my girl) are by Queen & Co and I coloured them with Copics.
~~~

Collecting bluebells.....the girls weren't deliberately wearing matching clothes and Lydia is mortified with this photo.....
 The felt leaves are by Stampin' Up and the plain button has rub-on spots added to it.  The bloom sticker is by Heidi Grace. The flower and frame are die cuts from the Silhouette.

~~~

Riding their bikes :)
 The stars and flower are stamped and cut out (Maya Road) all the rest are cut with the Silhouette.

~~~

Fascination with Star Wars.....I just don't get it!
Caleb went with his daddy to the Star Wars exhibition in W5  in Belfast.
Thank goodness I didn't have to go! 
The envelope was cut out with the Silhouette and it's for little notes about his special day.
The rub-ons are by Kaisercraft.

~~~

The ribbon goes right around the book under the front and back covers and helps keep the book together.

Whew! that's it :)
I had planned on teaching this little book at a class last winter but I just didn't have time.
Maybe I'll get to do it in the next month or two.

Thanks for joining me today!
See you soon
Sarah xx
I'd like to enter this in:
Make it Monday linky party - anything goes
Dutch Dare Card Challenge - tic tac toe  (bright colours, bling, buttons/brads)
Ribbon Carousel Challenge - Felt & ribbon (felt is on the leaves of the flower)
Papercrafting Journey - anything goes