Showing posts with label DT. Show all posts

Sunday, 8 September 2013

Well.........

after 4 months
I thought it was about time I updated my poor neglected blog!
*blush*

It's been a busy few months with GCSEs (my daughter - not me!)
and then the school holidays so crafting was put on hold AGAIN!

Now that they are all back to school, I'm itching to get crafting again :)

I have missed visiting you all so much and have a lot to catch up on.

I thought over the next few days I'd share some scrapbook pages
made in March for Creative Craft World.


This one is of Caleb when he was a few months old.


I found this vellum quote in a book by K & Co that I've had for ages and I love it!

The little banner came with the kit and I cut the paper hearts with my Silhouette.
The little wooden heart is by Studio Calico.

I cut the title with the Silhouette and layered the blue card over the kraft card on the word 'loved'

I love these MME buttons and I used a matching brad to hold back the folded corner of paper.

I'll be back soon with more projects.
and I'm looking forward to visiting your blogs too.

Thank you for stopping by!
Take care :)
Sarah xx 


Sunday, 21 April 2013

'Blues and/or Browns' mini challenge!

Hello again!
 
I'm just popping in to let you know about the new theme for our mini challenge at Creative Craft World this month.
All you need to do is make a project using blue and/or brown and link it to the
Creative Craft World blog HERE.
 
Lou very kindly sent me April's mini kit to have a play with.
You can find it HERE but you don't have to use it to enter the challenge.
 
(although you can if you want!)
 
 
This is what I came up with...
 The flower stamp is by Unity and the 'hello' stamp is Stampin' Up.

The sentiment is a stamp by Hampton Art Clear Expressions
and it's stamped with Elzybell's white ink. 
 

I have been very quiet on the blogging front,
mainly because we have been getting work done to the house and I'm stressed out with it!
Roll on the next few weeks to get the house back in order again :)
 
Thanks for visting and enjoy the rest of your weekend!
Sarah xx

Saturday, 6 April 2013

April scrapbook challenge at CCW

Good morning!
 
It's been a while since I posted but I'm back to let you know about the new scrap map challenge at Creative Craft World.
 We are having another blog hop this month and you'll find all the details on the CCW blog.
 
I didn't follow the sketch entirely this month as I only had one photo to use instead of three but I quite like how it turned out.
The papers are Echo Park 'Yours Truly' and the flowers are Green Tara.
I added a mix of fabric, suede and pearl brads to the flower centres and I made the gem flourish using a stitching template as a guide for placing the gems.
The photo is of Phoebe looking very pleased with herself at 11 months.


and now all you need to do is hop on over to Sarah W's blog to see her lovely layout. 
 
Thank you for stopping by to visit today
and I hope you all have a wonderful weekend :)
Take care
Sarah xx

Saturday, 2 March 2013

March scrap map - tiger teeth!

Good morning!
 
Can you believe it's the beginning of March already?
That means a new monthly challenge at Creative Craft World and we have
a brand new sketch for you to have a go at making a scrap page or card.
 
We're also having another blog hop so if you'd like to join in, just visit each of the DT and leave a comment to say you've visited and you'll be entered into a draw for a prize.
 
You don't have to enter the challenge to be eligible but if you do link up your project to the challenge
you have the chance to win a fab scrap kit and a guest design spot.
All the details are HERE.
 
Here's my take on the sketch
 
I used MME 'Alphabet Soup Boy' papers and I was delighted that the colours of Phoebe's jumper matched them - stripes and all!
Phoebe was always asking to have her face painted and on this particular day Lydia took great delight in painting her as a tiger.  I think she did a great job!
 
 
The metal gromlet is from WRMK and the tiny buttons are Fancy Pants.
 
 
As I had my sewing machine out for another project (and any excuse to sew ;)) I stitched a short zig zag line on 2 sides of the frame.
 
I'm looking forward to seeing what you do with the sketch
and to continue on with the blog hop you'll find Sarah W's page HERE.
 
Thank you for visiting today
and I'll be round to visit you all later :)
The children are going swimming with their grandparents so I'll have a couple of hours peace :)
 
Have a lovely weekend.
Take care,
Sarah xx

Saturday, 2 February 2013

Blog hop this month at CCW!

Hello again,
 
As it's the beginning of February we have another scrap map challenge at Creative Craft World
and today we are having a blog hop too!
There will be a prize for one reader who visits each of our blogs this month and leaves a comment, just to let us know you've visited.
 
And as usual there is the fabulous prize of a CCW kit, GDT spot and a generous shop discount for the winner of this month's scrap map challenge.
You can enter with a scrapbook page or a card!!
So have a look at the sketch and find all the details on how to enter HERE.
 
For those taking part in the hop, you will have made it here from Mel's blog.
 
For my page this month I've used a photo of my eldest daughter Lydia, taken when she was almost 3.
As she will be 16 in a few weeks time we have been reminiscing about her baby days and pulled out the old photo albums.
She was our only child until she was seven and was definitely our little princess :)
 
 I used pale yellow Bazzill card for the base and the patterned paper is
K&Co 'Greenhouse collection''
 
The 'princess' title is Me and my Big Ideas gemstones
 
 I added matching butterfly rub-ons to the top of the page and turquoise dew drops down the right hand side of the page.
 
I love to add hidden journaling to my pages so I made this tag to slip behind the photo.
I haven't added the journaling yet as I want to keep it personal just for Lydia. 

Now you've seen my page it's time to hop on over to Sarah W's blog.
 
Here's the complete list just in case you get lost!
 
Thank you for visiting today and I look forward to seeing what you do with the scrap map!
Don't forget.... from now on you can enter with a card or scrapbook page.
Take care and have a lovely weekend.
Sarah xx

Friday, 25 January 2013

New Christmas challenge at CCW

Good morning!
 
I hope by now those of you dealing with the terrible snow storms are over the worst of it.
We've been very fortunate here with just a little sprinkling of snow.
 
I'm back today to tell you about a new monthly challenge over at Creative Craft World.
For those of you who want to get a head start on your Christmas cards this will be perfect for you.
The challenge is called BtCR (Beat the Christmas Rush) and the idea is to create some Christmas cards each month and add them to the linky HERE.
By the time 25th November comes round you could have all your cards ready in time for posting in December!
 
This is a card I made as a Christmas thank you.
The image is a digi stamp from Tiddly Inks.
 
I coloured it with Copics and tied some twine around the centre to look like a present.
I stamped the sentiment (Stampin' Up) and punched it out with the Tiny Tags punch.
To add a little sparkle I outlined parts of the image with Stickles glitter glue.
 

Thank you so much for visiting today.
And to all my followers thank you for sticking with me.
I haven't been able to blog lately with my health playing up and other things having to take priority
but I hope to be back soon when everything settles down.
 
Hope you have a lovely day,
Take care.
Sarah xx

Saturday, 5 January 2013

A New Year and a new scrap map at Creative Craft World

Good Morning!
 
Happy New Year to you all...a bit late I know...
I have quite a lot of catching up to do with everyone!
 
Today we have a new scrap map at Creative Craft World
and this is the page I've made.
It's been 3 weeks since I put paper and glue together so my mojo is a bit rusty.

 
The Christmas words are on a vellum sheet which I layered over white dotted Bazzill card.
The baubles are cut with the Silhouette and the top of the large bauble comes out to reveal a journaling spot (no photo of it yet)

The photo was taken 9 days before Christmas Eve when the children went to see
 Santa at a National Trust event.
I took a lot of photos of their adventure so I made a little book (adhered to the large bauble)
to put all the photos in to complete the story.

The night started with a story from Ma Christmas in the tea rooms (while having juice & a treat).
Then they walked to the elves' house and made magic reindeer food.
When they finished that, they were picked up by horse and carriage and taken to the 'big' house to meet Santa.
His sleigh was parked outside and you can just imagine the excitement as the children saw it!
Inside the large hall they could just see Santa in the distance sleeping in his chair so they were allowed to creep up and wake him.
He had a list with all their names and had a chat with them before giving them their presents.
It was a truly magical night (for us 'big' ones as well!)

I do apologise for neglecting my blog for so long
but with the children back to school next week I should be back here again too :)

Thank you for stopping by today and do take a minute to visit
CCW and see all the gorgeous pages the rest of the DT have made.
Here is the sketch for this month and you can enter the challenge by using the sketch as your starting point for a page and then link it up to the blog here.
If you win you'll get a fabulous scrapbook kit, a generous discount instore and a Guest Design spot.


and that's it!
See you soon,
Sarah xx


Monday, 26 November 2012

Christmas Mini Envelope Book Tutorial

Hello everyone,
 
I hope your weekend went well, mine went far too quickly!
Well today is day 26 of the Christmas Countdown at Creative Craft World
and it's a special day for me as it's my birthday :)
 
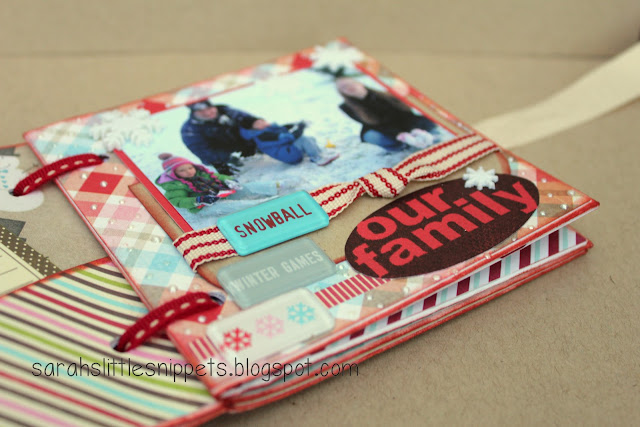
I have a tutorial today for a little mini album made with envelopes.
I haven't it fully decorated inside but maybe it's just as well as this post
has a lot of photos already.


 I used 3 DL size envelopes and I like to use PaperMill Direct ones but any good quality ones will do.
To start you score each envelope down the middle.
 
Then fold in half (with the flap to the inside)with a bone folder to get a good crease line.
 
 Take a piece of scrap card and trace the outline of the flap.
This will make a template for cutting patterned paper for the flap as you decorate.
 
 Take one envelope for the front cover and lay it flap side down.
Add a strip of double sided tape from left to right approximately halfway down.
Take approx. 1m of ribbon, find the centre and adhere to the tape.
This is your ribbon closure.
 
Now you can decorate the back and front of the envelopes.
 
The paper I used for the front and back cover is Jillibean soup.
I inked all the edges of each envelope with 'Barn Door' distress ink.
 
Measure 1.5 cms in from the spine and 2.5cms from the top and bottom
and mark with a pencil.
Using the large hole in the cropadile punch through the folded envelope.
Using this envelope as a guide, mark the holes in the other 2 envelopes and punch. 
 
Layer the envelopes together and tie ribbon through the holes.
I left one end longer so I can loosen the ribbon if the book becomes a little bulky after decorating.
You can dab some wet glue on the ends to stop the ribbon from fraying. 
 
Before I decorate a book I always gather up as many matching embellishments as I can.
(A great chance to use up that hoarded stash...)
It really does make decorating a book a lot quicker if everything is at hand.
 
This is the first page of the book, I have tags to make for journaling on the left hand side
and I'll probably add more bits and pieces as I go along :) 
 
The second page is a pic of the family (except me...) enjoying the first snowfall one winter.
I still have to complete the journaling on the left hand side.
You can use the flap of the envelope for tucking in tags and little bits and pieces inside. 
 

When I get the book completely finished I'll post all the photos of the inside
so you will have a better idea of how it all comes together.
 
If you made it to the end of this very long post
THANK YOU!
I hope I have inspired you to have a go at your own little book
and if you do, please post a link in the comments section below - I'd love to see it :)
 
Don't forget to pop back tomorrow for a link to Susi's blog
where she has made some handwarmers.
These are great little things, I've made some for the craft fair coming up
and I've had to hide them because all the family want one :)
 
Take care,
Sarah xx

Edited to add: Rene from Simply Cute has used my tutorial to make a fabulous calendar.  You really must check it out!!!
Click HERE to see it. 

I'd like to enter this in the following challenges:
MIM ~ linky party
Challenges 4 Everybody #8 ~ anything goes
Corrosive Challenges ~ anything goes
CI Paints ~ anything goes
The Squirrel & The Fox ~ anything goes 

Sunday, 25 November 2012

Christmas Countdown Days 24 & 25

Good Morning!
 
My internet connection has been terrible the past couple of days
so I'm hoping it lasts long enough to get this posted!
 
Yesterday and today we have 2 projects from Sarah W
for Creative Craft World's Christmas Coundown.
She has made loads of gorgeous inky tags and a layout.
If you pop over to her blog you'll see them here.
 
 
Tomorrow it's my turn again and I'll be posting a tutorial
for a mini envelope book
Here's a wee sneak peek...
 
 
I hope you're all enjoying your weekend
and all being well...I'll see you tomorrow :)
Take care
Sarah xx

Tuesday, 20 November 2012

4 cards using CCW's November Mini kit

Hello again!
I just remembered last night that I had to post these cards for the new mini challenge at
We've been so involved with the Christmas Countdown that the regular challenges have been a bit forgotten about.
We'd love you to take a moment and enter your projects.
 
Lou very kindly sent me this month's mini kit to have a play with and with the gorgeous mix of colours, I was able to make a male card as well as more feminine cards.
 

 This cute little mouse is from The Paper Shelter, the sentiment is a Daisy Bucket stamp and the brad is K&Co.
 
 The sentiment on this card is computer generated using 'LoosieScript' and the oval is cut with Nestabilities.

 I 'm sorry I can't remember the make of this stamp.  To save on space I removed all my stamps from their wooden blocks and I never made a note of the names!
It's coloured with Koh-i-Noor woodless pencils.
The button is by Fancy Pants and I tied twine through it. 
The brads were stuck on with pinflair glue gel after I removed the pins from the back of them.
I find that if I'm placing brads close together on card it can be hard to get them in a straight line.
Also the card crinkles when I pierce holes closely together so I find gluing them on gives a neater finish :)
The sentiment is computer generated using 'PhontPhreak's Handwriting'.
 
The flower stamp on this card is by Elzybells and the button is American Crafts.
Everything else is from the kit.
 
Thank you for reading both my posts today,
I'm a little behind in my commenting but I will be round to visit you soon :)
I  hope you have a lovely day
and if you pop back tomorrow, I'll have a link to Sue's project.
 
Take care,
Sarah xx

I'd like to enter some of these in the following challenges:
Loves Rubberstamps ~ fun with ribbons
Oldie But A Goodie ~ anything but Christmas (Sailing card...stamp, brads, button, twine, more than 6 months old)
Incy Wincy ~ hip to be square (Sailing card)
Crafty Cardmakers ~ more than 1 punch/die cut (Flowers/butterfly card...2 die cut circles, 2 punched butterflies)
Whoopsi Daisy ~ die cuts and punches (Get well soon card... die cut oval, punched flowers & Flowers/butterfly card...2 die cut circles, 2 punched butterflies)
 

Monday, 19 November 2012

Jingle Bells, clean & simple Christmas card

Good morning everyone!
That's another weekend over...I hope you had a good one :)
 
We are continuing with the Christmas Countdown at Creative Craft World
(the DT have made festive projects for every day of November)
and it's my turn today.
 
I have made a clean & simple Christmas card which is based on the theme at Less is More this week.
It's to use 'hardware' on your card.


I bought the little bells from Meiflower at the craft show on Thursday and couldn't resist using them on my card today.
I cut and scored a white card blank and then cut another piece of white card and embossed it with snow dots embossing folder (not sure of the proper name but it's by Cuttlebug!)
Then I pierced holes on each side of this card for the brads.
 
 
I made jump rings from silver wire, put them on the bells and threaded them on the beaded string.
I tied the 'string' around the brads and then inserted them in the holes securing at the back.
The sentiment is computer generated using MTF Sweet Cheeks font, which I cut into a tag and tied a bow at the top.
I then layered it all on the base card with foam pads.
 
I hope you're enjoying our festive projects and I hope you'll come back tomorrow
when I'll have the link to Lou's blog for her project.
 
Thanks so much for popping in!
I hope you have a lovely Monday :)
Take care,
Sarah xx
Edited to add: I'm over the moon that the super talented Lisa M has chosen this project as her pick of the week at MIM!! I love my cabinet and it's nice that someone else does too :)

Edited to add again: I've just discovered that Lalkygirl has chosen this project as her pick of the week!! Do check out her beautiful cards and projects here :)

I am so happy today :)
 
I'd like to enter this card in MIM ~ linky party
 

Wednesday, 14 November 2012

Day 14 and it's Origami Santas!

Hello again!
We're almost halfway through our Christmas Countdown at Creative Craft World
and Sue has some festive origami santas to share today.
They look like great fun and if you pop over HERE, you'll find out how to make them!
 
 
Tomorrow Trish has a notebook/planner which she has decorated using her Silhouette.
It really is gorgeous, so do come back and see it :)
 
I'll be back later this morning with a 'pink' Christmas card.
Sarah xx

Monday, 12 November 2012

Christmas treat bags

Good morning everyone,
 
I hope your weekend went well.
It's my turn again to create a project for Creative Craft World's
Christmas Countdown.
 
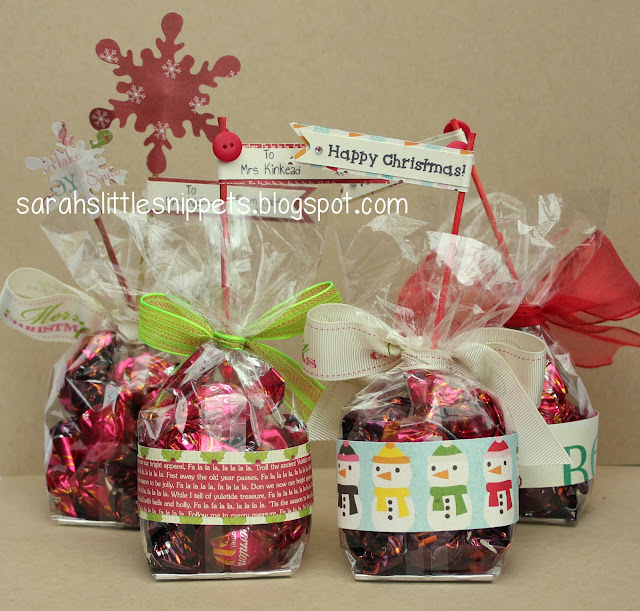
I like to make the children's teachers a little handmade gift at Christmas,
so this year I thought I would make some pretty packaging for some chocolates.
 
and here they are....
 
They are very easy to make!
 
You just take a cello bag (it's better if you can get one with a gusseted bottom or one with card in it like I have) and fill with chocolates.
It's very tempting having chocolates on my desk and I have to say they are YUMMY!!
 
For this bag, I just tied the top with ribbon and then made some toppers
with snowflakes cut out with my Silhouette Cameo.
Next, I cut two wooden skewers to size and coloured them with Copics.
Then layered the snowflakes with the stick in the middle and finished it with a button and some gems.
The banner with the sentiment was also cut out with the Silhouette,
wrapped around the stick and held in place with wet glue.
 
Regular readers of my blog may recognise this little gingerbread man from HERE.
 
I used the same cutting file and just reduced it in size before cutting him out of kraft card.
I layered two lenghs of Christmas paper together (one narrower than the other) and wrapped them around the bag, with the join at the front.
I covered the join with the gingerbread man, popping him up with foam pads.
The banner was made with matching paper with the sentiment on one side
and the to/from details on the other side along with a matching button.


 This 'Merry Christmas' ribbon is available to buy at Next!
 
 The back of the bags
 
The little banner - on one side 'Happy Christmas', on the other it's personalised with the teacher's name.
A wooden skewer, trimmed to size and coloured with a red Copic pen.
 
Supplies list
cellophane bags ~ with a gusset or a firm bottom (teehee...)
I got mine from a chocolate factory.
ribbon
chocolates ~ I used Thorntons Praline melts and Caramel melts
wooden skewers
various Christmas papers
buttons and gems
 
I hope you have enjoyed these little treat bags today,
and if you pop back tomorrow I'll have a link to Lou's blog where she will have a tutorial for a Christmas journal.
 
I'll also have a little project of my own that I made way back in the summer
but I'm only able to share it now, as it had to be kept secret!
 
Once again, thank you for stopping by today,
and I'll be catching up with you all later :)
Take care,
Sarah xx
 
I'd like to enter these in the following challenges:
MIM ~ always anything goes
Crafty Bloggers Network ~ Christmas anything goes
Forever Friends ~ ribbon and/or twine