Showing posts with label felt. Show all posts

Monday, 5 November 2012

Christmas decorations

Hello everyone!
 
I hope you had a good weekend :)
As we continue with the Christmas countdown at Creative Craft World
it's my turn to share a project and I have chosen to make some decorations for Christmas.
 
I used my Silhouette for these to show that the machine is not just for papercrafting.
You can cut fabric with it and although I didn't cut the felt for my decorations (I think it would be too dusty)
I made templates with the Silhouette designs.
 
Here's a photo tutorial so hopefully you will want to make your own!
 
To start with I cut out the designs from a sheet of 12x12" card
 
Then I kept the sheet of negative shapes to trace around.
 
To make this little lady...scroll on down.
 
 Lay the shape over black felt and trace around using a light coloured pencil.
 
 Lay the traced piece of felt on top of a 2nd piece of black felt (for the back and front)
and cut them out together.
 
Trace and cut out the other pieces of felt the same way.
I used black brads for eyes and stitched a nose with orange embroidery thread and added a red heart before sewing the white tummy to the black front piece with running stitches.
Sew the feet on the front piece as well.
Next lay the back and front pieces together, putting a length of doubled ribbon or twine for the hanging loop in between the pieces at the top.
Sew all around the shape leaving a small gap for stuffing.
Lightly stuff with toy stuffing and sew the gap closed.
And that's it finished!
 
 
The basic instructions are the same for all the felt decorations and you can embellish as you like.
 

 For the fabric hearts, I used a cream linen type material and used my heart nestabilites die to trace around the shape.  I then laid two pieces of fabric, right sides together and stitched following the traced line ~ make sure you leave a gap for turning right side out.  Then stuff firmly, sew up the gap and decorate with buttons and twine.


I hope you enjoyed this tutorial and that it made sense!
If there's anything that's not clear, just email me and I'll try to help.
 
If you don't have a Silhouette you can always use a roller die cutting machine (Cuttlebug or Sizzix)
or even draw your own templates.
 
Thank you for visiting today
and if you come back tomorrow, I'll have the link to Lou's blog where she is sharing a gorgeous Christmas layout.
 
Take care
Sarah xx

Thursday, 1 November 2012

Christmas Countdown and a card

Good morning everyone,
 
I have to apologise for being a bad blogger...life is just busy with the children at the moment.
 
But... I have some exciting news!
At Creative Craft World, it has become a yearly tradition to have a Christmas project every day for the month of November.
 
 
I will be posting a link every day to one of the DT blogs and I hope you will visit them
to see the exciting goodies they have made.
My own projects will be shared over the next 4 Mondays.
 
To start us off today,
Sue has made some fabulous Christmas tree decorations
and you can find the tutorial on how to make them HERE
and there's also a prize to be won.


I also have a card to share today!
Phoebe was invited to a 6th birthday party on Saturday and I left it to the last minute to make the card so I hastily threw this together on Saturday morning...not a good idea!
I was stressed and Phoebe was 15 minutes late.... not that she even noticed!
 I cut the shaped card, paper, sentiment and butterflies with the Cameo.
Then tied some pink gingham ribbon in a bow and topped with a pink button.
 
As part of the present I bought this pink fluffy pencil case and made a personalised zipper pull.
This was much to Phoebe's relief....Phoebe has an identical pencil case and Rachel loved it so much that she took it home from school and was reluctant to give it back.
In the end (after a week of pleading) Phoebe told her if it wasn't brought in the next day that I was going to have to tell her Mum and teacher what she'd done and she would be in a lot of trouble!
Thankfully the pencil case was returned the next morning :)
 
 
It's made from felt and is lightly padded. I cut the 'R' from white felt using a Sizzix alphabet die,
then ironed it on with bondaweb and added a couple of 'x' stitches.
 
 
Now I have to make Phoebe a zipper pull too!
 
Thank you for joining me today.
I'd love you to come back tomorrow for the link to Ali's Christmas project.
 I might even have another of my own projects too...
Take care
Sarah xx
 
I'd like to enter my card in the following challenges:
In the Pink ~ clean and simple pink (If mine is not CAS enough please delete it!)
Flutterby Wednesday ~ anything goes but must have butterfly or fairy on it
Nutcrafters ~ Ribbon or twine
Simon Says Stamp ~ shaped cards
Die Cuttin Diva's ~ anything goes (must use a die cut)
Make it Monday ~ anything goes (papercrafts)
 

Tuesday, 16 October 2012

Age cards....

A little bit later than planned....
but just to let you know I'm still around....
here's a couple of cards!!
 
This card was for my lovely friend Donna who has finally caught up with me in age (for a few months anyway!!)
I cut out the large felt butterfly with a Tim Holtz die and the smaller one was cut by hand.

A very simple card for my nephew.


I have a few Christmas projects on the go for Creative Craft World and I will be sharing them very soon.
I will definitely be back on Saturday with my projects using this month's mini kit.
 
Thank you so much for visiting and for staying with me as I muddle my way through things at the minute.
I will try and get  back on track as soon as possible.
Hope you are all keeping well.
Sarah xx

Tuesday, 4 September 2012

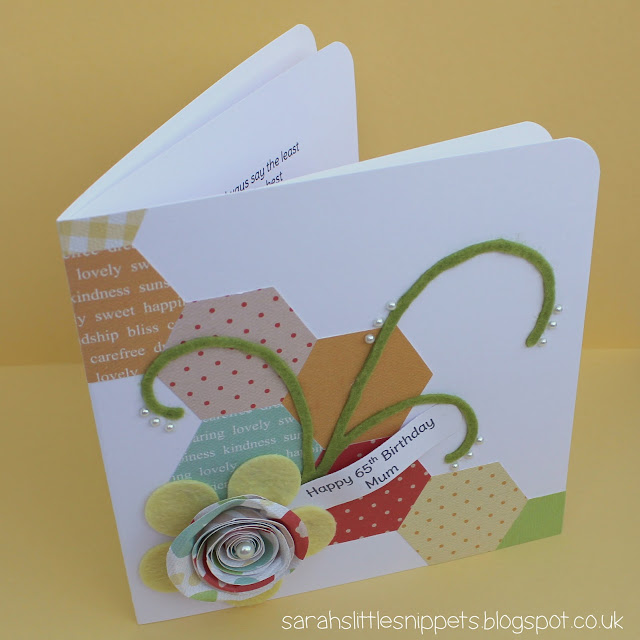
Felt & paper flower for a special birthday

 
It was my lovely Mum's 65th birthday two weeks ago
and this is the card I made for her.
I was making a Christmas table runner from felt and because I had the felt already out on the table I thought I'd try it out on the card.
I loved the effect and I'm pleased to say, Mum loved her card too :)


 Sizzix, Nestablilities, and Cuttlebug dies cut through felt very well and I used Sizzix dies for the flower and the flourish.
The hexagons are from a sheet of Echo Park paper (Sweet Day) and I cut them out individually and arranged them on the card blank.


I cut a rough spiral from a circle of patterned paper and rolled it into a flower and layered it on top of the yellow felt flower.
The sentiment is printed on the computer using 'Delius' font.


That's it for today,
I'd better go now and rustle up something for tea!

I'd love you to join me tomorrow for my project in Creative Craft World's rainbow blog hop!
I'm also having a prize draw.
Check out all the details here tomorrow (from 7am).

Thanks for visiting today :)
Take care
Sarah xx

I'd like to enter this card in the following challenges:
The pink elephant ~ patterned paper
Ladybug Crafts ~ anything goes
Stamp & Create ~ anything goes
Challenges4everybody ~ anything goes
MIM #105 ~ anything goes
Papertake Weekly ~ anything goes
Tuesday Alchemy ~ anything goes

Saturday, 31 December 2011

Happy New Year!


Happy New Year
everyone!
I hope you all have a great evening and I wish you many blessings for 2012.
Thank you for your support this year and for all the lovely comments left
I appreciate every one of them.


*whispers* I've been a bad blogger at updating so here's hoping I can keep a New Year's resolution to update at least twice once a week from now on.....

So, to finish off the year I'm posting the last of the Christmas things I've made...

These were for Lydia's best friend, a felt keyring, brooch and bookmark.


This has been a very popular image from Digistamp Boutique and I love it. Though when I made this card, I asked my 5 year old if she liked it  and after looking at it critically for a minute she said, 'Nah, you've made a mistake'.  Really?, I said....Yes...only one reindeer should have a red nose....lol


I made the same card for my own Mum and Dad but it's minus the red background.

The red postbox on this card is a Molly Blooms stamp which I borrowed from my friend. I added glossy accents to the snow and sprinkled it with Glamour dust.

and the baubles digi image on the last card is from a Passion for Stamps. I coloured it with Stampin' Up markers and the sentiment is from Pink Petticoat.

See you next year!
Sarah x

Wednesday, 27 July 2011

Birthday Gift Set

Hello again!

Here I am, up early trying to snatch some time at the computer before the little ones wake up.   Am I getting it??? Would you believe it! They typically get up around 9am but this morning.......8.15am arrrrghh.  Fortunately though, they have decided to play with Lego for a while before breakfast which gives me a bit longer to post these pics :) 

I made this gift set for a friend of Lydia who had a birthday last month.  The gorgeous papers were given to me by my lovely friend Lynda.  The image is from DigiStamp Boutique Lucy Collection and is coloured with Copics.  I also coloured a clear button to match as well.  The sentiment is 'teenage angst' downloaded from urbanfonts.com.


A sour cream container made from matching cardstock, filled with sweets, sealed with double sided tape and crimped at each end. 


I resized the image, this time cutting it out and adding it to the carton with foam pads.


This sentiment is a Magnolia stamp from here.  After stamping on white card, I rounded the corners, punched a hole and tied the tag to the carton with some East of India twisted paper string. 


 This keyring was made with felt and fabric.  I cut the felt pieces with a nestabilities heart die and used a smaller die for the fabric piece. I glued the ribbon between the felt pieces with hot glue and hand stitched the hearts together with small running stitches.


the back

The gift bag is made with 2 sheets of white A4 size cardstock and a wide strip of matching paper added to the front and back.  The tag is cut out with this Sizzix die.  The glitter ribbon (for the handles) is from Marks & Spencer (christmas range)


 For another of Lydia's friends, I made these felt pins for a decorated cork board. Both girls' birthdays were on a Monday and Tuesday of the same week, so we had a frantic weekend getting it all ready.  Hopefully it was worth it!


I got the idea for these pins from Sarah at Paper and String.  I asked permission first and as they are not being made for re-sale it was fine :) I really want to make more for our own cork board but I have too many half finished projects to do first...I'm running out of space to store them all!


 The pins on the cork board.
I also stuck plain buttons on pins but it's hard to see in the photo.


That's it for today!

Thank you for visiting my blog and hello to my new followers :)  I'm afraid my blog updates are a bit erratic but I will try my best and not let too much time pass between posts....!
Sarah xx

Monday, 31 January 2011

Mini sock buddies

Hello again :)

I made these little sock buddies for my nephews and they loved them.  I used small size 3½ - 5½ socks and they made up to around 6" tall.  While I was making them I realised that some socks are less stretchy than others, so one of them turned out a little shorter than the rest....


I hope to be back tomorrow with some of the notebooks and mini calendars I made for the craft night at our local school.

Thanks for visiting
Sarah :)

Tuesday, 10 August 2010

CAS sketch - Quick Thank You card


Here is this weeks great sketch FTL 102 on the Clean and Simple stamping blog.


This card was very quick and simple to do. I created a template for the card in a Word Document and printed it. (The font is Pea Stacey Tunibug)
My friend Freda gave me some strips of felt flowers (I love felt!) and I cut a flower from each strip and glued them to the card and added pink gems to finish.

Sarah xx

Thursday, 5 November 2009

Toilet Roll Holder Mini Scrapbook Album - Little Girl

Hi again! I’ve been finishing this Toilet roll book for the next class on Saturday 14th.
LOTS OF PHOTOS.....


Top View

Front Cover

Nappy Pin Button


The theme is ‘Little Girl’ and because not everyone coming to the class has a baby girl/granddaughter/niece I thought they could do a book on themselves, so I made this little book about....me

I have never scrapped anything about myself as a child before so mum had a good look through all the old photos and these are what she came up with. The earliest she could find were of me at 4 months. It was so funny looking at them and Phoebe is convinced they are photos of her!! The quality/condition of them is very poor but I think they scanned pretty well and now I have a book to pass on to my children :)

The front and back covers are chipboard and the inside pages are 4 toilet roll tubes flattened and painted. Then covered with My Minds Eye Whirlybird papers and embellished with chipboard pieces, gems, flowers, stamps, ribbon etc. It was great fun to do and I just have 4 tags to make and decorate with quotes and journaling and it’s all done!

Thanks for looking :)

Ps. I have a place left in the class if anyone’s interested….